Uniform heat distribution in the room: methods of installing an additional pump in the heating system
Pumps in an autonomous heating system can be included both during its initial installation and as an additional one - into an existing circuit.
This improvement improves the user experience of the entire structure.
Content
How to properly install additional pumps in a heating system?
The disadvantage of a heating system with forced circulation by a pump is considered to be energy dependence: the equipment will require electricity to operate. Accordingly, from these positions the heating will be vulnerable.
Additionally, electricity consumption will also increase, although only slightly - modern pumping equipment consumes at peak power no more than 100 W. Which is not much.
And the dependence on the presence of a socket is reduced to a minimum with the help of sources uninterruptible power supply and proper installation, providing backup routes to bypass the pumping unit.
Bonuses forced circulation more than compensate for the shortcomings:
- Inertia is sharply reduced. The system warms up faster and its adjustment is simplified.
- The heating is equalized. In a gravity system (without a pump), the radiators or registers closest to the boiler heat up more than those further away. A circulation pump helps eliminate this gradient.
- The system functions even if some of the main lines are laid at a negative angle.
Start of work on installation of two pumps in supply and processing
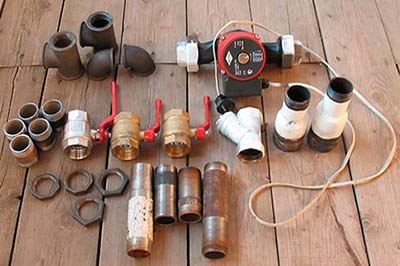
To install the unit you will need a little:
- Complete set of keys (from 22 to 36) or a pair of adjustable wrenches.
- Bubble level.
- Electrical tester and screwdriver for the electrical part.
Direct equipment of a standard, additional pump seat requires a slightly more developed set of tools, the range of which depends on the characteristics of the system, and in particular, the material of the pipes.
Accordingly, if we are talking about ferrous metal, then here, with a high degree of probability, you will need:
- hacksaw or grinder;
- thread cutting die;
- welding equipment.
For copper or plastic you will have to choose a different tool.
First of all, you need to determine where it is best to install the pump. Then prepare for its installation.
When selecting shut-off valves, preference should be given to those that create the least resistance to flow. Thus, it is preferable ball valves, and not ordinary valves; a ball valve, and not a spring valve, if we are talking about automating the bypass paths of the pump in the absence of power supply.
Attention! Definitely required mud filter mesh and, if the pump is not equipped with an air bleed system, a drain pipe for such purposes.
Where is the best place to connect and install equipment?
There are few basic rules for installing a pump and they are easy to follow.
- Modern pumps are made from wear-resistant materials. and are capable of operating at temperatures up to 100–115 °C. And they can be installed at any point in the heating system. But when working in conditions close to the limit their service life is noticeably reduced. Therefore, the pump should be installed where the heat load will be minimal - on the return or supply line, as close to the boiler as possible.

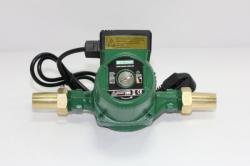
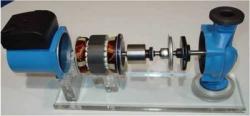
Photo 1. Double pump from the manufacturer DAB, designed for a circulating heating system, made of wear-resistant material.
Additional advantages of this configuration are: preventing water from boiling on the pump blades and the occurrence of the cavitation effect, leading to the destruction of the impeller. The place for the pump should be chosen as far as possible from the heating radiators. Their heat can affect the operation of the thermostat and the automation will begin to fail.
- If the system is equipped with an expansion tank, the pump is installed as close to it as possible, but after the point of its connection to the system. Otherwise, malfunctions are possible - before the pump, the coolant flow is laminar, and after it, swirls are already present.
- It is essential to install a mud filter in front of the device. Otherwise, small particles of debris, scale, sand or lime deposits may get into it and jam the working shaft.
- The pump can be installed both on a horizontal section of the pipeline and on a vertical one. But it should be remembered that installing a pump on a vertical section reduces its efficiency by approximately by 30%. And on the vertical, it is necessary to monitor the direction of the flow even more strictly: it is better if the direction vector is from bottom to top, and not from top to bottom - this will save the system from air locks.
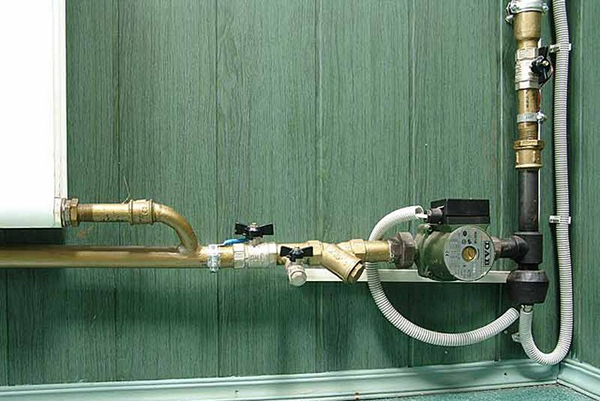
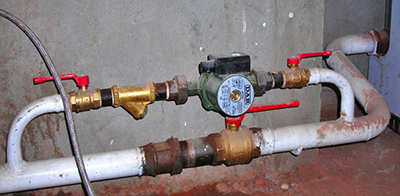
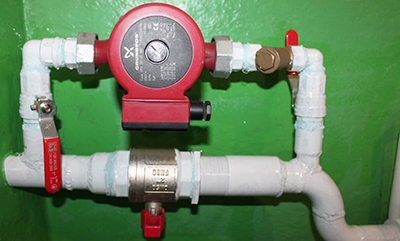
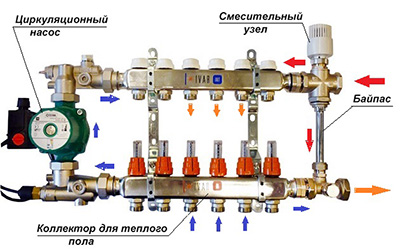
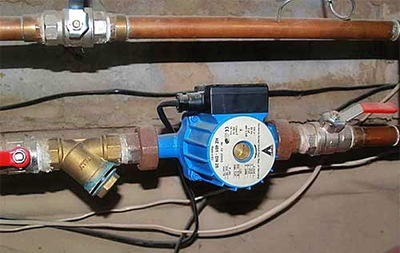
Photo 2. The heating pump is installed and connected on the horizontal, main section of the pipeline before entering the boiler.
- If the pump has a “wet” rotor (and this is almost 90% of equipment, installed in cottages and apartments), then when installing It is important to ensure that the rotor is in a strictly horizontal position. The point is that in this type of equipment the coolant acts as both a cooling liquid and a lubricant. And if the rotor is oriented incorrectly, areas with air bubbles may appear. This leads to a sharp reduction in service life.
Important! When installing the pump, shut-off valves and mud filter, always ensure behind the coolant flow vector. Each of the above-mentioned devices has an arrow indicating the required direction. Just strictly observe - all arrows must be directed along the flow.
Installation according to the electrical diagram
Installation of a circulation pump according to the diagram by directly cutting it into the main line — a gross mistake. The device that creates circulation is optimally installed and connected to the bypass line.
The installation algorithm itself looks simple. At the selected section, a line is cut into the main line shut-off ball valve (if manual switching from forced circulation to natural circulation is planned) or a ball check valve.
In extreme cases - spring (this provides some automation of switching operating modes).
In bypass on both sides (both at the input and output) are mounted two ball valves, cutting off the pump from the main line. In case of repair, replacement or maintenance.
Then, along the flow, a mesh mud filter and the pump itself are installed sequentially. If the housing does not have a screw for releasing air from the system, then an air outlet valve is also installed. Manual or automatic.
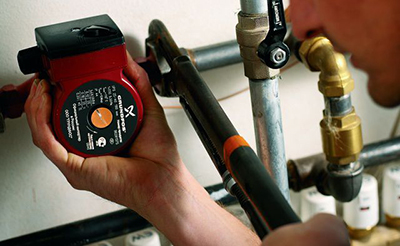
The pump must be mounted using detachable American connection. This will allow you to remove and install it without dismantling the main line. At the same time, monitor the horizontal position of the rotor. And the terminal box - it should be on top of the motor. This will protect it from water ingress.
Methods of connecting an additional device: how to install it?
Often additional pumps are installed in the heating or water supply system. There are several reasons for such modernization.
For example, if there is not enough pressure for normal operation of the washing machine, or when installing a heated towel rail, underfloor heating, or connecting an additional circuit.
The rules and methods for installing an additional device are the same as the main one. Just The additional highway is considered a separate system.
Sometimes such modernization is carried out to strengthen the system during the dead of winter, during periods of severe cold. In this case, the drive is connected to a thermal relay-thermostat. Accordingly, when the coolant temperature drops in a given area, additional circulation is switched on, increasing the coolant current.
Reference! Pumps are installed in the water supply system for approximately the same purposes. But only in this case it is preferable timer system, since reinforcement will be required only during peak hours: morning and evening. The rest of the time, the standard system is sufficient.
The electrical part is connected simply. According to the marking of the contact group: zero, phase, ground.
Useful video
The video shows the process of connecting the pump to the heating system so that it can operate smoothly.
System start
The equipment is always on after filling the system with water and removing air from it.
To do this, open all the shut-off valves and fill the system with water. After a while, let the air out. And turn on the power supply.
Just in case the first time start the equipment for a few minutes. And after it is turned off, the presence of air in the system is checked again. If everything is normal, the equipment is transferred to the normal mode.
By the way, it would be correct to repeat the procedure before each start-up after a long period of inactivity, i.e. at the beginning of each heating season.