Fine-tuning your heating system, accessible to everyone: how to connect a room thermostat to a gas boiler
Modern gas boilers are highly technological and most often have a built-in thermostat - a device that measures the temperature and humidity of the air in the room and sends signals to the boiler board about how to produce heating.
The adjustment is done by turning the boiler power on and off. However, there are situations when it is necessary to connect additional control equipment.
How to connect a room thermostat to a gas boiler?
For mounting the regulator no professional skills or special tools are required, it is enough to understand the installation diagram, follow the instructions of the manufacturer of the gas boiler and regulator, observe safety precautions for working with electric current. Then the installation can be done independently, without resorting to the help of a specialist.
Wiring diagram
The diagram of the gas boiler should indicate whether it is possible to connect a thermostat to it. It is important to ensure that the installation additional equipment permitted by the manufacturer and will not harm the heating system.
Incorrect installation may cause breakdown expensive equipment and loss of warranty.
In the case where the control unit is to be installed inside the boiler, find a suitable place for itIf necessary, a mounting box can be used.
Important! When connecting the thermostat compliance with manufacturer's requirements the boiler is absolutely necessary!
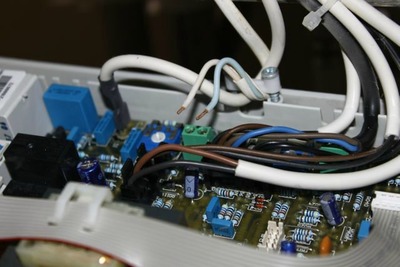
If you study main board diagram gas boiler, it is clear that it has two contacts connected to each other by a jumper, where the electric current first comes out of the board and then returns to it, controlling the switching on and off of the heating boiler. In many modern models, this jumper is located on a separate block for ease of installation, where the thermostat is simply connected.
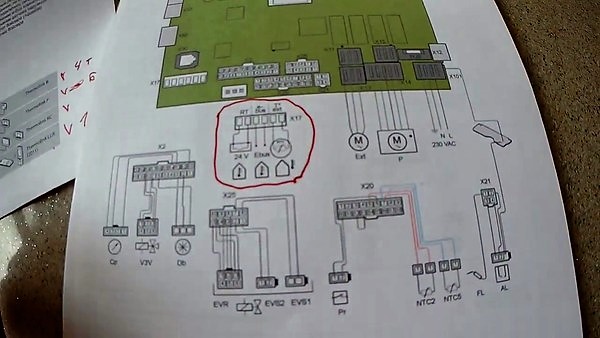
Photo 1. Printed diagram of the gas boiler board. The part showing the possibility of connecting various thermostats is circled in red.
But on some types of heating equipment, the installation location will have to be found directly on the board. In this case unscrew the screws that hold the jumper, they take it out and put it in its place they are installing wires, going to the thermostat.
A correctly connected thermostat allows the electric current to pass through itself, going to the boiler from the network, thus controlling the switching on and off of the entire system heating. If the air in the room is heated more than the temperature set on the regulator during its adjustment, the device switches off the gas boiler, and when the temperature drops below the specified limit, the heating is switched on again and the air in the house is heated.
Materials and tools

To install the thermostat to the gas boiler, no special tools are required. Everything that is needed to install the device in the heating system is included in the delivery set.
To install the regulator you will need: technical data sheets thermostat and heating boiler to verify electrical connection diagrams, household screwdriver, voltage tester on the net, set of tools for fastening device on the wall in a living space.
Choosing a location to install the thermostat
Before starting installation work, select the location for installing the thermostat. It is extremely important to choose the right room for the device, because it is the temperature and humidity of the air in this room that will regulate the entire heating system in the house.
A thermostat must be installed in a residential area, not in a technical area. Usually choose the coldest room in the whole house, for example, a corner one. Installing the device in a boiler room or in a storage room will lead to incorrect operation of the heating. The regulator must not be hung near heating radiators., household appliances that emit heat interference: kitchen stoves, heaters. It is not recommended to place the controller in a draft, near windows, or where it will be exposed to direct sunlight.
The thermostat should be easily accessible and visible so that the temperature settings can be changed at any time or the batteries can be replaced.

Rules installations:
- Mounting height no more than one and a half meters above floor level.
- Do not install on external, the cold wall of the house.
- To the device there must be free access.
- Do not hang near stoves, air conditioners, windows.
- Avoid exposure to direct sunlight on the device.

Preparation
Before you begin installing the thermostat, you must: make sure the boiler supports the installation additional equipment. Then the heating system is disconnected from the electrical network and the voltage is checked with a tester.
Attention! When installing the regulator, all equipment first of all disconnect from the electrical network!
After preparing the premises: provide free access to the thermostat installation site and to the boiler, sufficient lighting of work areas.
Installation and connection
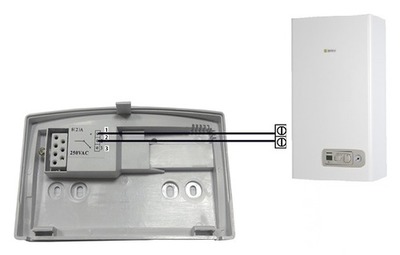
All modern gas boilers have special exits for connecting the thermostat. The thermostat comes with a special installation cable or installation using a terminal. If the connection for this model is non-standard, then it comes with technical passport, where all the detailed installation diagrams are available.
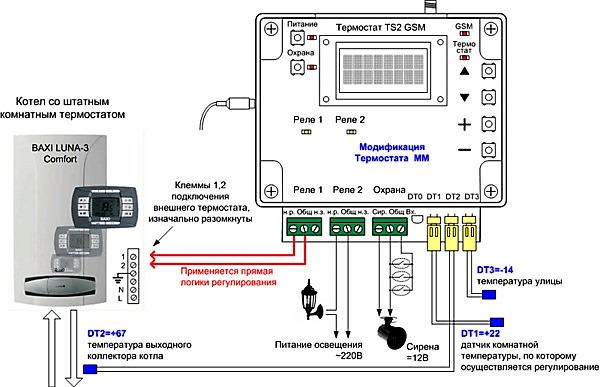
Photo 2. Detailed diagram of the TS2 GMS thermostat, showing its connection to the boiler and other equipment.
The connection consists of screw the ends of the wire thermostat to the terminal boiler, and then install the device on the wall in the living space. As a rule, the instructions have a corresponding section with detailed instructions for installing the thermostat.
Launch, check operation
After connection, the controller and the boiler are started for testing. In this the instructions will help, which comes with the regulator in the kit. The thermostat usually works on batteries, you need to make sure that they are inserted into the device and charged.
If the regulator is turned on, the boiler is also connected to the power supply. Using the buttons on the controller display, various parameters are set. and observe whether the heating system responds to changes. If it works correctly, then fine-tune it.
Heating settings
They are implementing in accordance with the instructions in the passport regulator. In order to ensure the correct operation of the heating system, follow the rules:
- If the house remains empty for a day or more, then during the absence of the owners they put up minimum temperature.
- Before a long trip, for example, in case of vacation, fresh batteries are installed in the regulator and switch the system to economy mode.
- It is important to monitor batteries and prevent them from discharging by replacing them in a timely manner.
- Boiler and regulator connected via a voltage stabilizer.
In most thermostats there are already pre-installed programs, which will provide optimal heating of the room during the day and resource savings at night. The number of such programs depends on the model of the device. You can choose one of them, or configure the device individually.
The regulator controls:
- Air temperature.
- The response time of the system. For example, will the boiler react to a short-term draft.
- Temperature range: how much the room temperature can deviate from the set value.
Useful video
Watch the video, which shows in detail the process of connecting the thermostat.
Conclusion
Even the most inexpensive regulator will save at least 15% of resources. The automation will create a comfortable temperature in the house and will independently maintain it without the owner's intervention. In addition, the regulator increases the reliability of the heating system, reduces wear on electrical components and other parts of the boiler, thereby extending its service life.
Thermostat rarely fails when connected via a voltage stabilizer. This device does not require any maintenance, except for timely replacement of batteries in it.