It is important not to flood your neighbors and not to be left without heat yourself! Principles of replacing heating batteries in an apartment
Dismantling of heating radiators is required in various situations: before installing new batteries; during room renovation; to replace leaking sections; when replacing couplings due to leaks; to clean batteries from accumulated deposits.
Content
Types of radiators
Various types of radiators are used for installation in the heating system. Their main properties are listed in the table.
| Type of radiator | Corrosion resistance | Heat dissipation | Weight | Price |
| Cast iron | Tall | Tall | Heavy | Low |
| Bimetallic | Tall | Tall | Average | Average |
| Aluminum | Tall | Average | Easy | Average |
| Steel | Low | Increased | Easy | Low |
| Copper | Tall | Tall | Average | Tall |
Based on this data, You can select a device suitable for installation in an apartment.
Dismantling of old equipment
Dismantling old heating radiators takes place in several stages.
What tools will you need?

To carry out the work you will need:
- adjustable wrench;
- Phillips screwdriver;
- a rag and a basin to collect water;
- wooden blocks for placing under the removed radiator.
In addition, to remove the radiator you may need:
- blowtorch for heating up rusted nuts;
- grinder or metal saw for cutting the couplings if you were unable to remove the battery in other ways.
How to drain water
Before removing the radiator, it is necessary to remove water from it:
- turn off the heating;
- drain the liquid.
If there are heating pipes installed in front of the radiator shut-off valves, then they are enough close it and proceed with further work.
Attention! A jumper must be installed between the connections to the battery to allow liquid to pass past the radiator - bypass. If it is not there, then the shut-off valves will block the flow of coolant in the entire riser and all the apartments through which it passes will be left without heat.
If there is no shut-off valve, then you will have to drain the water from the entire riser. In an apartment building, the heating system can be built in two ways, depending on which Water drainage is carried out in different ways:
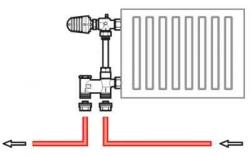
- Top pouring. The heat carrier in such a system enters each riser from a pipe located in the attic and goes into a pipe laid in the basement. One shut-off valve is in the attic, the second - in the basement.
- Bottom bottling. The coolant is supplied and received into the house through two pipes in the basement. In this case, both shut-off valves are installed in the basement.
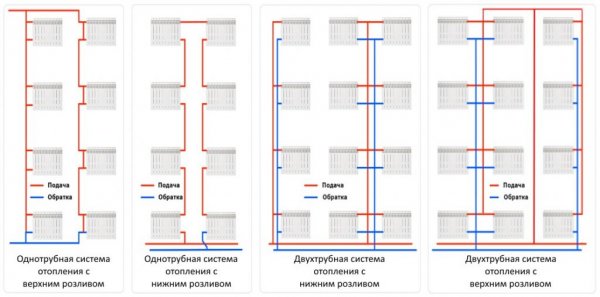
Photo 1. Diagram of a one-pipe and two-pipe heating system in an apartment building with upper and lower spillage.
Determining the type of bottling is easy: when the walls are laid along the perimeter two pipes in thermal insulation, then this is the bottom spill, if one - top.
Important! To find your boner, you need to get your bearings in the basement using the vents or staircases, otherwise you can accidentally drain water from the riser of someone else's apartment and then cause a flood from it of his own merged.
The procedure for draining water from the riser is as follows:
- Close the taps on the coolant supply and return.
- Carefully unscrew the drain plug in the basement 2-3 turns or slightly open the drain valve. The water in the riser will then drain in a small stream.
- Unscrew the plug completely or open the tap and make sure there is no water in the riser.
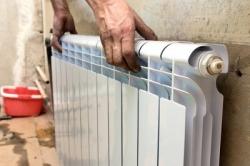
How to remove an aluminum battery
After the liquid has been drained from the riser, you can begin dismantling the batteries:
- At the bottom of the radiator Use a Phillips screwdriver to tighten the two plugs, blocking the water outlet from it.
- Place a basin under the lower connection of the radiator and a pipe suitable for it.
- Using an adjustable wrench, carefully unscrew it a few turns. attaching the battery to the pipe so that the leaking liquid gets into the basin.
- Unscrew the fasteners completely.
- Unscrew the plugs with a Phillips screwdriver and drain the water, remaining in the battery.
- By lifting the device up and towards you, remove it from its mounting points.
- It is advisable to place the removed radiator on wooden blocks., to avoid damage to both it and the floor covering.
- With a rag collect all spilled liquid in a basin.
How to remove a cast iron radiator
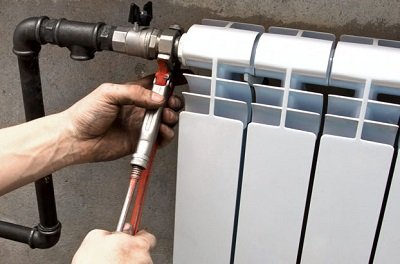
After draining the water from the riser, the work is carried out in the following order:
- The lock nut and nut are unscrewed with an adjustable wrench, securing the pipe to the radiator.
- If the nuts are rusted and won't unscrew, they can be heated using a blowtorch.
- When this doesn't help, all that's left is cut off the elbowsThen you will either have to cut new threads on the remaining part, or weld new couplings to the cuts.
- The water remaining in the radiator is carefully drained.
- The battery is removed from its mounting locations.
Reference. The cast iron radiator is very heavy, so It's better to remove it with an assistant.
- To avoid damaging the floor covering, The radiator is placed on wooden blocks.
- Any water spilled during the work is collected with a rag.


Replacing heating batteries in an apartment
Before carrying out work it is necessary:
- Check the quality of the threads on the couplings and restore them if necessary.
- If metal fittings were cut during dismantling, they are welded to the required length.
- The work site is cleared of debris.
Preliminary measurements
Building codes and regulations dictate how to properly install radiators, and these rules are the same for all types of radiators.
The distances between the heating device and surrounding objects are standardized, to ensure high-quality heat transfer:
- between the window sill and the radiator 5-10 cm;
- between the floor and the bottom of the heating appliance 8-12 cm;
- between the wall and the radiator 2-5 cm, when installing heat-reflecting screens, this distance is measured from them.
In addition, the following are measured:
- diameter of heating pipes;
- the number of fittings, corners, pipes and couplings required for installing the radiator.
Connection project It is better to depict it on paper to scale. This way, it will be much clearer what materials and in what quantities will be required.
Necessary tools
- pencil or marker for applying marks;
- roulette for measuring distances;
- screwdriver for tightening fasteners;
- building level to place the radiator strictly horizontally;
- pliers;
- adjustable wrench for pipes;
- special key for connecting additional sections radiator;
- drill for drilling holes.
Mayevsky crane
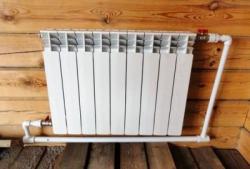
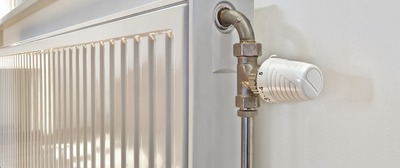
An important part of the heating device is the Mayevsky tap. This is a special device that is fixed to the radiator, It is intended to release the air accumulated there. It is a needle valve, the position of which is adjusted using a special key or screwdriver. The Mayevsky valve is installed at the top of the heating radiator instead of the plug.
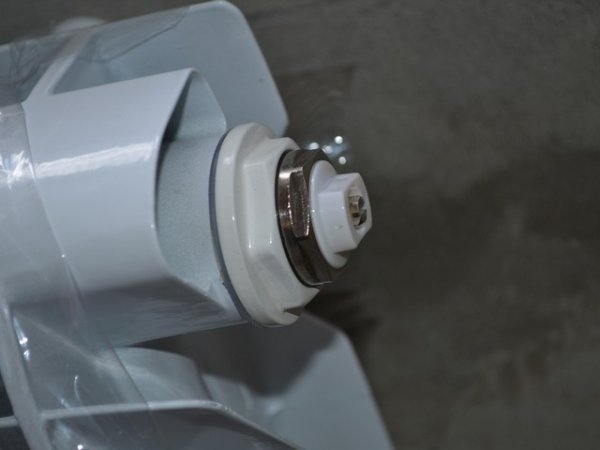
Photo 2. Mayevsky tap installed on a bimetallic radiator. Designed to remove excess air from the heating system.
Installing a radiator
Assembly is carried out in the following order:
- All parts of the battery are assembled together: plugs, gaskets, stoppers, shut-off valves. When assembling, it is necessary to pay attention to the direction of the connecting thread - right or left. The right thread is screwed clockwise and is usually applied to the right side of the device, and the left - counterclockwise and is applied to the left. All connections are laid with thermal paste or tow to prevent leakage.
- If necessary on the radiator The Mayevsky crane and thermostat are attached.
- Markings are applied to the wall for installing fasteners heating radiator. The marks must be applied in such a way that the battery is positioned strictly horizontally.
- According to the applied markings The fastening fittings are installed.
- A heating battery is hung on the fastener. The device must sit tightly on the fastener, without the slightest wobble or movement.
- Using a level The horizontal placement of the radiator is checked.
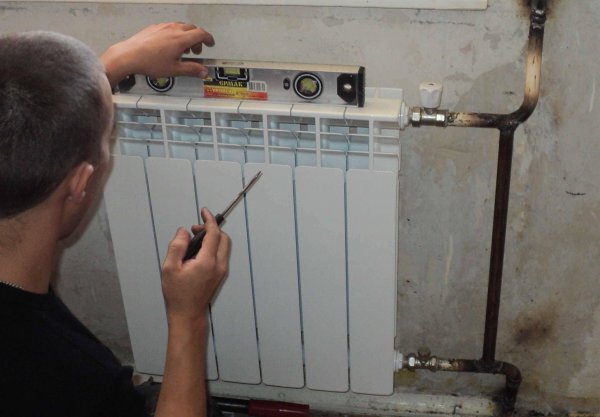
Photo 3. Checking the horizontal placement of the radiator using a building level.
- The radiator is connected to the heat supply pipesDepending on the type of battery and type of pipes, various flange connections and unions can be used.
- After completing all work with bimetallic radiators the protective film is removed.
Trial
After completing the installation of the radiator, it is necessary to test it:
- Open the taps and let the coolant into the system.
- Visually control the appearance of leaks.
Attention! Most often, leaks occur at the threaded connections, but it is also possible to detect a defective section. having fistulas or cracks.
- Leakage points in connections are additionally stretched.
Before the start of the heating season in apartment buildings, the heating system is tested under increased pressure - pressure testing. During this period, it is better to stay in the apartment and check whether additional leaks appear in the installed device.
Useful video
Watch the video, which tells you how to properly replace heating batteries in an apartment in the winter.
How not to flood your neighbors
The correct installation of batteries determines not only the availability of heat in the apartment, but also the quality of heat supply to the entire house. The guarantee of safety is purchasing quality materials and careful execution of work. Replacing radiators is not technically difficult, but if you have no experience, it is better to seek help from specialists.