A gift for chefs and gourmets: with this barbecue you can cook both on the grill and in the smokehouse
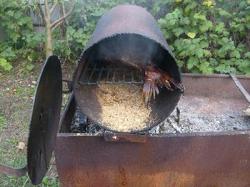
If you love to host parties outside and often cook over a fire, a smoker is great addition to a barbecue, and it’s not hard to build it yourself. The main thing is that the design is at the same time simple and attractive.
BBQ smoker is perfect Suitable for the backyard your home.
Cooking outdoors is much more enjoyable, especially if you are going to smoke meat – you are unlikely to be pleased with the extraneous smells in the house. Barbecue much easier to use, than a kitchen stove or oven.
Content
Where to start building an outdoor grill smoker?
When building a home barbecue smoker, it is important to choose the most convenient for use and arrangement in the yard option. In the future, extensions in the form of a home outdoor bar and other amenities for guests are possible.
Important! Be careful with open flames. Follow all safety precautions when building and testing your barbecue. fire safety rules.
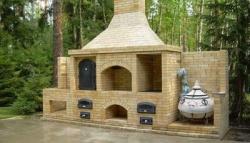
Brick barbecue smokehouse projects. Do you need a charcoal grill, oven, fireplace?
One of the advantages of a brick barbecue is diversity options. This allows you to add a sink, charcoal grill, cooking oven, smokehouse, barbecue, fireplace and much more to the main structure.
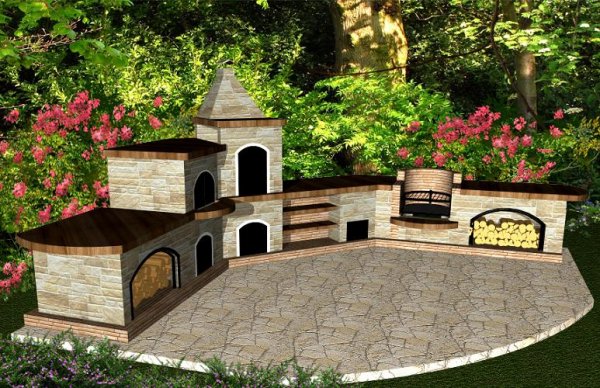
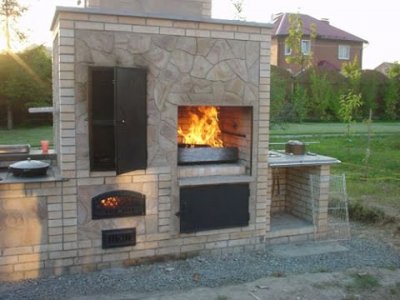
Photo 1. A challenging but attractive project of a brick barbecue grill with a smoker for placement in the backyard.
You can add space for dishes, food, firewood, skewers and other accessories. The most convenient option - a built-in sink with running water. There is also more simple options. For example, a scheme consisting of two levels: the lower one is for firewood, and the upper one is for the firebox.
Advice. Use ashto heat the brazier faster.
To be independent from weather conditions, take care of the construction canopy. It will protect your barbecue and significantly extend its service life, since moisture can destroy brickwork.

Photo 2. Under the canopy next to the barbecue smokehouse, you can set up a cozy gazebo with a table and chairs.
This scheme is an ideal option for a holiday at almost any time of the year.
Dimensions BBQ smokers depend on the size of your yard and the number of attached objects, there is no limit. In any case, you should take into account that the larger the size of the grill, the more firewood will be needed for kindling and cooking.
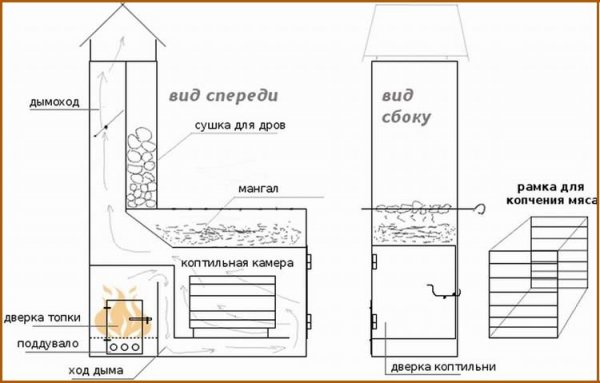
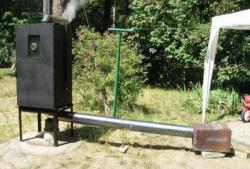
Photo 3. The project diagram shows how a barbecue can combine a smokehouse with a grill.
What does a barbecue smoker consist of:
- platform for barbecue;
- smokehouse;
- smoke exhaust;
- firebox.
Working with material. Tools
Before building a barbecue smoker, it is important to use high quality material to avoid fire incidents and to ensure that the brazier lasts much longer.
Selecting a brick
Choose firebrick medium density, as it heats up quickly and easily withstands temperatures up to 480ºC and cools quickly. Medium-grade firebricks reach their optimum temperature faster than clay bricks.
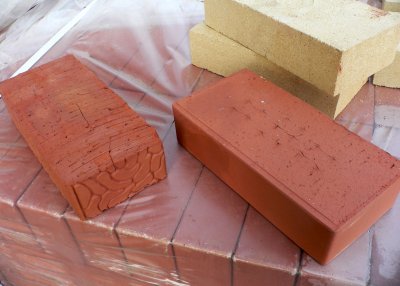
Choose bricks with straight edges. It is important that the bricks fit tightly together, an uneven edge will cause a gap. In rare cases, you can use traditional red clay brick.
Eat two disadvantages in using clay bricks to build a barbecue:
- Over time, under the influence of temperature red brick crumbles and needs to be replaced.
- Clay brick takes a very long time to heat up, as it is not a very good conductor of heat.
If you want to save on material, you can use red clay brick, it costs much less cheaper; if you are primarily interested in the quality of your building, choose firebrick, it will serve you much longer.
Advice. Use red clay brick as a material for additional extensions.
Cement mixture for foundation
Before preparing the mixture, please keep in mind that certain experience in pouring the foundation and handling cement will help you reduce the amount of time spent and eliminate gross errors during construction.
If you do not have relevant experience, it is advisable consult a professionalso that the finished structure does not sag and everything does not have to be torn down and redone.
There are different types of mixtures that are suitable for a brick barbecue, but first of all, consider the terrain.
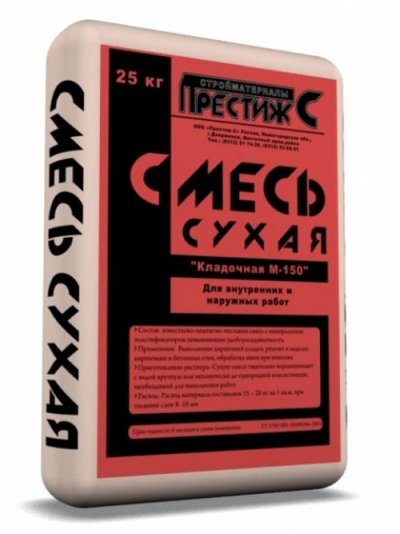
Try using a universal composition from sand, lime and cement (6:2:1 respectively).
It dries much faster and will last much longer. The solution can withstand almost any weather conditions. Do not overdo it with adding water, otherwise the solution will harden much longer.


What you will need for work
The set of tools depends on the type of barbecue smoker you choose. Your arsenal should include the following: tools:
- level;
- hammer;
- bit;
- roulette;
- trowel;
- wheelbarrow;
- hard brush;
- corner.
As you can see, most of them are available in almost every private home; if desired, it will not be difficult to buy the missing ones at the nearest hardware store.
DIY Brick BBQ with Smokehouse for a Summer Cottage
It is recommended to start construction with the simplest option with two compartments - for firewood and the brazier itself.
Preparing the foundation
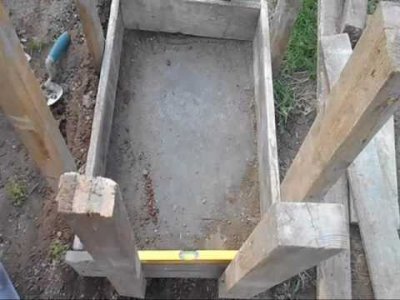
Use metal grill grates to determine the required width foundation. When measuring, determine the thickness of the walls.
Preliminary clear the selected area from grass, leaves and various debris. Prepare foundation hole (approximately deep) 20 cm).
Make sure that the hole is level at the edges and that the soil does not crumble, otherwise the foundation may tilt immediately after it dries completely. Add into the pit gravel (near 7 cm).
Prepare cement mixture (See instructions above). Add more gravel if needed. After you pour the foundation, smooth and level cement mixture with a spatula. Let the cement dry out for 24-48 hours.
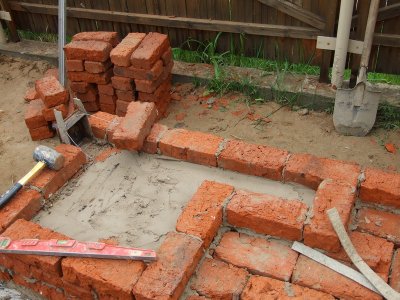
Smokehouse masonry
Make sure the bricks are dry before you begin laying. Put it down bricks around the perimeter of the poured foundation, leave for mortar 1 cm gap between the bricks. Make sure the bricks are perfectly level, without cracks or chips. The bottom tier is the most important, as it determines how level your smokehouse will be.
Important. Place the bricks in water 30 minutes before stylingThis will prevent excess moisture from being absorbed from the solution.
For bricklaying, you can purchase ready-made mortar, it is suitable for all options (for example, the company has a very wide selection Max). The main thing is not to skimp on the solution during installation; its abundant amount will eliminate possible unevenness.
Fill the foundation with mortar around the perimeter, then lay the first brick. Apply a layer of mortar to one end of the next brick before you lay it against the first. Remember to remove excess mortar from the bricks as you work. Continue repeating these steps until first tier bricks will not be laid along the entire perimeter. Check everything carefully: it is important that the bricks are laid evenly.
The next two tiers should be built on the outside walls only, leaving the front panel open for access to the coals, firewood and grate. Apply mortar to the top of the previous tier. Continue laying bricks until the next two tiers are complete.
Some bricks in the last tier should act as support ledges for the grate. Use several ledges for different purposes.
For cooking, it is advisable to build the ledges higher than for smoking products. Continue laying bricks in this way, until the desired height is reached.
Make sure the top and bottom tiers are parallel and do not have large gaps between the bricks.
Once the last tier is completed, wait for the mortar to dry to check if the structure is secure.
The most common problem during construction - uneven masonryIf the first or second tier has deviations, they can easily be corrected during the construction of subsequent tiers. Check the tilt angle immediately after laying a certain row, so that the solution does not have time to harden; in this case, it is possible to adjust the angle of inclination according to the next tier. If the foundation slopes excessively, focus on the first row of masonry. As a last resort, place small pieces of brick under the bottom row and fill them with mortar.
Installation of a chimney
Since the smoke exhaust will increase the weight of the entire structure, take care of a strong and thick foundation. Proceed to install the smoke exhaust last but not least, so as not to damage the finished structure. Keep in mind that base length the chimney was no less 15 cm.
Advice. If you decide to build a chimney, it is advisable to use durable canopy with a chimney blocking function. Otherwise, if moisture gets in, the fire may go out and the wood may become damp, which is unacceptable when smoking products.
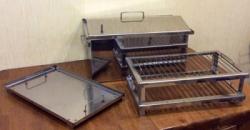
Manufacturing and installation of the grille
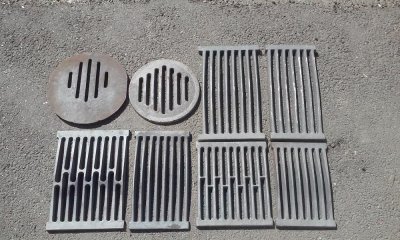
Various everyday objects can be used as a grill grate. The ideal option for smoking meat is a grill from an old grate from a stove.
In its original form it is very small. If you know how to weld, you will need about three grates.
This method is convenient, since a self-made grate is ideal for both smoking and frying.
Pros and Cons of a Homemade BBQ Smoker
| Pros | Cons |
| Individual a structure built exclusively for one's own needs. | Construction can cost several times more expensive, than buying a ready-made barbecue smoker, since a lot of money will be spent on high-quality material. |
| The materials from which the finished smokehouse is made may be of low quality, as a result of which the service life will be significantly shorter than that more durable models that you make yourself. | If you have no experience with pouring the foundation and laying, as a final result problems may arise (from a slight tilt of the entire structure to the crumbling of bricks). |
After a week and a half After construction, you can safely test the barbecue smokehouse. During this time, the foundation and mortar will dry out completely, all the moisture will leave the bricks, and the structure will not crack when kindling and frying. If you did not check how dry the bricks were before construction, proceed to the first test two weeks later.
Useful video
Check out this video that shows all the stages of building a barbecue with a smoker in a slide show.

Comments
The exact percentage composition (cement, sand, crushed stone and water) is indicated by manufacturers on the packaging (bag) of cement.