The most delicious dishes are made on it! Gas grill-barbecue: how to make the device with your own hands
There are a lot of options for gas barbecue grills. They all differ by the number of burners, structure, size, and functionality.
Some of them have an oven and a smokehouse in their arsenal, others - only a few burners and a grate. Based on this, the possibility of placing the device also changes.
The simplest devices with two burners, having a small size are suitable for a gazebo, terrace or yard. Models having more burners, as well as additional panels, are already too bulky for installation indoors. It is better to place them outdoors or in separate rooms.
And also the conditions of placement change and depending on the gas the grill will be running on. A grill that uses a propane tank as a source is relatively self-contained and can be placed anywhere in the room or yard. If the device is to operate on natural gas, it should be located close enough to a branch line to avoid long hoses and a chain of flexible connections.
Installation of a gas barbecue grill
The basic structure looks like this (from bottom to top):
- Wheels with lock — allow you to move the device if necessary. The lock is installed to prevent the grill from rolling away spontaneously.
- Compartment for gas cylinder — available for models designed for propane or liquefied gas. It is better to use European-style cylinders with an excess pressure valve. This will significantly reduce the likelihood of gas detonation in the cylinder.
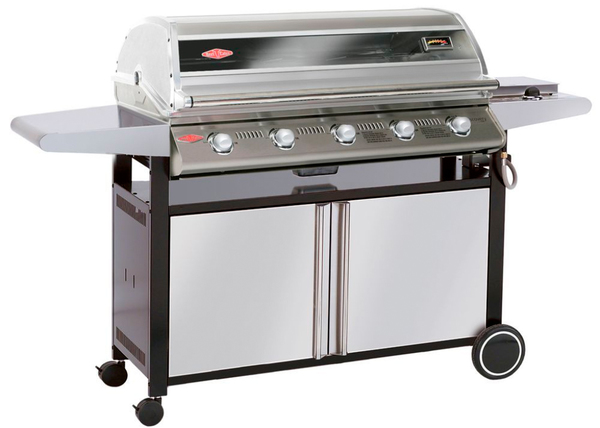
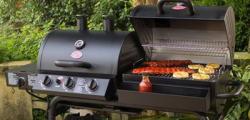
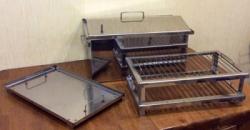
Photo 1. Installation with a gas grill. Equipped with tabletops, wheels for moving the device.
- Control Panel — usually located in the front part of the work area. Has switches and controls for all or most of the functions of the device.
- Gas burner — a basic option for all grills. Used for frying meat, fish or seafood.
- Flame arrester — basic option. Prevents exposure of food to direct flame.
- Grill grate — basic option.
- Side burner — for models with this option. It is usually located to the right of the grill area and is used to prepare side dishes.
- Grease collector — a tray where the fat produced during frying of food drains.
- Warming shelf — as a rule, in models that have an infrared panel.
- Infrared burner — optional. Located on the lid, it is used for heating or lightly frying food.
- Control window — is located on the lid and allows you to observe the cooking process.
- Thermometer.
DIY Grill
- The body will be used used gas cylinder — we unpin the valve and remove the tap valve, pour in water up to two thirds of the volume and boil, remove the skirts and a third of the sector surface, remove the coating by heating the cylinder and treating it with an emery surface or brush.
Attention! Heating and cutting of the cylinder only after filling with waterOtherwise, detonation of the remaining gas is inevitable.
- We process the cylinder to make a body from it — We weld the gas source and the grill body together, install the doors. We install the pipe on the stove, and the dampers on the generator. We attach the handles and drain cock, and make holes for the skewers. We install the structure on the stand.
Reference. It is more convenient to transport if you equip it with a grill two stands, not wheels.
- Generator installation — we shorten a standard propane cylinder up to 71 cm, We cut a triangular hole in one bottom and a round hole in the other. 7.5 cmThen we cut out a rectangle on the side 30x20 cmWe weld the cut rectangle to the body using hinges, and attach a steel strip to the free end.
- In the main body we cut a hole with a diameter of 7.5 cm in the right bottom and with the help of a steel pipe. We weld the seams between the pipe and the bottom with a "green" electrode.
Materials and tools

Materials (beer keg grill used as an example):
- Keg (or other container, depending on the project).
- Heavy loop.
- Aluminum plate.
- Small bolts and washers.
- Lattice.
Additionally, the project may require:
- gas cylinder;
- handles or staples;
- loops;
- several pieces of pipe;
- elbows for pipes;
- crane, stand;
- stainless steel strip;
- rivets.
Tools:
- "Bulgarian".
- Drill.
- Welding.
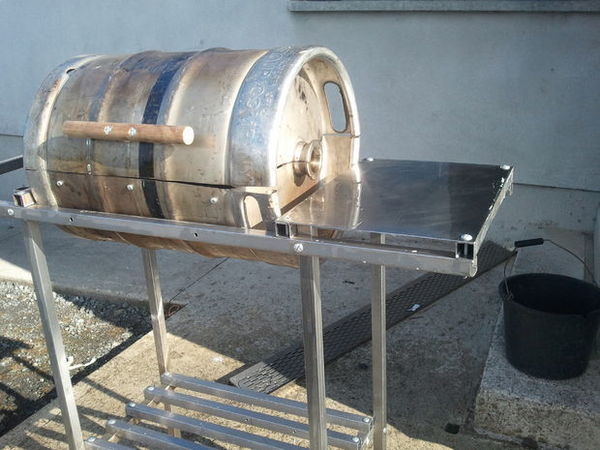
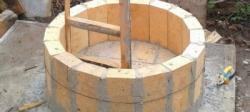
Photo 2. Ready-made gas grill, made with your own hands from an old beer keg. Additionally equipped with a tabletop.
Other tools depend on the project, according to which the grill will be constructed.
Possible difficulties in operation
In addition to the usual problems such as gas leaks, there may be a problem with webs in the burners. The reason for this is that the smell of gas, both propane and natural, attracts spiders. To eliminate this problem, you need remove the burner from the device and remove the cobwebs from it. If this is not done, at best a yellow flame will appear.
This is due to the fact that the web will burn in the burner. In the worst case, the web can ignite and cause reverse thermal shock, directed inside the device, which may cause it to break.
Useful video
Watch the video for a recipe for rump steaks to cook on a gas barbecue grill.
Safe to use
- Thoroughly check all connections for tightness.
- Monitor your blood pressure in a cylinder.
- Monitor the condition of the burner.
- If cobwebs appear, remove them from the burner.
- Place the device only in fire-safe places.
- Avoid exposing the cylinder to direct sunlight, heat sources and fire.

Comments