The best of its kind! Kuznetsov stove, DIY: diagrams and ordering
You are viewing the section Kuznetsova, located in the large section Types of furnaces.
Starting since 1962 I. V. Kuznetsov developed about 150 varieties models of furnaces with a special economical design.
High efficiency (Efficiency up to 80–90%) his inventions helped them gain popularity throughout the world.
Kuznetsov's stoves are used in all areas of human life - for heating, heating water, cooking.
There are special designs for a bathhouse, outdoor options for installation in a summer kitchen. These devices are distinguished by a rather complex design, but if you carefully follow the instructions and recommendations, you can easily make them yourself.
Content
Kuznetsov bell furnace diagram
The principle of operation of Kuznetsov's devices takes into account the natural properties of hot air and gases released during fuel combustion. The design of a brick stove is distinguished by the fact that the smoke is retained inside the oven itself. For this purpose, a so-called cap is installed - a combustion chamber, which is a closed dome, where the hottest air rises, displacing the cooling air through the lower side outlet.
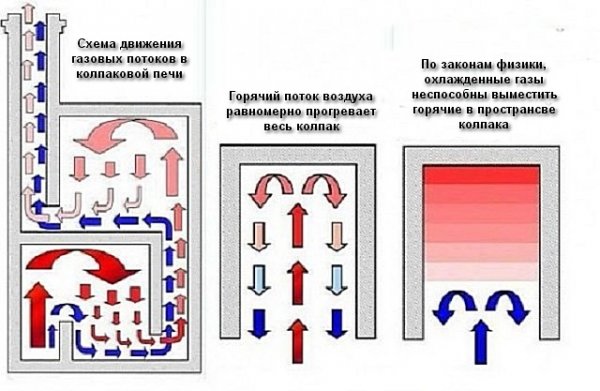
Photo 1. Diagram of Kuznetsov's bell furnace, showing the features of gas flow movement in the device.
The ventilation opening under the bottom of the firebox provides a constant flow of cold air. Due to the fact that the hot air is retained in the stove as long as possible, the efficiency of heat transfer increases three times compared to other similar devices.
Designers have tried to achieve such results in the case of traditional stoves as well - for this purpose, models with a system of chimney channels have been developed. In them, hot air is also retained inside the device, but the chimney is naturally extended worsens the hood, so the heating efficiency does not increase much.
In the case of Kuznetsov's devices, the draft is not disturbed, and the hot air is retained not by increasing the length of the channel. This happens due to the natural properties of hot gases to rise and displace colder ones. The dimensions of this type of stove can vary depending on the required power and the area of the room to be heated. Models with one hood are usually compact and are suitable for arranging a small country house.
Double-bell furnace
The most common option for high-quality heating of a private home is the Kuznetsov device with two caps.
Its efficiency is significantly higher due to longer retention of hot air.
The heat-resistant brick caps are placed one above the other with a slight offset - the air displaced from the first cap immediately enters the second, from which it goes into the exhaust pipe.
The size of such a stove is directly dependent on the area of the house, it is even possible to build it with an internal one. volume up to 5 cubic meters. The firebox usually occupies the entire area of the base, which helps to increase the heating power of the air in the furnace.
Reference. In the design of a two-cap furnace, special valves are often installed, allowing the second cap to be insulated and the heat output of the device to be reduced. This is necessary in warmer times of the year, when high heating power is no longer required.
When using dampers, hot air from the first cap is directed directly into the chimney.
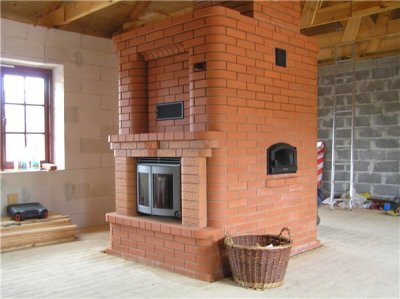
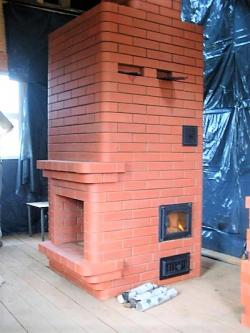
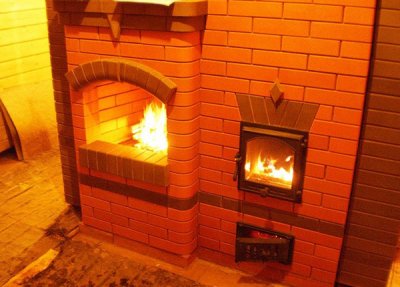
Heating and cooking version of the device
The peculiarity of such a design will be the changed location of the first cap - it is made protruding and a hob is installed in its vault, most often made of cast iron.
The stove must be one piece, since due to the design, smoke is not drawn out of the hood, so it will inevitably enter the room through the detachable burners.
Sometimes a stove is installed above the second hood - it does not heat up as much and cannot be used for cooking, but it will be an excellent means for drying vegetables, fruits, mushrooms and herbs. They often make a niche there for storing logs and drying them before use.
With a bread chamber
This option is almost no different from a standard heating and cooking stove, but additionally equipped with an oven, mounted in the space of the first hood. The chamber is usually made of cast iron or particularly strong steel, lined from the inside with fireclay bricks to provide a softer heat for baking.
In addition to the bread chamber, they often install water heating tank — the area of the second hood is also suitable for this. Depending on the number of additional functions, the size of the furnace will increase, it will require more fuel costs.
Kuznetsov stove for a bathhouse
The principle of operation of the sauna stove is no different from the options described above. But still, it has several features:
- the lower cap of the device is built in tray with stones;
- the device has a provision access for water And steam outlet holes;
- has thicker walls to ensure maximum heating of the stones and to avoid overheating of the room.
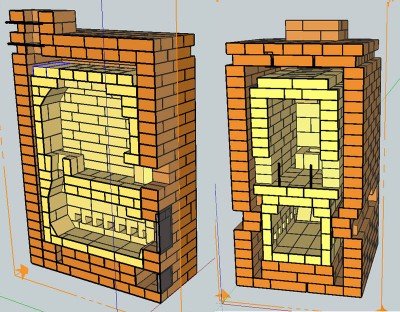
Furnace drawings
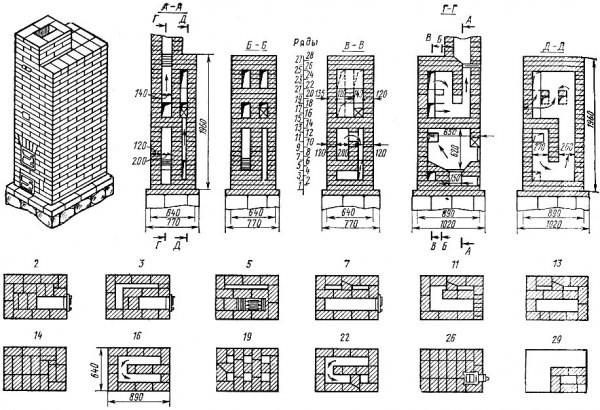
Photo 2. Drawing and ordering of Kuznetsov's two-bell furnace. The device is presented in one piece and in section.
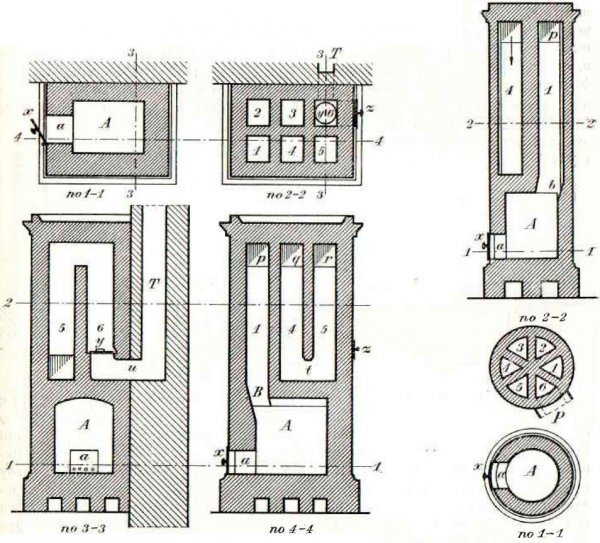
Photo 3. Drawing of Kuznetsov's bell-type furnace. The device is also equipped with a system of flue channels.
Do-it-yourself construction, ordering of the device
Before starting work, it is necessary to correctly calculate the design of the device, For this, the following factors are taken into account:
- Furnace power — depends on the total area of the room and the quality of its thermal insulation.
- Number of caps — in Kuznetsov furnaces, they are often made three or more, which significantly increases the heating efficiency, almost without requiring extra fuel consumption. Only the change in the massiveness of the device is taken into account.
- The main function of the oven — will the device be used only for heating or will additional functions be needed: cooking, heating water.
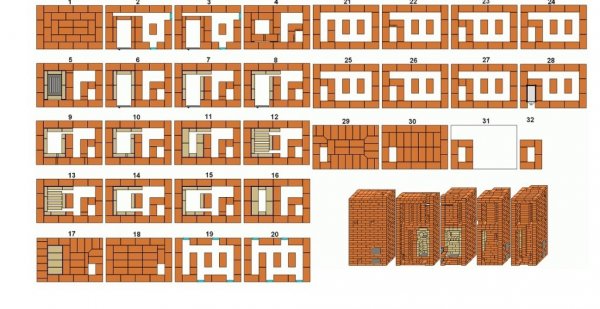
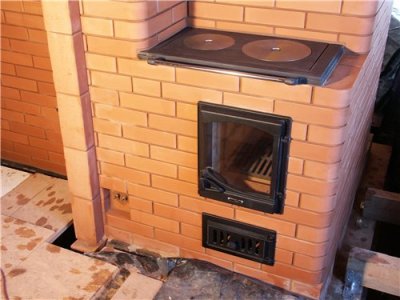
Photo 4. Step-by-step layout of the Kuznetsov stove. The device is also shown in its finished form from different angles.
A common option for construction is a double-cap stove with a hobIt is functional despite its compact dimensions and is well suited for placement in small country houses.
Materials
The temperature inside the cap area is very high, so only firebrick And fireclay with fine sand for masonry mortar. Homemade mix is often recommended to replace ready-made mixtures from construction stores — this reduces the risk that the cap will crack during use and lose its seal.
For laying out the external walls and upper tiers, ordinary ceramic bricks with a density of M150 And cement mortar.
When working, one must not forget that laying ordinary and fireclay bricks in one row is impossible - they have different expansion rates and the masonry will collapse during use.
In addition to the materials for laying, you will need to purchase additional elements - metal corners, doors and hinges, latches, a hob. All this is available for purchase in specialized stores. You will need reinforced wire to perform the masonry binding.
Tools
For all types of work you need to prepare a set of tools in advance:
- a container for preparing the solution and a shovel for mixing it;
- a stove hammer-pick for breaking bricks;
- grinder with a cutting disc for stone;
- pliers and metal scissors for cutting wire;
- trowel for applying mortar;
- leveling rule;
- protective gloves and glasses.
To check the correctness of the laying you will also need various measuring instruments: tape measure, building level, plumb lines, cords, etc.
Preparing the site
The construction of a brick oven always begins with the equipment of the foundation. Under the forge a standard type foundation will do - depth half a meter and with sides extending beyond the perimeter of the future masonry 10 cm. Work order:
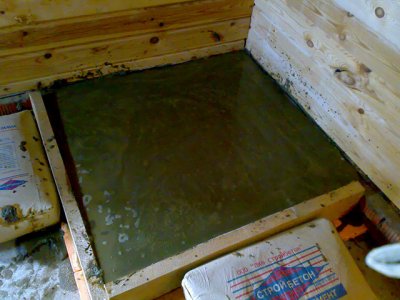
- The pit is being prepared, the bottom is on 15-20 cm covers the drainage - a layer of sand and crushed stone.
- Wooden formwork is placed on a well-compacted drainage, protruding above the surface by 20 cm.
- The foundation is filled with concrete mixture and left to harden.
- After the foundation has been laid correctly, a level platform is obtained, protruding above the floor surface by 10-15 cm (depends on shrinkage).
The base surface is closed layer of waterproofing (roofing felt works well), then it is laid down reflective layer metal industrial foil. In the case of building a forge, the heat from the furnace will be stronger than from conventional devices, especially in the lower tier, so the foundation is protected from overheating.
The walls adjacent to the future location of the device are closed thermal insulation material, it is recommended to put a metal sheet on the floor in front of the firebox to avoid the risk of fire from falling coals. The location of the chimney is calculated in advance - it is not recommended to place it near the ridge of the roof.
Carrying out the masonry
Once the foundation is prepared, work begins on the construction of the device itself:

- The solution is mixed in a prepared container. — before starting work, the clay is soaked for two days. In addition to a shovel, a construction mixer will be effective for mixing.
- When performing masonry, it is recommended Each row is first laid on a dry surface to accurately determine the dimensions of the cut bricks. The first row of the foundation is made solid.
- Starting from the second row The ash pit is laid out, and then the area of the first hood. Hinges for the firebox door are installed as needed. Every third row The masonry is tied together with wire, the cut pieces of which are placed in the mortar.
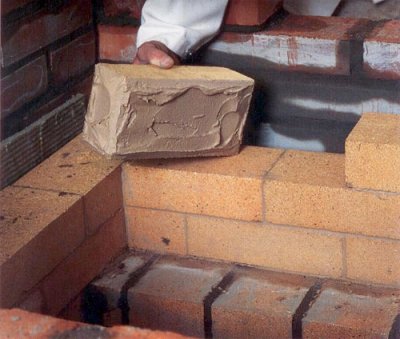
- The inside of the firebox laid out with fireclay bricks, external — regular ceramic. There is no binding solution between these layers, a small gap is left. Bricks from two rows should also not protrude, intersect with the adjacent layer.
- Inside the vault of the first cap, a fireclay brick support is installed cast iron hob, which is hermetically fixed with a solution.
- After completing the vault first cap, the laying of the foundation for the second one begins with a slight offset (to the width of the hob).
- It is being laid out second cap, chimney column, valves are installed to isolate the second level in the summer.
After laying out the top and installing the chimney pipe, the finished stove is left to dry, which takes at least a month. The first two weeks the device is dried with the windows and doors open, starting from the third week They gradually heat up the fuel, increasing the volume of fuel until it reaches the full load.
Possible complications
The Kuznetsovka masonry has some specific features, therefore In the absence of experience, mistakes are often made:
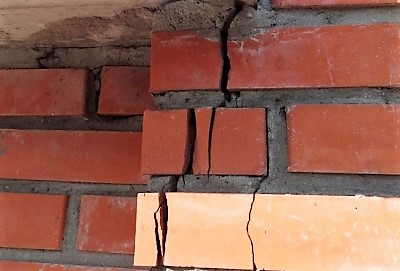
- There is no gap left between the walls of the firebox and the outside - fireclay bricks expand when heated, so they can destroy the masonry.
- No wire is used to bind the masonry — due to the higher degree of heating, the walls of the oven may crack.
- No gap left when installing metal parts — also leads to expansion of the metal when heated strongly and the appearance of cracks.
- Incorrect heating will disrupt the drying process of the masonry and lead to the occurrence of deformations and cracks.
- Proper thermal insulation was not carried out walls and ceilings (where the chimney is installed) - due to the high heating temperature, the risk of fire when using a forge is higher than with a simple furnace.
Attention! Due to the high heat output, the finished oven must be cover the outside with a fireproof composition, this will help reduce the risk of fire hazards and improve the decorative qualities of the device.
Useful video
Watch the video, which demonstrates the process of laying the Kuznetsov stove on a pre-poured foundation.
Advantages of Kuznetsov furnaces
After completing all the work, you get a highly efficient device that is ideal for living outside the city. Multifunctionality, ease of operation and maintenance will be a beneficial addition to excellent heating qualities.
Due to the very high temperatures inside the combustion chamber, most of the ash and soot burns away, allowing for a reduction in the frequency of cleaning.
One of the advantages of Kuznetsovka is the possibility of choice any currently available solid fuel: firewood, dry pieces of peat, sawdust.
With minor design changes, it is possible to install a gas or electric heating system. It is possible to connect the stove to a water circuit, which will allow you to efficiently heat remote rooms. An undoubted advantage will be the comparatively low cost of materials, the ability to complete all stages of work independently.
Comments