Building a brick barbecue: photos and drawings of interesting projects

Often the concepts of barbecue and grill are confused, as they are built for cooking food on smoke and coals. But a grill is needed for cooking shashlik, and a barbecue is a way of cooking food over an open fire using a grate.
Ordinary barbecue can be converted into a barbecue by adding a grill to it.
BBQ ovens can be mobile and stationary, the dimensions depend on the functions performed. The simplest oven is constructed in dimensions 0.18*0.07*0.9 m, resembles a regular barbecue with a grate.
A slightly improved barbecue is built with a place for a hob, its dimensions are 1.7*0.4*1.9 m. The simplest furnace complex has dimensions 1.2*2.2*1.9 m.
The stoves are offered for construction with a cauldron, barbecue, stove, and other devices. for cooking on coals. You just have to choose the project that suits your needs. We will tell you in detail in this article how to build a brick barbecue with your own hands. Drawings, photos of some projects are attached. Well, the dimensions of the brick barbecue, drawings and photos of other models of stoves can be found on the neighboring pages of our site.
Content
- Why build an outdoor brick barbecue with your own hands?
- What are the different types of barbecue and shashlik oven designs made of bricks?
- Building a Brick BBQ: Cost Estimate
- Selecting and preparing a place for construction
- Building a Brick Barbecue
- Fire safety
- Various brick barbecue ovens: projects, photos, drawings
- Useful video
- What does a stove maker do after creating a barbecue?
- Comments (3 opinions)
Why build an outdoor brick barbecue with your own hands?
Modern variety of street tiles does not allow you to choose a single model - you want to take an element from each project. Building a barbecue oven in the garden from bricks with your own hands allows you to combine them into one ideal oven on your site.
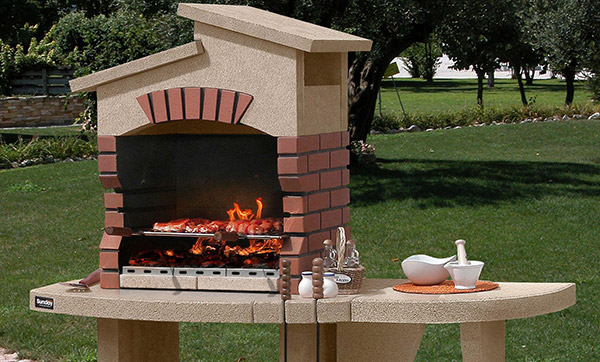
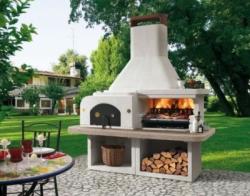
Photo 1. A small, highly aesthetic garden barbecue oven made of brick with a grill and a work table. Such a simple barbecue oven is built with your own hands from brick and stone easily and quickly, especially if there are special instructions for laying a barbecue with a grill.
TO advantages of a brick oven The advantages of building your own include the following:
- the ability to create your own project;
- a stove built in this way will be stationary - it won’t be stolen, even if the owners of the site are absent for a long time;
- confidence in the materials and durability of the assembled stove;
- laying a barbecue is so simple that a person without any stove-making experience can master it;
- giving the area a classic style or country style;
- creating a reason to be proud in front of friends.
What are the different types of barbecue and shashlik oven designs made of bricks?
The main projects for building a barbecue for a summer house made of brick are divided into 3 types:
- without a pipe — a simple oven, reminiscent of a barbecue, requiring minimal construction costs;
- with a pipe - an improved oven, in which smoke will not be scattered in different directions by the wind when cooking;
- with a pipe and a hob — to be able to prepare first courses, such as soups, borscht, fish soup.
The best option is to create stoves with a chimney without a stove, because most often the company gathers to eat hot shashlik with equally hot drinks.
The pipe in the stove design will protect vacationers from the random dispersion of smoke and flying ash particles.
Building a Brick BBQ: Cost Estimate
One of the first stages of the project implementation is the calculation of the material that will be needed to build the stove. Garden barbecues for the dacha have many schemes showing how to make this or that structure, and some of them also have a row layout. It is especially convenient to determine in advance the volume of the necessary building material.
Calculation of the amount of ordinary bricks for construction stoves with a chimney (by rows): 38+10.5+10.5+10.5+10.5+33+33.5+13+13+13+13+35+35+9+9+9+9+9+9+9+9+9+18+26+22+20+12+10+9+7+5+5 = 474.5 pcs.
- ordinary red brick 1st grade - 474.5 pcs.;
Calculation of the amount of firebricks for laying firebox (starting from row 14): 7+7+7.5+7.5+7+7.5+7+3 = 53.5 pcs.
- firebrick to create a firebox - 53.5 pcs.;
- concrete solution for pouring the foundation or its mixture of water, sand, crushed stone, cement in a ratio of 4:4:4:1;
- metal pipe 15-20 cm in diameter - 1 pc.;
- board for forming formwork - 1 pc.;
- coarse sand — 17 kg;
- reinforcing mesh — 2 m;
- sheet metal — 1 pc.;
- table top — 1 pc.;
- oven grate for collecting coals - 1 pc.;
- silicone and heat resistant sealant for sealing cracks in masonry - 1 tube;
- facing material.
Before proceeding to the construction stage, check if there is any in stock tools:
- shovel;
- building level;
- rope;
- roulette;
- hammer.
These tools are so simple that it is difficult to find an alternative to use them.
Attention! When building a stove, you will need half bricks - these can be made using a grinding machine.


Selecting and preparing a place for construction
The place where you can build a barbecue oven with your own hands is chosen based on comfort and fire safety. at a distance of 3-4 meters from the stove trees, bushes, grass should not grow. If extensions, a bathhouse, or other buildings are built on the site, the stove should be built at a distance. The prevailing wind direction should not be towards your own or neighboring buildings.
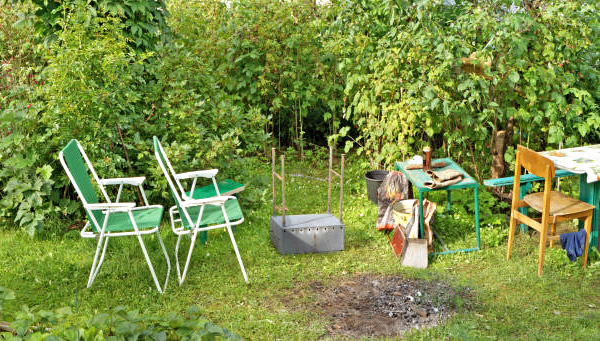
Photo 2. An improvised place to relax with a barbecue in the garden thicket. Surely, you have such a corner on your site, where a brick barbecue would fit perfectly. The photo does not allow you to estimate the size of the site, but even a small oven will look better than such a scorched patch of land.
If we discuss the comfort of using future cooking in an outdoor oven, it is most convenient to place the structure next to recreation area — patio, gazebo, terrace. If there are no such places on the site, you can choose any place for a barbecue, and place a table with chairs nearby. Keep in mind that you will need a lot of water and firewood for cooking and servicing the stove. The size of the working area of the stove is selected depending on financial capabilities and the size of the site.
Basic recommendations for stove placement:
- located on the leeward side relative to a residential building. Otherwise, the smoke will go towards the house, penetrating inside and leaving traces of soot outside;
- It is undesirable to have plants near a brick barbecue - their vital functions will be disrupted due to high temperatures.
Once the location has been chosen, it is time to prepare area for the oven area. The soil is cleared of the fertile layer: grass, bushes, trees. Removing trees from your site is permitted without the consent of local authorities, provided that there are no environmental restrictions.
Attention! Remember that roots left in the ground can sprout and damage the floor covering of the stove area.
Usually, during the planning and clearing of the area for the future building, coniferous and fruit trees are planted. After that, you can move on to the stage of pouring the foundation according to the shape and size suggested by the barbecue drawing scheme you have chosen.
Building a Brick Barbecue
A stove on a garden plot, no matter what type it is, is a rather intricate structure that requires a certain amount of knowledge. Therefore, for everyone who has decided to build a barbecue for a summer residence with their own hands, step by step instructions, which is given on this page of the site, is simply necessary. If laying barbecue ovens by hand is an unfamiliar process to you, you will hardly be able to lay even the first row of brickwork without such instructions.
Before starting construction, it is advisable to carry out an approximate drawing to calculate the required amount of materials and the correct construction of the structure.
Stove-makers with extensive experience do not use a drawing for laying (they already know by heart how to lay a brick barbecue with their own hands).
If you are not a specialist, you will also need, in addition to the usual drawing, ordering Brick barbecue, masonry drawings or detailed barbecue masonry diagram.
Any brick barbecue oven is built layer by layer - one row of bricks after another. The number of bricks in each row is not the same and they can be stacked differently. In order to know exactly how to build a brick barbecue with your own hands and not mix anything up, you need drawings with a row order. Even a novice stove maker, having such drawings in hand, is sure that the projects for the order of barbecue ovens will help to avoid gross errors during construction.
How to make barbecue ovens for a summer house from brick: foundation (step by step)
The heavy weight of a brick oven requires a solid foundation. A brick oven is equally suitable. tape And monolithic foundation. Let's use the recommendations of stove experts and give preference to the monolithic option.
Attention! It is best to pave the work area around the stove.
So, let's start building a barbecue with our own hands - step-by-step instructions for pouring the foundation:
- a pit of dimensions is dug 1.5*2 m with a depth of up to 0.4 m.
- the bottom is leveled using a shovel;
- a layer of sand is poured in 10 cm thick, pour in a small amount of water and compact;
- wooden formwork is installed, fastened with self-tapping screws;
- the reinforcing mesh is laid;
- the foundation is filled with concrete mortar;
- leave for a week until set.
Attention! When mixing, air accumulates in the solution, which reduces the strength of the structure. To remove the air, holes must be made in the uncured concrete.
Laying a barbecue out of bricks: the foundation
The foundation on which the entire stove structure will be installed is the first stage from which the brick barbecue laying begins. The step-by-step instructions that we provide here should help to avoid mistakes due to which the entire structure may ultimately be unsuitable for use.
Attention! At the stage of laying out the barbecue with your own hands, red burnt bricks of the 1st grade and cement mortar are used step by step.
After the foundation has hardened, it is carefully examined for presence of cracksThey need to be sealed and left to harden.
Next, it is marked furnace outline. Experts recommend stretching a cord between pieces of reinforcement stuck in the corners. Bricks are laid along the cord, coated with cement mortar and the 2nd layer is laid, starting with half a brick.
The evenness of the masonry should be checked using a level.
Attention! Tap each laid brick with a hammer from above and from the side - this will strengthen the adhesion of the building materials.
The second row is filled with a grate for coals.Apply mortar to the end of the brick to increase the reliability of the masonry.
Subsequent rows will start with halves of a brick. Next, 5 rows of bricks are laid according to the presented scheme. Starting from the 6th, oven tray - a small ledge is made here. 3 rows are laid according to the pattern, and a new ledge is made for stove table basics.
Advice! Choose the height of the stove and table based on ease of use. You can freely treat the number of initial rows - they do not affect the strength and reliability of the structure.
Laying the barbecue oven: firebox
Attention! At this stage, you will need 2 types of bricks - regular red and fireproof, a solution of clay and sand. The bricks will be laid out in 2 rows - the outer one of red brick, the inner one of fireclay. The bottom of the firebox should also be laid out with fireproof bricks.
Reason for firebox And countertops is made in the form of a screed. The planks are laid out with a thickness of one brick, cut to the size of the span. The concrete solution is poured on top, and left for 5 days.
The height of this part of the oven depends on its shape: 9 bricks for a rectangular one, 7 for an arched one. Depth - up to 70 cmThe pipe is brought out after several rows.
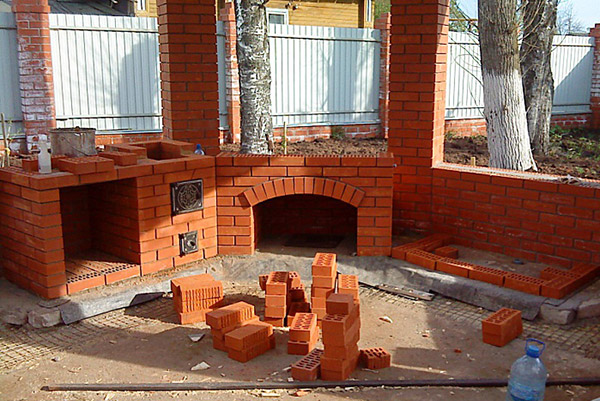
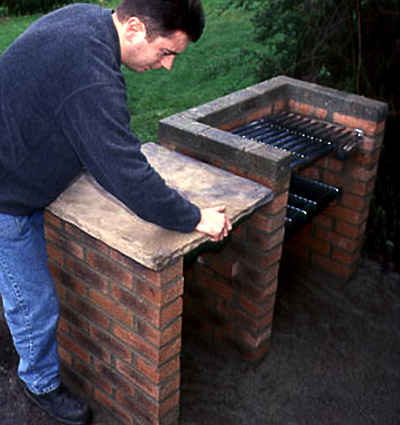
Photo 3. The process of building a brick barbecue is underway. The photo was taken at the stage when the barbecue stove masonry is almost ready and the construction of the woodshed is being completed. Another module is at the stage of laying the first row of bricks.
Attention! To bring out the chimney, the area of the masonry is gradually reduced, each row is reduced by half a brick in length and ¼ in width. From the 7th row, the laying of the pipe will begin with a height of up to 13 rows.
Laying the chimney
Attention! At this stage, red brick and cement mortar are used.
The chimney for a brick barbecue located in a gazebo is purchased at a hardware store or welded from sheet material. To seal the free space between the pipe and the furnace, use heat resistant sealantThe gazebo must have a fire-safe opening for the chimney outlet.
Important! A cap is placed on the upper end of the pipe to create proper draft and protect the stove from precipitation that could impair its functionality.
It is easier to buy a tabletop in a store and attach it to the created ledge. silicone sealantTo make it yourself, you need to plaster with cement and finish the surface with tiles or stone after installing the slab.
Decorating a stove with a chimney
After the chimney is installed, you can take care of the appearance of the barbecue. To do this, decorate the barbecue and shashlik oven with your own hands: lay out the floor covering with non-slip material, for example, porcelain stoneware. In this case, a special glue is used. The facade is passed over with a grinding machine and cleaned with a brush to remove the remains of the solution. You can use tiles or wild stone to improve the aesthetic appearance of the structure.
Additional attributes
To increase the comfort of rest near an outdoor stove, it is advisable to take care of additional attributes.
To decorate the site and to have a cozy time in the evening, you should connect electricity and do table lighting, fireplace, space under the roof, boundaries of a recreation area or plot.
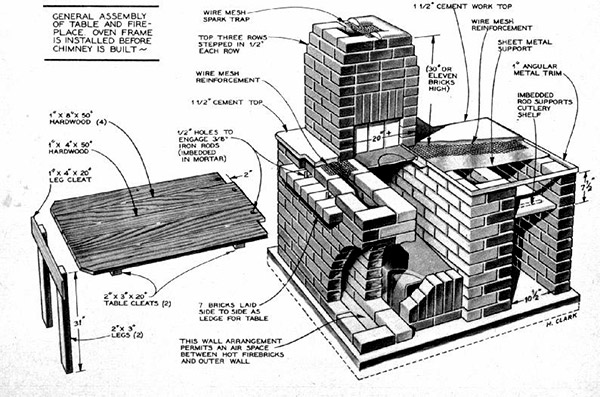
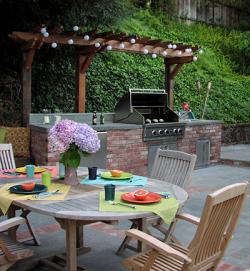
Photo 4. Detailed diagram of a brick barbecue by English-speaking specialists. In addition to the oven itself, the drawing also includes a description of the work table with the necessary dimensions. If you are going to build a brick barbecue with your own hands, drawings of this kind will be necessary.
Work table to prepare food for cooking, rack for storing spices, dishes and accessories, they are placed next to the work area.
You can completely place the stove with a chimney in a glazed gazebo and cook delicious kebabs all year round or install a canopy for basic protection from precipitation.
As furniture for relaxation, a table, benches or chairs are purchased or created. Designers It is not recommended to buy cheap plastic furniture - it will spoil the atmosphere of outdoor cooking and may cause a fire. It is better to give preference to forged, wooden, wicker furniture of natural colors.
Fire safety
Remember to follow fire safety rules. No one wants to interrupt their vacation to call the fire department and deal with the consequences of a fire in nearby objects.
Rules for installing a stove to prevent fire:
- necessity of construction on a solid foundation;
- metal sheet finishing or other non-flammable floor material in front of the stove;
- placement at a decent distance from flammable substances, trees, bushes, buildings.
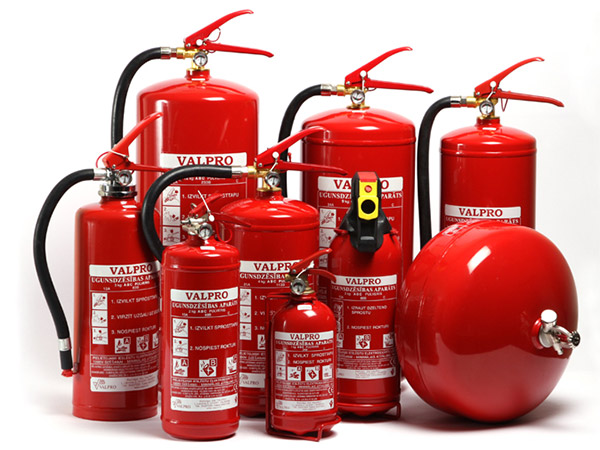
Photo 5. A set of imported fire extinguishers of various sizes. For fire safety purposes, any brick barbecue oven must be equipped with one of these items: the photo demonstrates how rich the choice is for a summer cottage owner.
Operating rules:
- when the oven is idle, it is covered cover, so that precipitation does not impair functionality;
- protect children from being close to the stove;
- do not leave the stove lit, especially with food, without supervision.
Various brick barbecue ovens: projects, photos, drawings
When you can't decide on a particular brick barbecue project, photos, diagrams, and barbecue masonry drawings can help you make your choice. Study the selection of illustrations we have prepared to understand which of the projects you like best. Pay special attention to the complexity of the proposed design: will you be able to implement this or that project with your own hands?
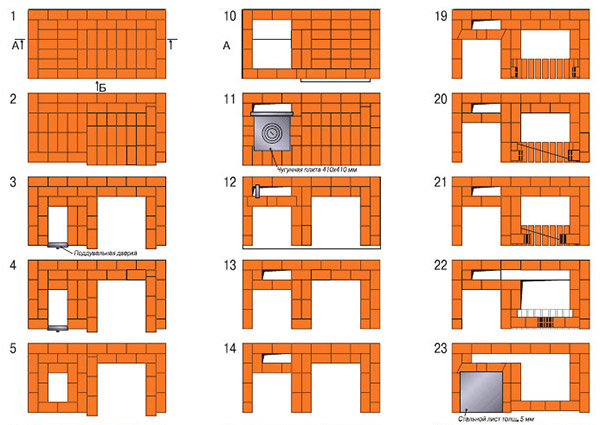
Photo 6. A fragment of the instructions showing how to build a brick barbecue oven. A row-by-row layout of the barbecue, like this one, makes the work much easier, especially for those who have never built a brick barbecue with their own hands. Drawings, so try to choose exactly those with row-by-row layout.
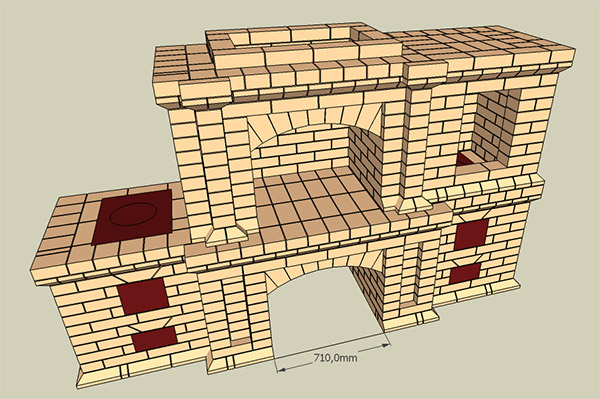
Photo 7. Graphic diagram of a brick barbecue. It will not be difficult at all to build a brick barbecue for a summer house with your own hands according to such a project.

Photo 8. Computer model of a brick barbecue: row by row and construction diagram. It will be easier to build a barbecue with a more detailed diagram, but even such a drawing speeds up the construction of the structure.
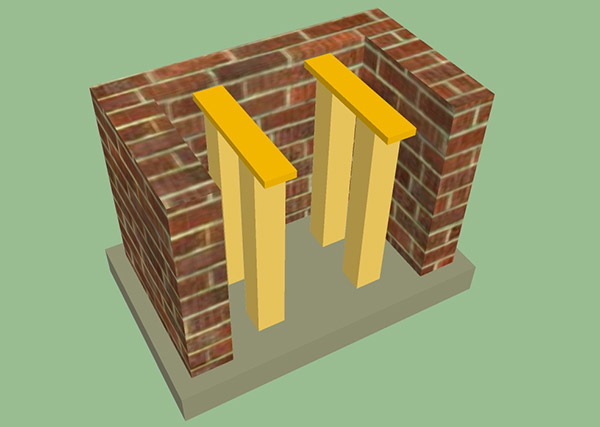
Photo 9. Computer generated rough diagram of a brick barbecue. Masonry drawings attached to such a diagram will provide precise information on the size of the structure and the order of its construction.
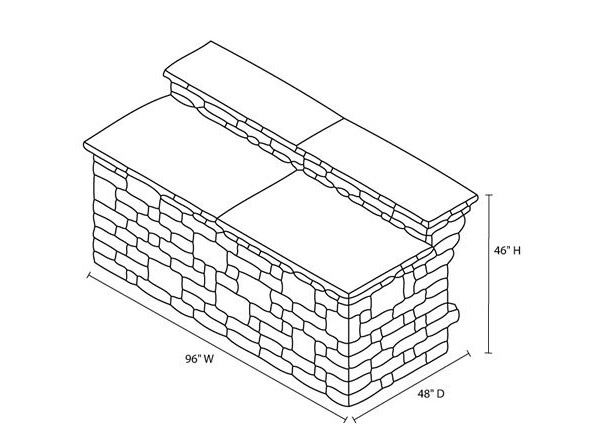
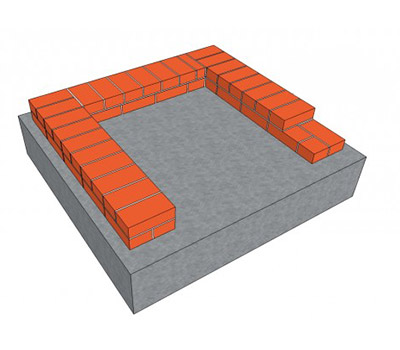
Photo 10. Schematic sketch of the pedestal for the barbecue project. Drawings with dimensions are necessary, no matter what type of oven you choose - stone or brick, small or large, complex in its design or not.
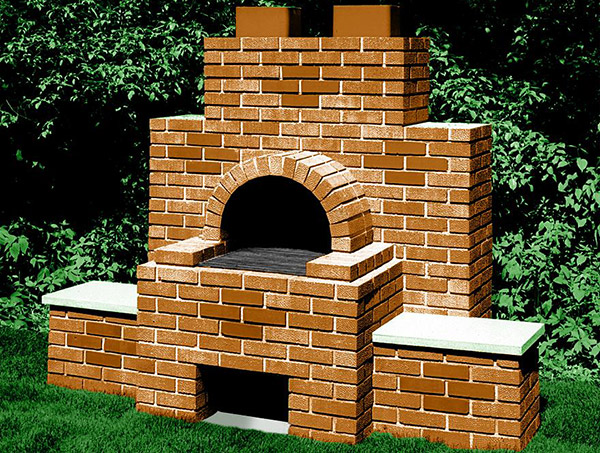
Photo 11. Computer generated brick barbecue project. Downloading a similar project for free is very useful when you want to build a garden brick barbecue with your own hands.
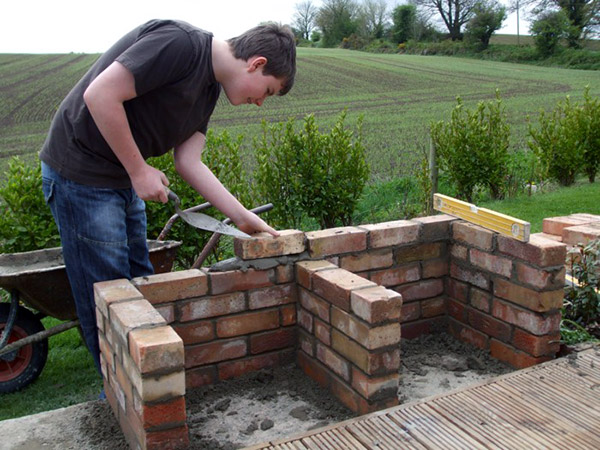
Photo 12. A novice stove-maker lays out a brick barbecue with his own hands. The photo was taken at the stage when the foundation was already ready and several rows of bricks had already been laid.
Photo 13. A small outdoor brick barbecue. The drawings for such a structure are extremely simple, however, if you decide to install a brick barbecue with your own hands, a row layout that describes the laying of bricks in detail is also desirable in this case.
h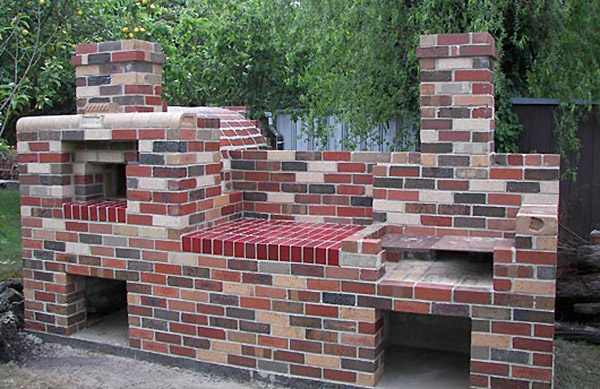
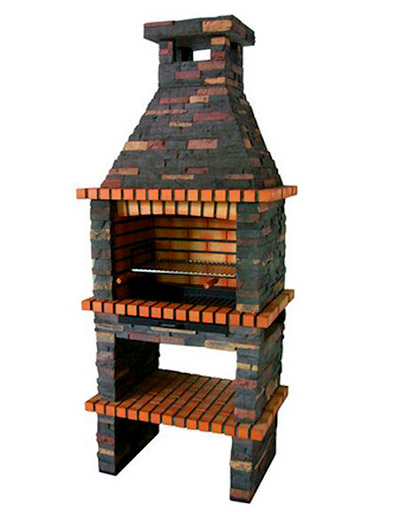
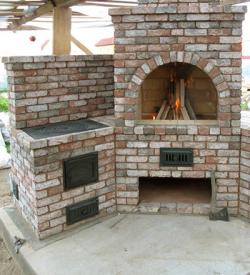
Photo 14. Brick oven with two pipes. On our website you can see the most unusual barbecue projects. The photo of this model, for example, shows that a barbecue and shashlik oven, built with your own hands, can resemble the outlines of a stove from a Russian hut.
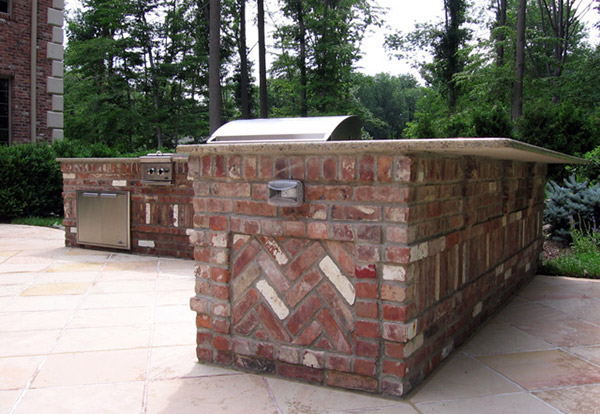
Photo 15. There are a variety of types of barbecues for a summer house made of brick. The photo shows an elongated model folded into a corner. It is noticeable from the side wall that an original brick barbecue laying scheme was used.
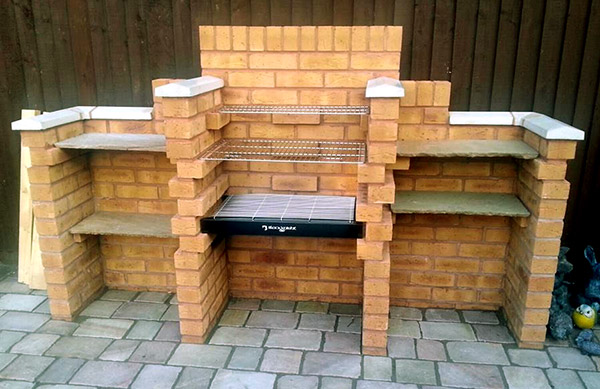
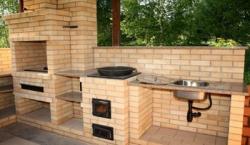
Photo 16. Near the wooden fence there is a country barbecue made of brick, built by the owner of the site with his own hands. This structure consists of three simple sections. It is clear that a rather unusual layout of the barbecue made of brick was used.
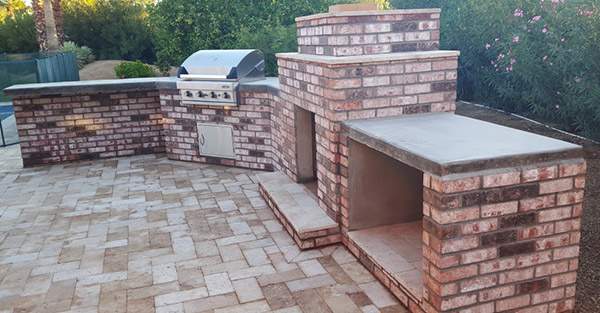
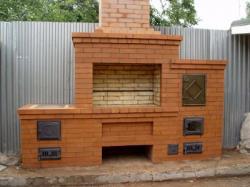
Photo 17. Brick structure for cooking various dishes outdoors. To build even such a relatively simple barbecue oven with your own hands, the order of the brickwork may be necessary.
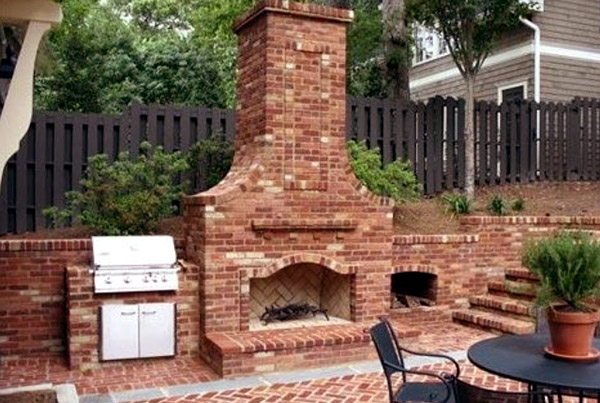
Photo 18. Backyard of a country house with a barbecue area and a stove with a large chimney. To build such a rather complex brick barbecue with your own hands, diagrams with detailed dimensions and sequence of actions are simply necessary.
Useful video
Watch the video posted here, in which you can see how to lay a barbecue from bricks with your own hands. All other stages of construction are shown as well.
What does a stove maker do after creating a barbecue?
When the brick barbecue oven, built and decorated with your own hands, has become another beautiful structure on the site, and the recreation area around it is arranged, it is time to enjoy the first portion of aromatic home-made shashlik. The construction of the oven took 2 weeks, so that this work does not go in vain, an experienced stove-maker advises not to neglect subsequent care. Clean the chimney annually and do not forget to wash the firebox before each cooking, because it would be very unfortunate to make a barbecue oven at the dacha with your own hands and soon ruin it with improper operation.

You don't have to wash the firebox every time, especially if you don't cook in the stove every day! But it's advisable to do it twice a month. Bricks don't get destroyed by moisture. This is all done for the sake of cleanliness and preserving the appearance of the stove! Sooner or later everything will get destroyed, but that's in 20-30 years!