A pleasing to the eye and safe frame: how to make a portal for a sauna stove correctly?
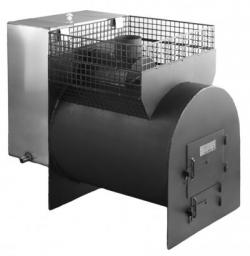
The firebox of the sauna stove is often moved to a room adjacent to the steam room. This allows you to add firewood from the rest room and heat it at the same time.
The portal serves as a frame for the firebox door. With it, the stove looks more aesthetically pleasing and fits better into the existing design.
In addition, the portal covers the joints walls with fireproof materials around the fuel channel and door.
How to make a frame for a sauna stove
The production of a furnace portal is divided into several stages:
- is cut out opening;
- is being filled fireproof building materials;
- is decorated finishing.
The size of the furnace portal is made sufficient to protect the walls from overheating. It depends on the dimensions of the firebox.
In the standard version, the door takes up about half height And three quarters of the width, but others are possible.
What can be used to lay out a portal in a bathhouse?
The frame of the furnace portal is made from various materials, including a combination of different types. The choice depends on:
- from materials And decor walls;
- from the general design premises;
- from financial opportunities;
- when making it yourself - from skills working with this or that material;
- from personal preferences.
Naturally, the parts that are in direct contact with the furnace must be fireproof.
The following are used for production:
- stone;
- brick;
- tile;
- tree;
- metal;
- plasterboard.
Each of them has certain advantages and disadvantages. It is useful to know them and imagine the limitations associated with them before starting work.
Tree
Applies natural wood of various species, both valuable and simpler. It is used board (including parquet), timber, plywood, as well as boards containing wood materials - MDF and laminated chipboard.
Such portals can be made in a variety of styles and, as a rule, fit well into the interior of a wooden bathhouse. If you have wood carving skills, you can additionally decorate them with images, ornaments, etc.
But over time it is likely deformation, especially valuable species. To avoid this, the following methods are used:
- They use heat reflective screen or inserts made of stone and concrete.
- They take different wood species.
- They choose well dried raw materials.
- It has proven itself well glued laminated timber. But if the glue is water-based, it will not work.
- Cover the parts with varnish, preferably in 2-3 layers.
Important! All wooden parts must be treated. fireproof impregnations.
Drywall
Drywall is lightweight and inexpensive, but it requires additional finishing, such as plastering or painting. Another option is cladding lightweight artificial stone.
Attention! It is better to think through the project carefully before starting work. In the future, the design it will be impossible to redo, just delete and reassemble.
Metal
The metal is used to create frame (for example, for plasterboard structures) or as decorative portal finishing.
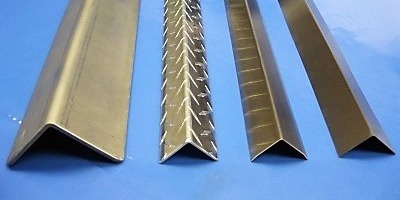
It can withstand temperature changes and is easy to clean. But the portal is completely metal gets very hot, there is a risk of burns.
The following are used for construction:
- metal profiles and corners;
- shields;
- separate decorative elements.
Peculiarities! Forged inserts are good are combined with stone finishing.
Stone
Decorative stone gives the stove portal a respectable look. It becomes similar to a classic fireplace.
Used and natural, And artificial options. Looks interesting pebble frameIt is fixed with special glue.
Metamorphic and volcanic rocks, traditional for use in furnaces, are suitable for these purposes:
- granite;
- coil;
- slate;
- talc-magnesite.
Elements located at some distance from the door can also be made of porous sedimentary rocks to prevent soot from being absorbed. These include:
- sandstone;
- shell rock;
- marble;
- travertine.
The stone withstands heat well, but it usually more expensive wood or plasterboard. Natural options, in addition, are quite heavy, and this increases the load on the wall and supporting structures.
Preparation of tools and materials
To build you will need:
- trowel;
- jigsaw;
- drill or screwdriver;
- building level;
- clamps;
- metal profile;
- self-tapping screws;
- carpentry glue;
- cement-sand mixture.
Construction process: photo
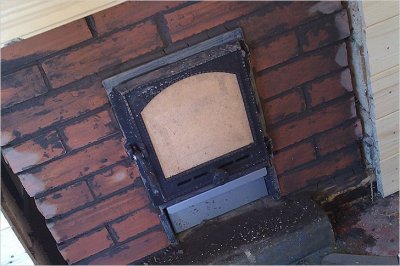
Before installing a stove with a remote firebox, cut a rectangular hole in the wall. The required dimensions are indicated in the stove passport. For homemade devices, it is recommended to make a distance from the firebox to the wall not less than 30 cm (100 cm for all types wooden walls).
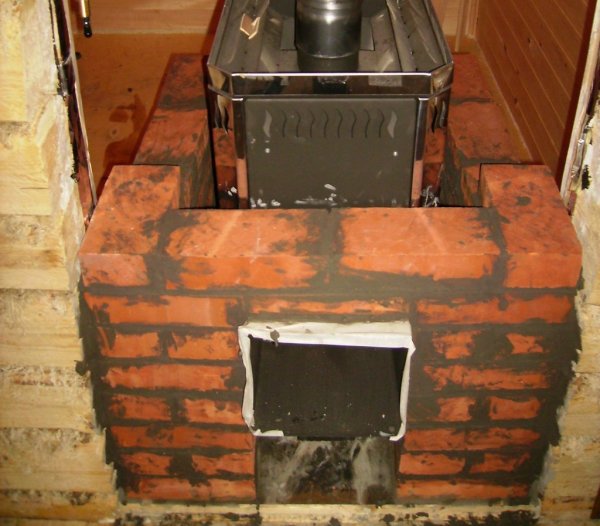
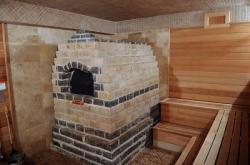
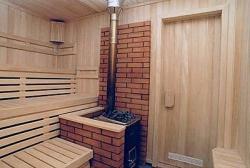
Photo 1. The space between the stove channel and the walls of the bathhouse is filled with brickwork.
Fill the gap between the wall and the channel:
- brick masonry;
- minerite sheets (on a frame made of metal profiles).
Depending on the thickness of the wall and personal preference, fireproof materials are laid flush with the wall or recessed.
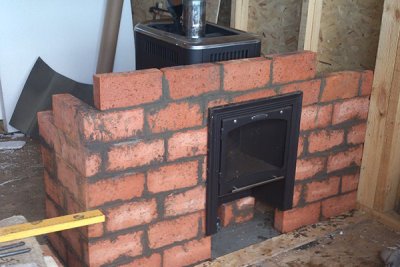
Peculiarities! Masonry in 2-3 bricks has quite a lot of weight. In this case, you will need strengthening the foundation.
Leave a small gap between the masonry and the wall. (0.5-1 cm). Fill it with insulation:
- stone cotton wool (without plant fibers);
- basalt cardboard.
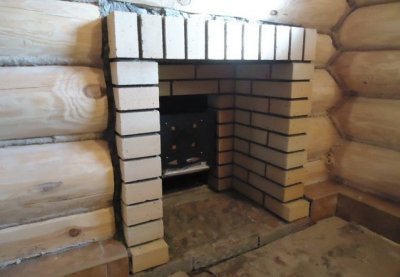
If there are unsightly joints where the walls meet the masonry, cover them with finishing material.

Photo 2. The joints of the walls and the masonry of the portal can be covered with finishing material: wooden panels, for example.
The method of fastening depends on the choice of finish:
- The stone is placed on cement-sand mortarSince it is flat and the height is small, the metal mesh is not necessary.
- Drywall and plywood fastened with self-tapping screws to the frame. In the first case, it is made of a metal profile, for the second, a slatted one will do.
- Wooden boards are also attached with self-tapping screws (which are then masked) or special with glue.
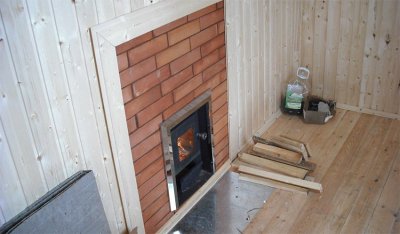
If the portal is made with a recess, close the side walls as well.
Reference! The thickness of the stone or board should be more than a centimeterThen the joint will close.
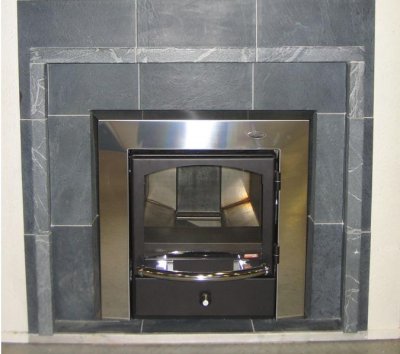
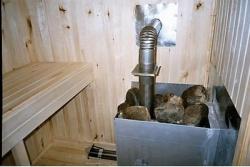
If you attach a board as the top part, you will get a shelf for small decorative items. And if the frame is installed on a frame, it is enough to make it wider.
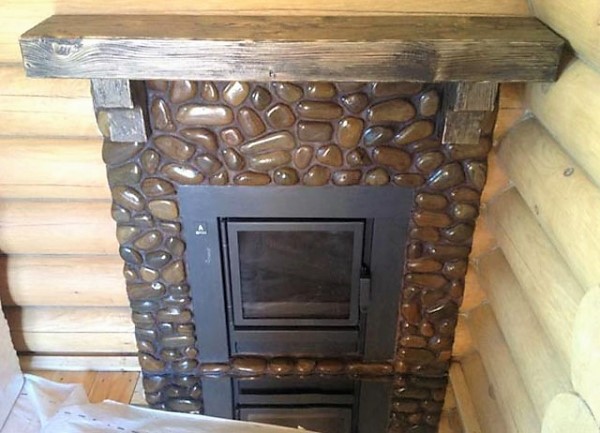
Photo 3. Option for decorative finishing of the bath stove portal. There is a shelf for small decorations on top.
Finishing is done last. inner part, adjacent to the firebox, but if it fits the overall style, you can leave it without additions.
Possible complications
When laying bricks, a lot of time is spent on circumcision And adjustment. Therefore, it is better to calculate the size so that a whole number of bricks fits (taking into account the loose fit to the wall).
Important! Carry out all work under supervision level absence of deviations from horizontal and vertical.
Laying can be inconvenient from behind the doorIn some models of stoves it is removed, then the brick is laid without it.
Useful video
Watch the video, which explains the installation schemes for a portal for a stove in a bathhouse, and discusses the most common mistakes.
Decorating
The assembled portal will become a real decoration of the recreation room. It can be paint, tint, varnish or plaster (including textured).
Comments