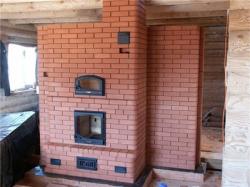
Although it is small, it heats perfectly! Instructions for making and row by row 4 by 4 bricks of the stove
Brick ovens are often used to heat private homes. With a small area a 4x4 brick stove will be enough. It will not only warm you up, but also prepare healthy food.
And if you have some construction skills, you can build it yourself. This will save on the cost of the master's services.
Features of a 4 by 4 brick heating stove

Dimensions of the oven at the base 102x102 cm, and the height is 2 m. 10 cm. Minimum ceiling height taking into account fire safety requirements — 2 m. 45 cm.
These parameters are approximate and depend on the size of the bricks. To find out the exact width and depth of the oven, the first row needs to be laid out.
In this case, leave some space for the seams (about 5 mm). To determine the height of the oven, add the height of the brick and the thickness of the seam, and then multiply by the number of rows.
If necessary, the oven is made higher. To do this, the rows are repeated 23 and 24.
With two-time firing, the heat output will be not less than 4480 W. This is enough to warm up 35-40 square meters with proper thermal insulation.
The model has a straight stroke, which facilitates kindling in bad weather. It is also used in summer, as the heating is noticeably reduced.
How to make a 4x4 brick oven
To build this heating device, choose a place, prepare materials and tools. Arrange the foundation, then start laying according to the instructions.
Selecting a location
The best location for the stove depends on how many rooms it will heat. If the heating device is designed for one room, it is desirable to place it at some distance from the walls. Then its entire surface will give off heat.

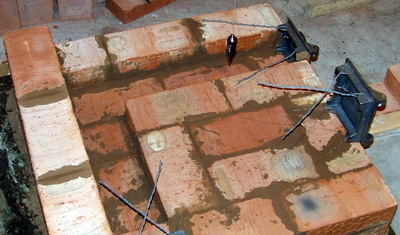
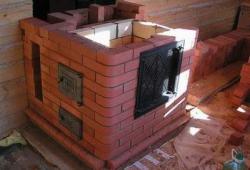
Photo 1. The process of laying a 4 by 4 brick stove. The structure is additionally equipped with a hob.
If heating is required two rooms, a brick oven is being built in into the internal partition between them. When using for three her rooms are installed in the corner. It is more convenient to locate the outlets of the firebox and cooking chambers in the kitchen. Then there will be no dirt or kitchen smells in the living area.
It is advisable to build a stove not far from the entrance. Firstly, in this case you won't have to carry firewood and ash through the entire room. Secondly, the air coming through the door will quickly heat up. And it won't create a feeling of a draft near the floor.
Important! It is necessary to calculate the location of the stove so that the chimney does not pass through through ceiling beams and roof rafters. To do this, lower a plumb line to the intended installation location.
Materials
To build the oven you will need: two types of bricks. The firebox of the furnace is made of fireclay (refractory), the rest is made of red (ceramic). Choose high-quality brick: uniform in color, without chips or cracks. It should be smooth, without "humps" and recesses.
The project requires 541 red bricks and 133 fireclay bricks. But it is better to purchase building materials with a small reserve.
You will also need stove fittings, including doors:
- furnace DT-3 with dimensions 210x250 mm;
- blower DPK (R) (140x250);
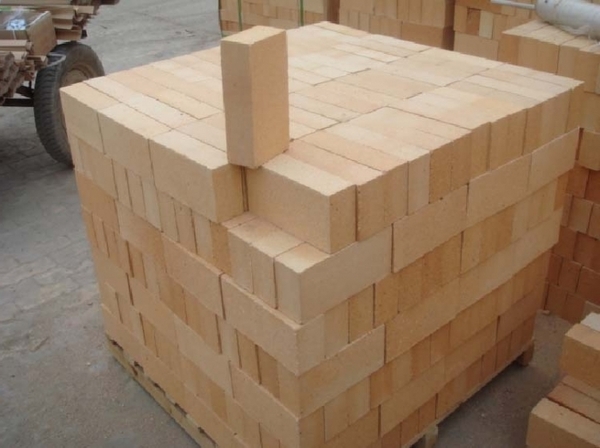
Photo 2. Fireclay brick for laying the furnace firebox. Sand-colored material.
8 doors, used in cleaning - DPR-4 (130x130).
A grate will also come in handy (300x250) and cooking two-burner stove (586x336). Four valves are required:
- two with dimensions 130x130 mm;
- one 130x250;
- one bigger, 260x240x455 (ЗВ-5).
Also prepare a steel strip (30x6x400 mm), four corners (40x40x4x640) and sheets:
- 640x440x0.5;
- 900x900x0.5;
- 500x700 (pre-furnace).
To fill the seams of the stove you will need:
- clay (or special stove) mortar;
- fine dry sand;
- asbestos cord (diameter 5 mm);
- basalt cardboard (width 1.5-2 mm).
Tools
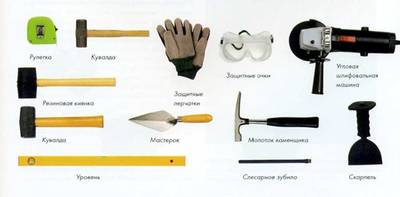
For construction ovens you will need:
- trowel;
- level;
- special hammer;
- Bulgarian;
- gas cutter or brick cutting machine;
- bucket and shovel for mortar;
- square;
- construction pencil.

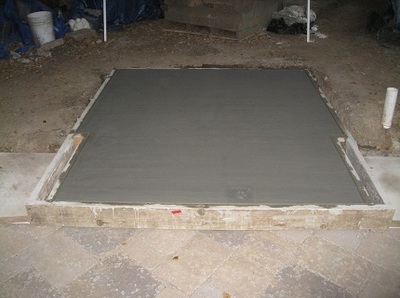
Preparing the foundation
Since the weight of the structure is quite large, it will need a foundation. The durability of the entire furnace depends on its quality. The dimensions should be such that from the furnace to its edge on each side there is not less than 5 cm.
Types of foundations and their differences
For stoves The following foundations are used:
- concrete or concrete-rubble;
- slab on piles or pillars.
They differ in construction technology and materials used.
Selection criteria
The main criterion will be soil type. For clayey more suitable pile or columnar, and for sandy - concrete.
Sometimes rubble stone is added to concrete. This is done for the sake of economy, in areas where it is available. Asbestos or polyethylene pipes are sometimes used as piles.
Construction rules
A pit is dug for the concrete foundation below freezing depth. The bottom is filled with sand and crushed stone. Then formwork is placed along the edges of the pit, and it is filled with concrete.
Part of the solution is sometimes replaced rubble stone. In this case, the pouring occurs in stages. A layer of stone is poured with concrete, and the next layer is laid only after it has hardened. Also used as a filler brick breakage.
For a slab foundation, holes are first drilled for the piles. Then a layer of crushed stone is poured on top, and concrete is poured on top.
Attention! With any technology, it is necessary to leave a distance between the foundation of the stove and the house. It should be not less than 50 mm. The gap is filled with, for example, sand.
Then it is placed on top roofing felt for waterproofing. The finished floor is placed on top of it.
Manufacturing of the device, ordering
1 row is placed on the finished floor. The base is formed.
The seams are made thick about 5 mm.
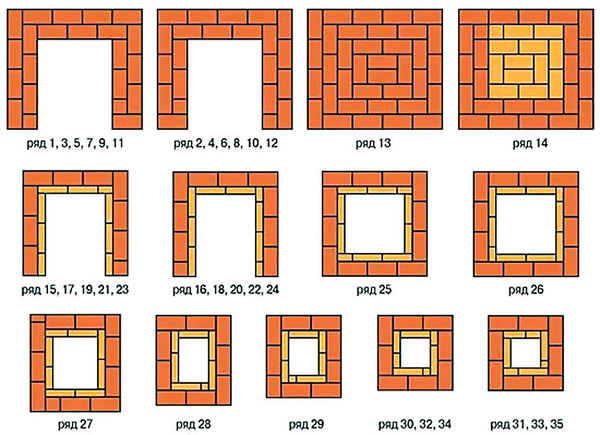
Photo 3. Option for arranging a 4 by 4 brick stove. Ceramic bricks are shown in orange, fireclay bricks in yellow.
In the 2nd row the formation of the ash chamber and lower flues begins. The ash door is installed and three doors for cleaning flue ducts.
Reference. Special fasteners are used to secure the oven doors. clamps or annealed wire.
In 3 the formation continuesA vertical channel stands out behind the rear wall of the ash chamber of the furnace.
In the 4th layer the doors are closed for cleaning. The ash pan door cover is being prepared. For this purpose, two bricks the corners are chamfered. They are laid on third, which two corners are cut off. And the front part of the ash pan is partially closed.
From 5 the firebox is formed. For this purpose, fireclay bricks are used. Two of them are cut diagonally and are placed on the front and rear edges of the future fuel chamber.
After this, the grate is laid. At its edges, 5mm gap, which is filled with sand. The formation of the firebox and flues continues.
On the 6th row the fuel door is installed. The gap between it and the front wall is filled with asbestos cord. The thickness of the gap in this case is also 5 mm.
On 7 the formation of walls continues.
8th tier is laid out according to the diagram.
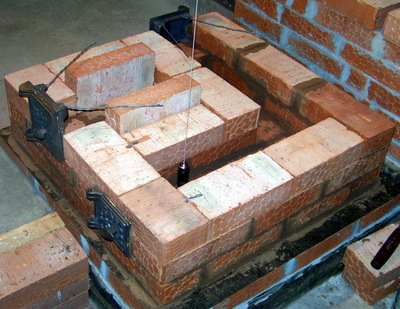
On 9 are being cut three bricks to cover the fuel door. One is cut diagonally, and a rectangular cut is made in the other. The third is placed on top. A passage is made into the channel behind the chamber.
On the 10th row the hob is placed. Preliminary cutouts are made for it. As in other cases, a distance of 5 mm. It is filled with asbestos cord. A steel corner is placed in front of the stove (to protect the surface from heavy dishes), and a steel strip is placed on the left. Basalt cardboard is placed in the side seams.
From 11 the cooking chamber is formed. The bricks to the left of the stove and between the near and middle vertical channels are fireclay, the rest are red. Basalt cardboard is laid between them.
On the 12th tier unite two left channels: near and middle. From here on only red bricks are used again.
On the 13th All channels are connected except the middle right one.
On 14 the walls rise higher.
At level 15 The cooking chamber is covered with a steel sheet. A hole is made in it for the ventilation channel.
On 16 the cooking chamber and the lower flue system are blocked. two valves: for the direct stroke and the cooking chamber. Holes are cut out for them in advance.
On the 17th the overlap is repeated.
From layer 18 the installation of chimneys begins. Doors are installed for their subsequent cleaning.
At 19 the channel leading from the lower flues is separated.
On 20 the doors are blocked.
At levels 21-25 The upper chimneys are formed.
On 26 The upper chimneys (except the main one) are combined.
On rows 27 and 28 the walls rise higher.
On the 29th row the stove is closed. Only the opening of the main chimney remains. A steel sheet with an opening for the chimney is placed on top.
At 30 — the overlap is repeated. Cutouts are made in the brick walls of the main chimney, into which the main smoke damper is then placed.
31 tier — laying the base of the mounting pipe.
32 - the next row of pipes.
Possible complications
It is important to lay out the first row of the stove so that it is level in the horizontal plane and has right angles (that is, it is square, not diamond-shaped). To check the plane level applied. And to check whether the sides of the stove are even, take a string or a strip. Mark a distance equal to one side on it. Then transfer it to the other side and check the length. If they are equal on all sides, the foundation is laid correctly.
Attention! If the stove is not completely dry before firing, it cracks may form. It will be unfit for use.
Useful video
Watch the video, which demonstrates the process of designing a 4 by 4 brick oven, and provides the order of the device.
Construction period
How long it will take to build such a stove depends on the speed of work. But it is not advisable to rush, it is more important to build it evenly and qualitatively. Approximate period - from one to three days of work.
Allow it to dry completely before using the oven. This takes another a week or two.
Comments
A grill is installed on top, you can cook on it.
Very convenient and inexpensive.