Easy to make, unpretentious in operation! Building the simplest brick oven with your own hands
A simple brick oven is required if the room it is necessary to maintain a constant temperature and humidity.
The stone it is made of releases water vapor into the air when heated and takes it back when cooled. Thus, the humidity remains approximately at the same level.
In addition, it allows you to maintain the temperature inside the room in 18–20 °C, which is optimal for medical reasons.
Scheme of the simplest brick oven for a summer house and home

Heating stone stove in general it looks like this:
- Below the floor level is located foundation, on which the insulation is laid.
- Tents are installed on the floor - legs, providing heating of the lower part.
- Directly above them is located an ash pit and also a vent. It is needed for uniform heating by height.
- It is separated from the main room by blower door.
- Directly above it is located firebox. It is placed on its bottom grate, which is also the vault of the ash pit.
- Directly above the firebox door is located firebox vault, behind which is located mouth or mouth.
- Above starts cleaning, transpiration and convectors.
- Above the cleaning are located two valves.
- Almost at the very top there are vent outlet into the room, smoke channel and roof.
- The chimney separates from the ceiling internal cutting.
- At the very top is located chimney mouth.
How to build the simplest brick stove with your own hands, the order of the device
First of all, you need to decide on the shape of the stove. There are several criteria by which this can be done:
- Correspondence of the oven size to the area of the room - the side walls give off more heat, while the front wall gives off this indicator 3-4 times less.
- One of the most effective solutions is T-shaped oven - it can heat up to four small rooms.
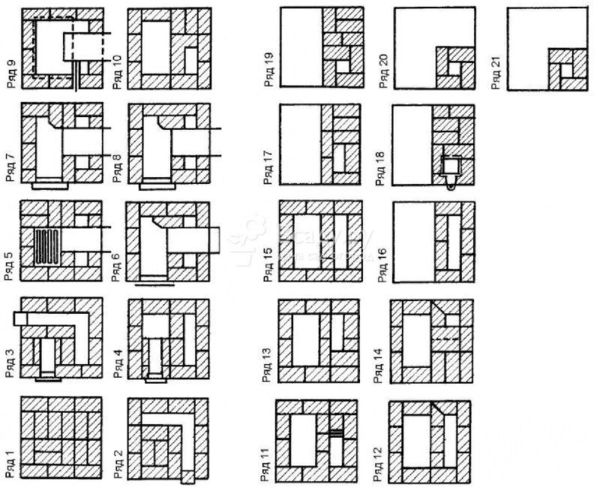
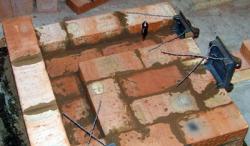
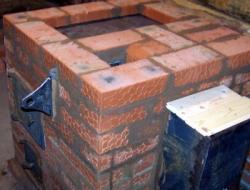
Photo 1. A variant of the order of a simple brick stove for heating houses. Contains 21 rows.
- Correct placement - this partially follows from the first point. So, if the stove will serve not only for heating, but also for cooking, then it is better to place the mouth of the hob on the kitchen side, and direct the side walls to the living rooms.
- It is not worth making large stoves for small rooms - the efficiency of the structure does not depend on the size, but from the internal structure. Cap-type stoves are well suited.
- To avoid unnecessary fuel consumption and maintain the temperature in the room, it is advisable to insulate the walls.
There are several rules stove masonry:
- The seams in the entire structure, with the exception of the firebox, must have a width 3 mm with deviations up to 2 and up to 5 mm in the smaller and larger directions, respectively. The width of the seams for the firebox is 13 mm.
- The width of the seams between materials with different expansion rates is 5 mm. This is relevant for joints between ceramics and fireclay or steel and concrete.
- Each masonry joint is overlapped by the adjacent brick by at least a quarter of the length of the latter.
- Bricks should be laid starting from the corners. The verticality is checked with a level or plumb line. To do this (in the first case), a nail is driven into the ceiling and a weight is tied to a string. The other end is secured at the seams. The string is then used as a guide.
- Doors and flaps are secured with wire, and in highly heated areas (such as the oven) with a steel strip. 25x2 mm.
The following types of bricks are used for masonry:
- Red ceramic — for the lower part of the stove and sections of the chimney with a temperature no more than 80 °C.

Photo 2. Ceramic brick used for laying the outer sides of the heating stove.
- Stove ceramic — for heating.
- Fireclay — they line the inside surface of the firebox with it. Such bricks are capable of withstanding up to 1600 °C, and is also a good conductor and heat accumulator.
Tools:
- Hammer-pick - may be required if you have to trim bricks.
- Trowels - for bonding bricks.
- Rubber hammer - for leveling the masonry.
- Painter's cord - for marking.
- Plumb line - for vertical alignment.
- Laser level is optional.
- Construction rule - for checking the evenness of walls.
- Level - control for horizontal alignment.
You may also need:
- Container for solution.
- Expansion for seam finishing.
- Drill with mixer (instead of a drill).
- Tape measure, pencil.
- Angle grinder and a chisel.
- Protective glasses and gloves.
The laying process
- Foundation - any brick is used, even crushed stone will do. The base layer is filled with cement and leveled.
- Furnace body — horizontally, the marking is pushed off from the wall of the room. For laying, a stove mortar is used. Each row is leveled using a level. A grate is placed in the place where the fireplace is planned to be placed.
- For fire safety purposes, the wall adjacent to the wall of the house, reinforced with additional brick. An empty space is left where the chimney will be, the rest is completely filled in. At this stage, an ash removal door is installed.
- The door is fixed to the mortar and leveled.For additional stability, it is secured with wire laid between the bricks.
- 3 more rows are laid, then a stop is placed for the lattice - two more rows of a quarter of a brick.
- On fireclay bricks the grate is being laid.
- It is mounted next to the grille large door.
- The door is installed in the same way as the small one.
- The first row of firebox is placed above the fireplace. It is reinforced with metal corners or tin, and slots of the required sizes are made in the bricks.
- The next row is laid. Along with it, there is another lattice on the fireclay brick.
- The door is fixed and the brick is adjusted precisely to fit it.
- It is placed above the firebox another layer of fireclay.
- Chimney — the space left for it is divided into wells and reinforced with metal plates.
- They are being laid down smoke exhaust wells.
- They are placed above the firebox soot removal doors.
- The wells are divided again. It wouldn't hurt to reinforce them with metal strips.
- On the body of the furnace, with the exception of the chimney space, the ceiling is being laid.
- Under construction body cornice and smoke exhausts.
- The last division of the wells is covered with a sheet of tin, and two more rows of bricks are laid on it to compensate for the internal pressure.
- It is placed on the valve for each chimney.
- It is being installed waterproofing, and the chimney is strengthened once again.
- A hole for the chimney is cut in the roof.
- The chimney is strengthened again and the minimum is removed half a meter above the roof level, but not lower than the height of the ridge.
Attention! Areas subject to the greatest thermal impact are laid out exclusively with fireclay bricks (other types may crack from heat).
Possible complications
- Door fastening - one of the options is to hook the wire onto the masonry seam.
- Laying a pipe above the roof - well-selected bricks are used, bonded with cement-lime or cement-clay mortar.
Useful video
Watch the video, which demonstrates the process of laying a heating stove from bricks.
Brick or metal?
If the room is planned to be heated only by a stove, then a brick one would be better - it takes longer to release heat into the room and cools down more slowly. It requires the installation of a strong foundation that holds the structure.
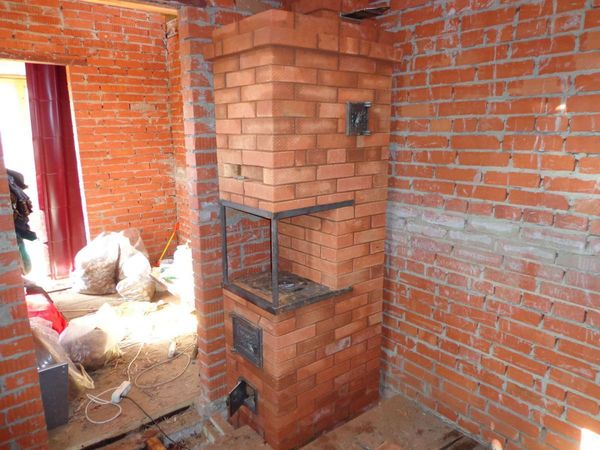
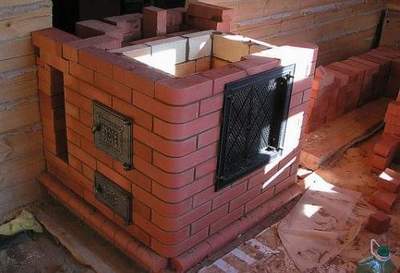
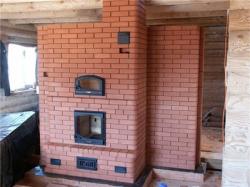
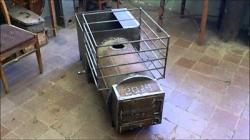
Photo 3. A ready-made simple stove for heating a summer house. Additionally equipped with a hob.
A metal stove is suitable when the house already has heating or the room is used only occasionally and needs to be heated quickly. Metal stove lightweight and does not require the installation of a foundation.
The choice of one or another type of furnace depends on the conditions where it is planned to be used.
Comments