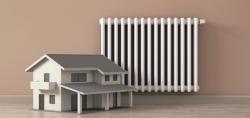
Add steam thicker and hotter! A sauna stove is the most essential structure for a sauna
Bath stoves are responsible for heating the air and water in a Russian steam room. They are called stone stoves because the stones perform main function technological process – give off steam.
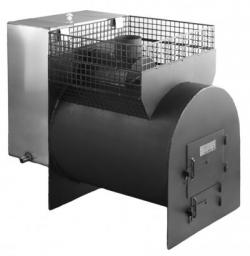
Stoves for saunas are divided according to the type of heat supply (continuous and continuous action), according to material housings (brick, metal). They can operate on liquid, gaseous fuel and on firewood.
Content
How to build a stove with an open type of heater in a bathhouse
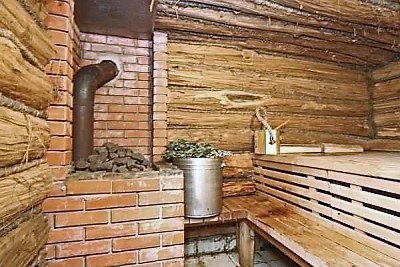
Scheme of a stove with an open type of heater easy to implement. Its dimensions 102 by 62 cmThis is enough to obtain a functional family steam room with steam and heat in nine square meters of the bathhouse.
In this version, lining is not performed, therefore the furnace is built from high-quality brick grade M150, achieving very thin seams.
This option not expensive, but not durable — the seams are restored every two years, covering them with fresh mortar. The stones are placed on a plate located above the firebox of the stove. The plate can be metal or cast iron.
This oven has two variants of schemes:
- with remote capacity or located at the top;
- with water heating from a pipe, laid through the firebox.
Every construction process begins with preparatory work.
Because the brick oven weighs more than 500 kilograms, and during its operation the floor of the bathhouse may subside, then it is necessary to build a foundation under the device.
Foundation
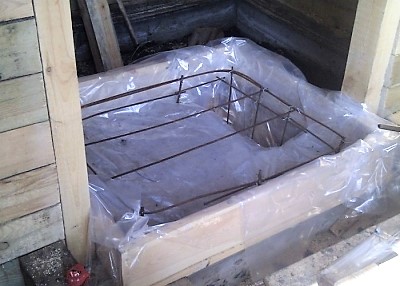
Step by step instructions foundation devices for the furnace:
- Knowing the dimensions of the oven, draw the markings on the ground with a reserve of half a brick.
- They are digging a pit depth from 0.5 to one meter.
- Avoid too close proximity to the foundation of the bathhouse itself. In the event of soil movement, friction will become a destructive force for the stove and the bathhouse itself. Allowed distance 5 centimetersUpon completion of the work, the gaps are sealed with river sand.
- Bottom of the pit leveled and compacted.
- Choice binding solution is dictated by the quality of the soil: if it is dry, then it is cooked lime-cement solution (6:1) with some river sand. To prepare the lime binder mixture, mix sand with lime (2:1). Cement mortar is made by mixing sand with cement (3:1).
- At the bottom of the pit they are laid one by one 10 centimeters of sand and gravelThen they compact it.
- They are placed on top waterproofing material, moving the film higher up the walls.
- The mixture is poured into the pit and left until absolute hardeningIt will take approximately week.
- After the surface has hardened, apply it pour in freshly prepared liquid a solution that will spread strictly horizontally.
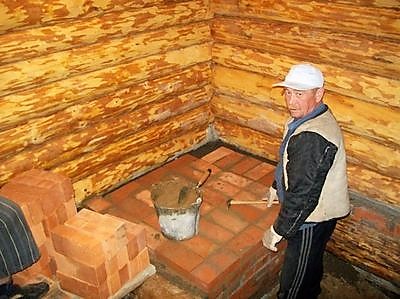
The stage of laying the stove is underway after 14 days, when the base of the stove is completely dry. The solution is prepared from lime, clay and sand (1:1:4).
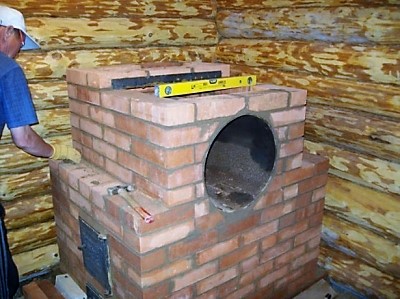
Building a brick oven with your own hands
The fuel part is laid out fireproof brick and supplied grate, the rest is done from ordinary red bricks.
The laying of all sauna stoves uses the same type of technology, but in each case the execution of the seams is approached responsibly. Seam tightness - this is a guarantee that harmful carbon monoxide gases will not enter the room.
Work order:
- Before starting to lay the stove, place it on the prepared foundation waterproofing sheet made of roofing felt in two layers with dimensions 5 centimeters more dimensions of the foundation.
- To prevent the brick from drawing moisture from the binding mixture, it should be saturate with water, lowering it into it 1-3 minutes.
- Prepare a homogeneous and viscous mixture masonry mortar from sand and clay, taken in equal quantities.
- The solution is placed on the entire surface of the brick in a thin layer to create a sealed, filled seam no more than 3 mm. Guides from three-millimeter wire between the planes will provide a high-quality seam. After pressing, the wire is removed and excess mixture is removed from both sides.
- Completing each row of the oven, check the values of the angles.
- Bandaging (shift) of bricks in the next new row is mandatory.
Important! It is not possible to use heat-resistant and ordinary bricks next to each other, because different heat capacity these materials threatens rapid destruction ovens.
Recommendations
Important points:
- Constantly control the dressing rules.
- The thickness of the solution layer is about 10 mm.
- Seal the furnace seams to ensure tightness.
- Through every two rows check the horizontal and vertical levels with a level.
- Allowed to use cement mixture When laying the bottom line, the temperature at the bottom is not too high, and the cement will strengthen the structure itself and protect the stove from moisture.
- After laying two lines install a blower and continue with continuous laying.
- After the construction of the ashpit walls put the door in place and cover it with a grate, which will be the bottom of the firebox.
- Provide for ash pan (mobile or landline).
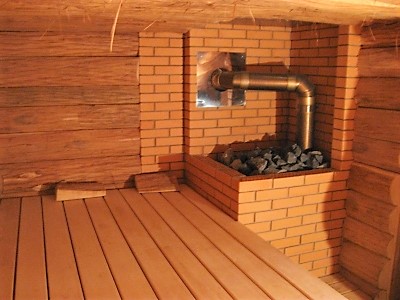
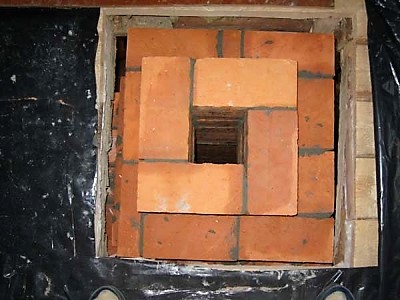
- To erect combustion chamber height 0.6 metersThis is enough to create the highest possible temperature at the top of the flame.
- Necessary depth furnace fireboxes — 80 cm.
- The dimensions of the place for the stone backfill for the bathhouse are determined based on the calculation 60 kg per square meter steam rooms.
The next step is installation. fittings: hinges, grilles, doors. When installing doors in seams lay down pieces of two-millimeter wire. Continue laying from the door.

Construction with water tank
If the stove in the bathhouse is equipped with a tank, then provide it with free expansion from heating can clay-asbestos mixture, which fills the space around it.
For chimney use a pipe made of metal or asbestos cement. In the place where it passes through the ceiling and roof, it must be isolate fireproof material.
When building stoves with your own hands, you must follow fire safety. The main requirements are that the structure must be located not closer than 0.4 meters from elements that can ignite quickly.
If the standards could not be met, then in order to avoid fires the wall is insulated with foil or sheets of asbestos cardboard.
There are several designs of sauna stoves:
- With a stove — the heating of the stone backfill in it occurs from the plate and lasts a long time. The advantage of this option is that the plate, blocking the chimney, significantly reduces the formation of soot and carbon.
- With a "white" firebox. Heating duration - about 12 hoursA small amount of soot is formed due to the partially open chimney.
- With kindling "in grey". It heats up faster, but due to the open chimney, a significant amount of soot is formed.
- With a black firebox. This option has the shortest heating period, but since there is no chimney in this design, you have to wait until the fuel burns completely.
Select any type of stove for your own sauna dictated by the owner's preferences.
Brick sauna stove project
Any of these options is made either with or without grates. When choosing the optimal furnace for yourself, evaluate technological characteristics:
- When installing a grate The fuel burns quite intensely. Such designs are difficult to operate.
- In the absence of grates the oven is easier to maintain, it more economical in fuel consumption. When you have to heat the bathhouse with wet firewood, the grate helps to heat it up quickly and ensures stable combustion.
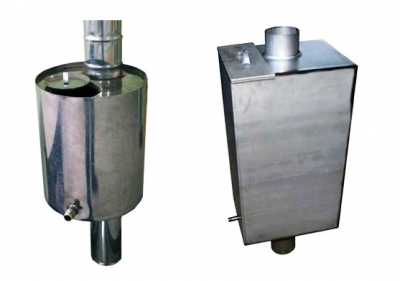
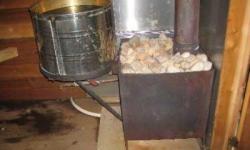
Having decided to build a version of the furnace with a tank, they select the design and calculate the required volume, which is taken from the calculation 10 liters of heated water per person.
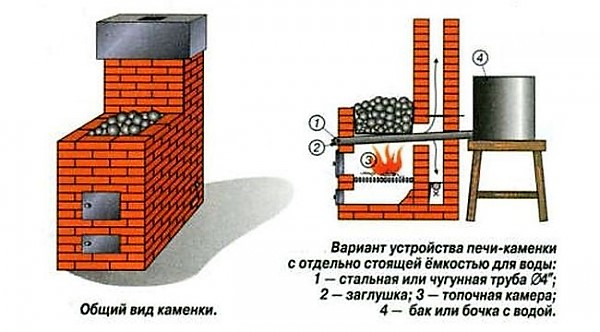
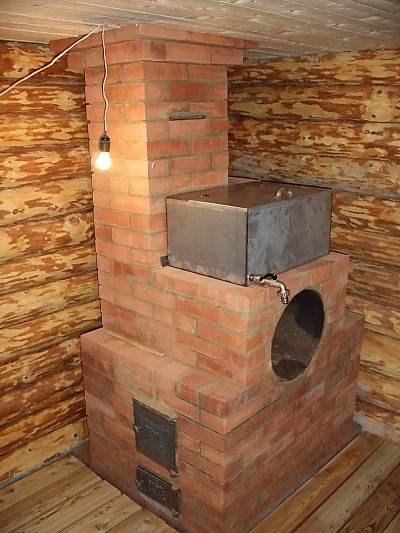
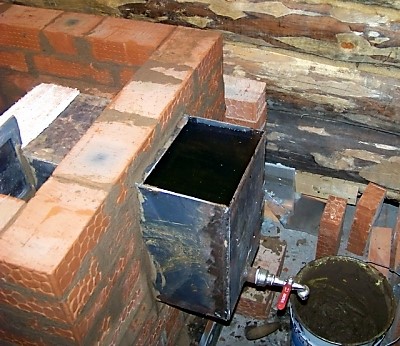
Photo 1. Example of a design for a sauna stove with a remote water heating tank: general view and diagram of the device.
Preferably for cleaning and drying purposes preventive maintenance work is considered a variant of a stove with an open tank. The container is placed at some distance and a pipe is welded into it. It is placed over an open flame, the end is sealed. When boiling, water starts to circulate: rising upward, it displaces the cold liquid, sending it to heat up. This process is continuous while the stove is heated in the bathhouse.
What to consider when choosing
When choosing are guided by the rules:
- Correctly placed the tank will not reduce comfort. They try to place the tank under the chimney or on the stove.
- The service life depends on the material tank. The steel element quickly rusts and, accordingly, quickly fails. Galvanized tanks last longer than enameled ones, but are more expensive.
- The best option is considered to be a tank for the stove made of stainless steel. The grade of steel considered suitable for the tank 08X17 or 8-12X18N10.
- Cast iron The bath tank is interesting because the water in it does not cool down for a long time. The disadvantages of this option include significant weight and long heating.
- An important parameter is also considered wall thickness tank. The larger the capacity, the thicker the walls should be. If the tank, the volume up to 100 liters it is enough to have wall thickness 1.0 mm, then with volume above 100 - 1.5 mm.
Important! Choosing a tank for a stove is a responsible matter. Strength and reliability — the main requirements for it. And since the bath has high humidity, then anti-corrosion resistance comes to the fore.
Stove placement
The placement has three options:
- Built-in. The tank is mounted directly on the firebox, the bottom is located directly above the flame. Such containers can have a special tap for water intake. If there is no tap, water is collected from above with a ladle.
- Remote. This option involves installing a built-in heat exchanger in the stove, which is connected to the tank with metal pipes. The tank itself is installed in any convenient place in the bathhouse.
- Available on the pipe. This option is considered in cases where bathing procedures last throughout the day. Such tanks usually have a large volume.
When choosing a place for the stove, you need to remember that it is built for a long time and must be durable and safe.
Before installing the heater, it is mounted supply and exhaust ventilation, purchase a tank and a chimney.
Stoves with a heater are installed:
- In the central part steam room in small baths, with the base located in the washing room. The firebox door of the stove in this arrangement is located in the dressing room.
- Next to the internal load-bearing wall bathhouse buildings closer to the corner or the entrance door. This eliminates contamination of the room when delivering fuel to the firebox. Placement efficient in terms of heat transfer, ease of operation and maintenance of the furnace.
- Between the steam room and the anteroom. Installing a fireplace in the opening is the best solution. This ensures heating of the dressing room and the bathhouse itself. According to building codes and regulations, bathhouse stoves should be installed on solid foundation, so the brick structure and the water tank together can have a significant mass. The absence of a foundation leads to soil movement under the stove, to its skewing and even to destruction.
From the designated place in the ceiling attach a plumb line, from which the construction of the furnace begins.
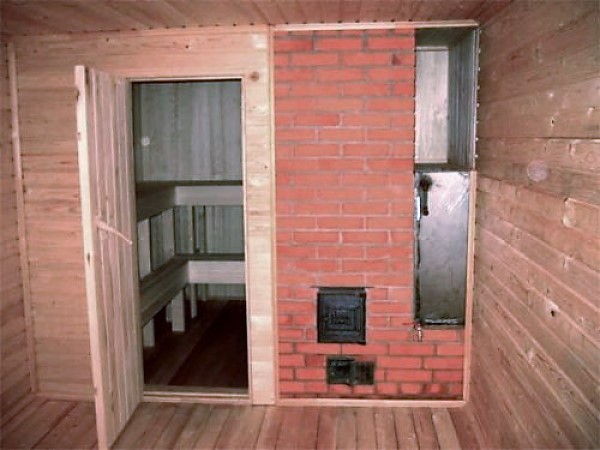
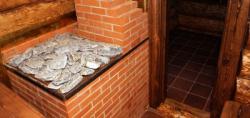
Photo 2. A stove in a bathhouse with a built-in water tank, located between the steam room and the changing room.
Construction order
Before you start building a sauna heater with a tank with your own hands, you need to prepare the following materials and tools: pencil, tape measure, level, trowel, mallet, plumb line, mixer, screwdriver, grinder, roller, shovel, metal corner, roofing felt, clay, cement, bucket.
- They are building the foundation of the furnace. They are digging pit 0.6 m deep, slightly expanding downwards. They pour out 10 cm of sand, 10 cm of crushed stone on top.
- They are tamping. They are installing. formwork and fill with solution. After some hardening, the formwork is removed, filled with a small amount of liquid solution to create a horizontal surface and left until it hardens completely, approximately for two weeks.
- They are laying down double layer of roofing felt, the side walls are coated with tar.
- They are preparing clay mortar, mix clay with sand in equal quantities. The solution is considered high-quality if it is easily separated from the tool.
- First row The stoves are laid flat on the foundation, leaving space for the door. The lower fastening made of three-millimeter galvanized wire is inserted from below, and special grooves are made in the brick for the upper one. After laying the wire in the grooves, clay mortar is laid on top.
- During the device third row perform the lower door fastening blower. In sixth perform the upper fastening. To ensure a tight fit, the bricks are sawn and installed above the door.
- With a plumb line check the verticals.
- IN third row they are installing ash pit, install the grates and the firebox door.
- They are building in the next row a partition that removes flue gases.
- The stove is being laid out up to row 14, an opening is made and channels are attached to the side walls, to which install the tank.
Chimney
The installation is completed by construction chimney with an outlet on the roof of the bathhouse and installation on the stove heating tank.
The chimney is made with cross section, equal to the size one or half a brick and output more than by 0.5 meters. Where the pipe passes through the ceiling, an expansion is provided to prevent fire.
The laying of the stove in the bathhouse is carried out exclusively on a cement mixture, plastered and whitewashed. A whitewashed pipe becomes an indicator of strength.
In case of poor quality masonry During a test fire, you can see how the smoke coming out through the cracks leaves black marks on the white surface of the chimney. The shortcomings are being eliminated using cleaning, plastering solution and whitewashing.
There is a pipe metal or asbestos cement. Its disadvantage is the formation of condensate with an unpleasant smell in the chimney, so it is necessary to make a heat-insulating casing. A more practical option is to install the pipe in a brick frame.
After thorough drying the hearth is being cleaned from dust and residues of the mortar mixture, wet and plaster clay-sand mortar (1:4) with the addition of a small amount of asbestos or fiberglass. Plastering is carried out in three layers.
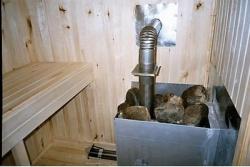
What stones are best for a Russian bath?
To extract good quality steam, it is necessary to choose the right stones for filling the stove heater and to lay them correctly (start with the big ones, end with the small ones). In order to perform the function of providing the bath with steam for a long time, the stones must have the following characteristics:
- maximum thermal conductivity;
- homogeneity;
- strength;
- heat capacity.
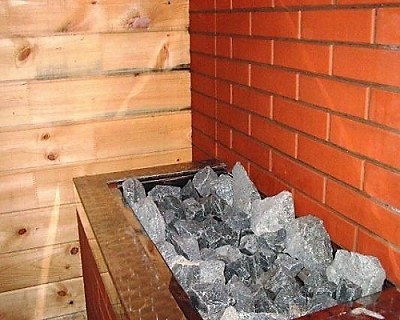
Oval and round shape Even if the stones are laid out randomly, this will ensure that there are guaranteed air spaces between them, and therefore, air and moisture circulation in the bathhouse.
It is used in saunas smooth cobblestones, but for wet steam rooms and Russian baths it is more suitable porous structure. The best stones are considered to be those made from jadeite, diabase, dunite, porphyrite and basalt.
Application granite and marble rocks for a bath not recommendedThe minimum size is five centimeters, the maximum is 12 cm.
Difficulties in installing a homemade heater
Failure to comply with the rules construction leads to errors. In such cases, the furnaces become short-livedTo avoid disappointment, it is important to keep the following points in mind:
- remember about waterproofing on the foundation of the furnace;
- cook right sand-clay mortar (1:2);
- choose quality material;
- follow standards when choosing stove sizes.
Construction without compliance with the scheme, installation of non-standard reinforcement, uneven masonry can lead to lack of traction and to smoke baths.
Possible problems:
- There is no proper heatingThis happens when the wrong valve is closed - they are different for "summer" and "winter" heating of the sauna.
- Smoke is coming out in different parts of the pipe - it is necessary to widen the chimney and eliminate right angles.
- The stove is smoking - cracks and cleaning holes are poorly sealed with mortar. Or damp firewood is used.
- Slow heating - There is a lot of soot on the inner walls of the stove. It needs to be cleaned.
Useful video
A video showing the construction of a brick sauna stove with a tank performed by professionals.
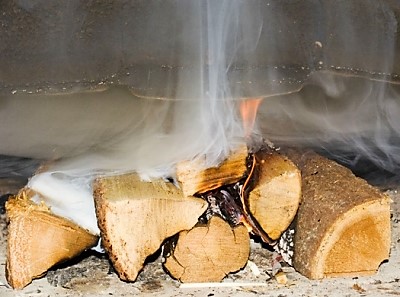
Proper use of a wood burning stove with a heater
Quality steam room is good only when in the bathhouse both water and steam are enoughTo get all this, you should follow these recommendations:
- stack firewood with gaps for air circulation and do not bring to the top by 20 cm;
- close the valve to reduce draft and save firewood;
- close the stove damper only after the wood has completely burned out and the absence of carbon monoxide in the chimney.
Comments