There are no unnecessary things in the household: you can make an excellent stove from an old cast iron bathtub
If you have an old cast iron bathtub lying around somewhere in your garage or summer house, don't rush to hand it over for scrap metal. You can make an excellent outdoor stove out of it and install in a garden plot.
A stove made from an old unnecessary thing will become decoration and a great helper, delighting guests and family members with delicious and original dishes.
Most often, old cast iron bathtubs are used to make garden barbecue ovens. The cast iron from which the bathtub is made has high thermal conductivity, keeps warm for a long time and allows you to cook not only familiar food, but even bake bread and other unique dishes.
Content
How to make a stove from an old cast iron bathtub?
The essence of the construction is that the bath cut in halfThe resulting halves are placed one on top of the other, with the curved side facing outwards, and laid there is a metal sheet between them.
It separates the firebox and the chamber in which the food will be cooked. Holes are made in the sheet of iron and the upper half of the bath for chimney and the pipe is welded in.
It remains to strengthen the structure, give it an interesting look, insert grate bars and do doors.
Necessary materials and equipment
To build a garden oven you will need:
- herself bath, it can be steel, but cast iron is better;
- Bulgarian;
- trimmed metal cutting wheels;
- circles for grinding;
- sheet metal thickness 5 mm and more;
- drill;
- bolts;
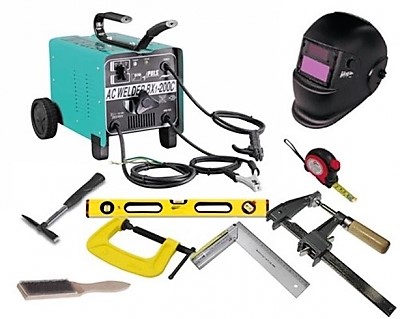
- heat resistant sealant;
- tape measure or roulette;
- pencil or marker;
- welding machine;
- pipe for the chimney;
- grate bars;
- bricks;
- clay;
- sand.
Preparatory work
Before you start building a structure, you need to make all the preparations:
- Marking the middle of the bath and cutting it in half is a labor-intensive and dusty job, so It's better to spend it outside, turning the bathtub upside down.
- Cut a blank from a sheet of metal to the size of the resulting half.
- On the cut sheet of iron and half of the bath that will be on top, mark the holes for the chimney and cut them out.
- Weld the pipe into the partition and bring it out through the top.
- Do marking for fasteners.
Important! All work on sawing, grinding edges and trimming of sheet iron must be carried out in protective glasses. And welding works are in special mask.
Building a stove with your own hands
When everything preliminary the work is done, you can begin the construction of the stove itself.
Foundation
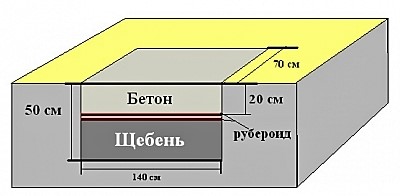
Furnace design quite heavy, so you can't do without a foundation. It will prevent the device from shrinking and deforming.
For a structure that is not heavy in weight, the foundation can be brick. For more weighty it is done bulk - depth up to 50 cmTo ensure that the stove is at a convenient level, supports of the required height are concreted into the foundation.
Further work is underway after complete drying foundation.
Assembling the structure: photo
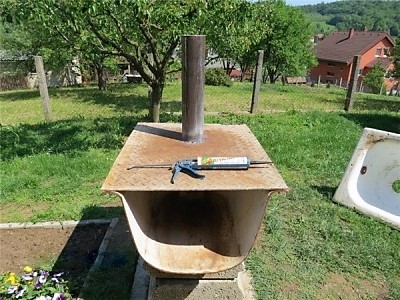
- Half of the bath, which is reserved for the lower firebox of the furnace, coated with sealant, covered with pre-cut top sheet of iron with a welded chimney. You can insert a cast iron into this sheet hob.

Photo 1. A cast iron bathtub, carefully cut in half, is prepared for the application of sealant.
- Above is the structure is covered by the second half baths, bottom up, passing the chimney pipe through a pre-cut hole. The edges that come into contact with the metal sheet are also coated with sealant.
- Both halves of the bath and a sheet between them are fastened together with bolts.
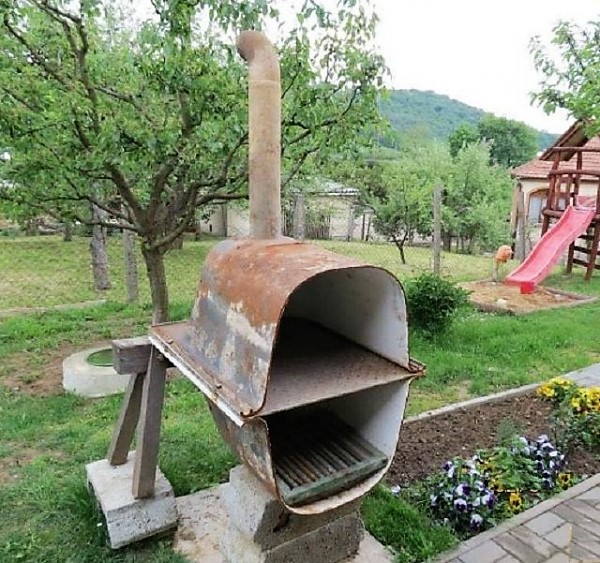
Photo 2. The connected halves of the bath form the body of the stove: the firebox and the compartment for cooking.
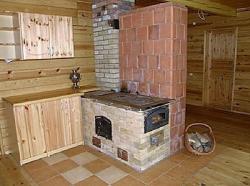
- Finished construction is attached to supports in the foundation and is covered with bricksThe masonry can be only at the back and sides or on all sides.
- The lower part, the combustion chamber, is installed grate.
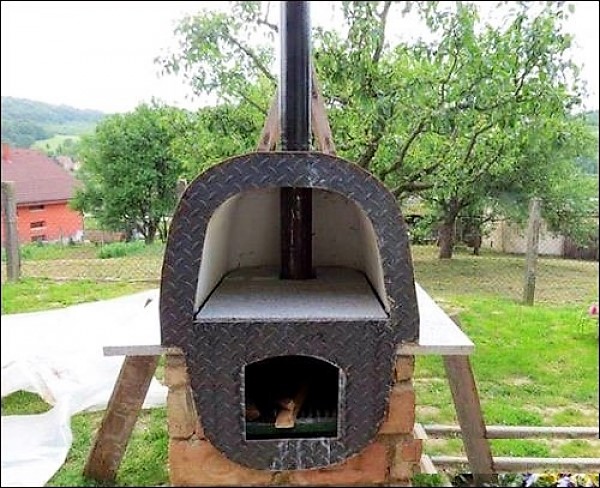
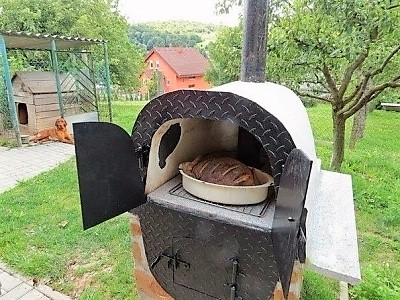
Photo 3. The stove, assembled from two halves of the bath, is almost ready. It remains to attach the doors.
If the design of the stove provides for a firebox and ash pit closed with brickwork, then when working immediately doors are being installed: for the ash pit in the lower part, for the firebox - slightly higher, opposite the grate.
Important! The damper or door handle must be wooden to avoid burns.
The wall is being laid out to the place where the edges of the bath are connected to each other. The bricks should fit tightly to all edges of the stove.
For the upper compartment stoves are provided damper or doorsIn the tightly closing part you can not only cook any dishes, but even bake bread.
Insulation of the cooking chamber
Upper half is tightening with a chain-link fence, is thrown in a solution of 1 part clay and 2 parts sand, thickness up to 7 cm and is leveled. You can decorate the top wild stone, in pieces heat-resistant tiles or simply whitewash.
The final stage
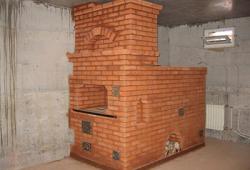
That's it - the oven ready, it can already be used. But many are trying to give it a more modern look, for which the rough work is hidden beautiful brickwork, are being faced wild stone or decorative tiles.

Photo 4. The finished whitewashed cast iron stove from the bathtub, installed in the garden on a brick base.
Possible difficulties during work
Problems when constructing a garden oven, problems may arise at the preparatory stage when cutting an old cast iron bathtub.
Advice. The work is carried out in glasses and thick clothes, covering the body.
It needs to be cut carefully, slowly. First, the enamel layer is cut along the marking line to prevent chipping. Then the cast iron is cut at an angle, making small cuts, and not allowing the grinder to overheat. To prevent the disk from being pinched by the halves of the bath, the incision site is expanded with a wooden stick or a brick.
Useful video
Check out the video that demonstrates a cast iron stove made from a bathtub: what bolts and sealant are needed for construction, what can be cooked in such a stove, how the design is arranged.
Advantages of a garden stove
An idea to make an outdoor stove from a bathtub very practical, because it solves several problems at once:
- gets rid of unnecessary things (old bathtub);
- allows save a decent amount on construction costs;
- gives the opportunity cook amazing dishes all year round;
- significantly saves gas or electricity.
Beautifully made stove from an old bathtub becomes an exclusive decoration garden plot and allows you to diversify the range of your favorite dishes.

Comments
I built this stove a month ago according to your instructions. All members of our family are simply delighted! It doesn't require much firewood to heat up, it holds the temperature very well. I can especially recommend using this stove for cooking trout in foil with lemon, the taste is amazing due to the even distribution of temperature throughout the stove. I recommend it to everyone!
I have already adapted two of them for a small decorative lake. I cut off the side walls, connected two tubs and welded them with electric welding using the "butterfly" method. I buried the structure in the ground. I painted the container with blue enamel for metal. You can dust it with spray cans, but I had some leftovers from painting a car. It turned out beautiful. My wife enjoyed it around the flowers, we released some crucian carp fry. It seems like it came out of nothing, but it turned out to be a cozy corner.