It's time to make life more comfortable: building a small brick oven for a summer house with your own hands
They build in summer cottages heating or heating and cooking mini-ovens made of brick. These structures allow you to heat your home in the off-season and in winter.
A stove designed exclusively for heating is built if the summer cottage has gas and electricity all year round. If there is nothing to cook food on, stoves with a hob are built.
Content
Schemes of small brick ovens
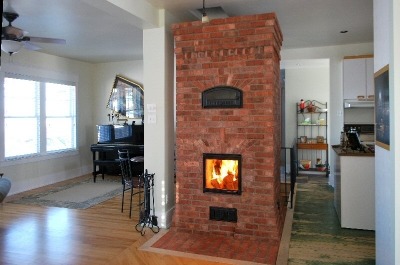
Compact ovens don't take up much space, which is especially important for small areas. Heaters have rectangular section at the base. Height stoves depends on the height of the building and the model chosen. A brick chimney is often replaced with a factory-made steel pipe.
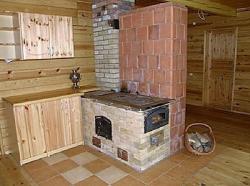
Heating and cooking mini-stove
Small stoves designed for heating the home and cooking food are equipped with niche for the stove.
In another niche, located above the firebox, you can build in oven, water heating containerThe niche space is often used for drying clothes.
Let's consider a specific diagram of a compact stove with dimensions base 0.64 x 0.51 meters (2 x 3.5 bricks) And 2.15 meters high (32 layers of masonry).
This model of heater is designed for heating small and medium-sized houses with an area of from 25 to 40 square meters. Solid ceramic (ordinary) brick is suitable for laying.
The stove is built in the kitchen (in the middle of the room or against the wall). The stove of this model has the following design elements:
- combustion chamber;
- ash pit;
- smoke channels;
- hole for cleaning smoke channels;
- hole for the construction of a chimney;
- niche with cooking surface;
- a niche for installing an oven or a hot water tank.
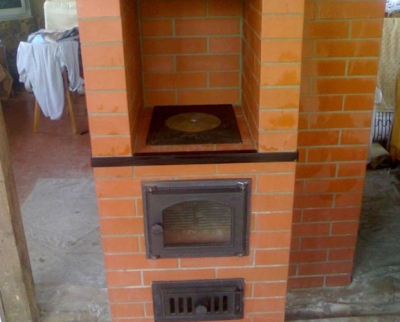
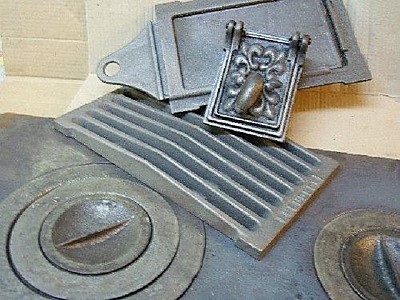
Metallic heater elements buy in a hardware store. In the list factory parts include:
- firebox door size 20 x 20 cm (solid cast iron or with fireproof glass in a metal frame);
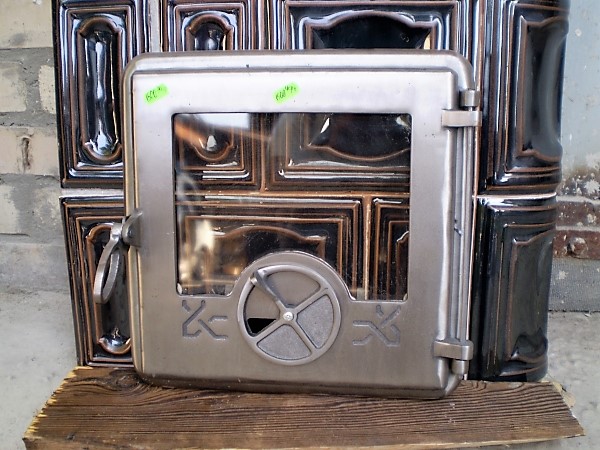
Photo 1. Firebox door measuring 30 by 30, made of polished cast iron and fireproof glass. There is a possibility of traction regulation.
- blower door (14 x 14 cm);
- 2 doors for cleaning smoke channels (20 x 14 cm);
- grate (45 x 25 cm);
- cooking deck size 20 x 35 cm (with or without hole);
- 2 valves;
- steel angle profile length 50 cm (attached between the firebox sheet and the stove wall);
- metal sheet pre-firebox size 50 x 60-70 cm.
Oven and hot water tank welded from sheet steel. Under firebox sheet asbestos cardboard of the same size is laid. For furnace work you will need:
- 222 units full-bodied red bricks;
- ready masonry mixture for fireplaces and stoves (or a solution of sand and ordinary clay taken from the quarry).
Small heating device
Let's look at a specific heater diagram. Base This model has a rectangular shape with dimensions 0.89 x 0.51 meters (2.5 by 2 bricks). Height stoves - 2 meters 38 cm.
Compact dimensions allow you to build a heater in a corner or in the center of the room. If the dacha has a kitchen and a couple of living rooms with a total area up to 40 square meters, the heater is built into wall openings (interior partitions).
Main elements this model:
- firebox;
- ash pit;
- smoke channels;
- chimney outlet.
A door with heat-resistant glass in a metal frame or a solid cast-iron door is built into the firebox portal. The stove is built on a solid foundation, buried in the ground. The foundation is made solid or columnar.
Important! The oven is laid out from ceramic and fireclay bricks. The firebox is laid out of fireclay bricks, and the lower and upper parts of the heater are laid out of ceramic bricks. The masonry is done on sand-clay and fireclay solutions.
Making a small stove for a summer house with your own hands
In this example, we will consider in detail the preparatory and main work on the construction of a compact mini-heating stove at the dacha. Important points The works are:
- choice of ready-made project;
- choice places in a summer house for building a stove;
- acquisition materials;
- purchase of metal parts and accessories;
- preparation of the stove tool, purchase or rental of power tools (grinders, vibrating drills);
- construction foundation;
- construction stoves.
Selecting a ready-made project
The main requirement to the heater - the ability to give off heat for several hours after heating. Of considerable importance is the rapid heating of the house with economical combustion of fuel. To choose from also influence:
- weather conditions region during the winter months and off-season;
- square country house and the number of heated rooms;
- price materials.
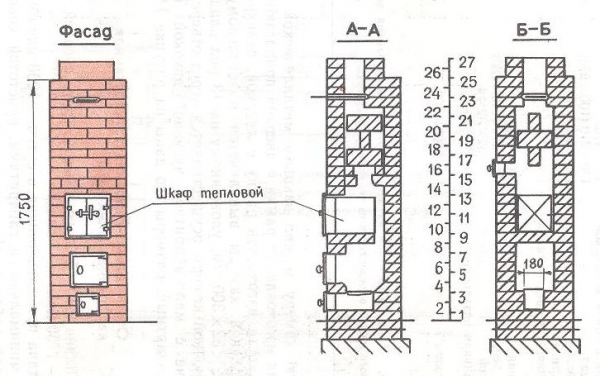
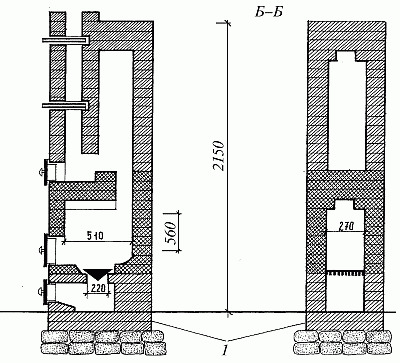
Photo 2. Example of a drawing of a small heating brick stove with dimensions. On the right is a sectional view, the order is indicated.
The choice of model is influenced by the tastes of the owner of the houseA well-built heating stove of this design is capable of not only heating, but also decorating a country house.
Materials
The choice of quality materials allows you to build a reliable oven. For work will be needed:
- ceramic bricks (260 units);
- fireclay bricks (130 units);
- factory (ready-made) mixtures for furnace work (clay-sand and fireclay-sand).
When choosing fireclay bricks for the firebox, pay attention to the markings. Bricks with letter "U" are made from recycled, secondary fireclay. They have lower strength values compared to bricks with letter "Ш".
Suitable for laying the lower and upper parts of the heater ordinary red brick. The quality of the material is judged by the presence of cracks, black spots from factory firing. If the batch contains a lot of broken, cracked, over-burnt bricks, it is better to look for the material in another store.
The mixtures are diluted water according to the instructions on the package. You don't need to add salt or other ingredients.
Advice. Masonry paste of normal consistency, applied to a spatula, does not fall or flow when the instrument is tilted 45-55 degrees.
The metal parts of the stove are purchased at a hardware store. For this design you will need:
- firebox door size 30 x 20 cm;
- blower door size 20 x 14 cm;
- 2 cleaning hole doors - 20 x 40 cm;
- grate (40 x 23 cm);
- roofing felt (60 x 100 cm), two segment;
- steel sheet size 50 x 70 cm;
- asbestos slate (50 x 70 cm);
- steel angle (rolled product) length 50 cm;
- 2 Furnace dampers size 13 x 13 cm.
To secure the doors to the masonry you will need 6 meters steel wire diameter 1-2 mm or steel strips (1.65 meters), bolts and long screws.
Preparing the foundation
The size of the foundation depends on the specific construction conditions. Minimum the thickness of the base for this model of small oven is 55-60 cm.
The foundation is built in such a way that it blocked the soil freezing zone, A little towered above the floor or was flush with it. Concrete, steel reinforcement, brick, rubble stone, sand, crushed stone, and waterproofing roll material are used for construction.
For a compact small furnace, a monolithic reinforced concrete foundation is suitable. Installation and pouring are carried out in the following order:
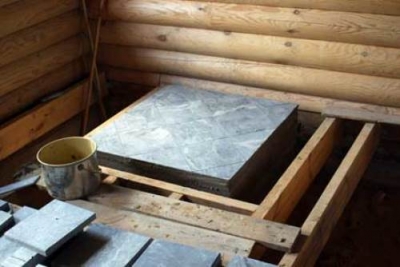
- A pit is dug in the ground, the dimensions of which exceed the perimeter of the future stove 10-20 cm on each side.
- The bottom of the pit is leveled and compacted.
- A layer of fine gravel is poured into the hole (22-25 cm), on it - a layer of medium-grained sand (15-17 cm).
- The loose stone cushion is leveled and compacted.
- The pit is lined with roofing felt and roofing felt, and the joints are coated with mastic made from bitumen and tar.
- They install it in the pit formwork to the required height, a grid of steel reinforcement is installed inside it.
- The pit is filled with concrete, and a vibratory drill is used to compact it and release air bubbles.
- After the cement has completely set and dried, it is placed on the base two waterproofing layers from roofing felt.
- Two layers of firebrick are placed on top of the roofing felt (on mortar).
Construction of the brick oven itself
Before starting work, the masonry mortars are mixed. Brickwork is carried out on strictly horizontal surfaces. This parameter is checked at the stage of foundation construction. Below is a description of the row laying of the heating mini-stove.
1 row. According to the scheme, bricks are laid, forming an ashpit. The lower frame of the ashpit door is fixed in the ashpit portal.
2-3 rows. Laying according to the scheme.
Row 4. Fixing the blower door in the masonry, masonry according to the diagram.
Row 5. Laying out the firebox. Installing the grate. Installing the firebox door into the portal (placing the fasteners into the seams).
Rows 6-9. Laying the firebox according to the diagram. Fastening the door holders into the seams.
10-12 rows. Firebox masonry.
Rows 13-15. Laying the firebox vault, forming the furnace smoke channel.
Row 16-17. Laying according to the scheme, building in a door for cleaning the smoke channel. Sealing the door fasteners into the seams.
Rows 18-24. Formation of smoke channels of the furnace.
Row 25-26. Installing a door for cleaning the smoke channel. Forming smoke channels.
Row 27. Laying of channels.
Row 28. Installation of the lower valve, laying of channels.
Rows 29-31. Formation of channels, work according to the scheme.
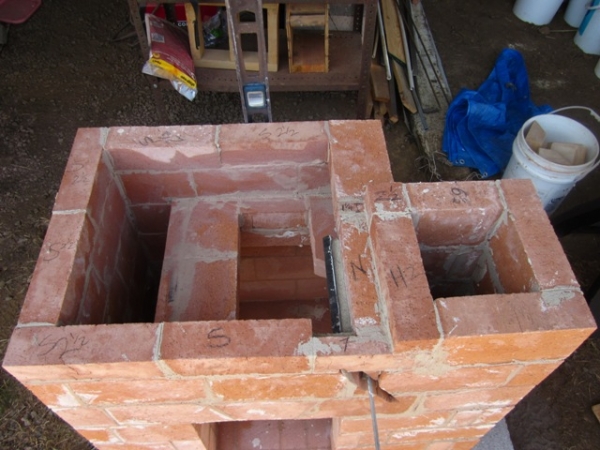
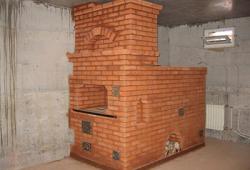
Photo 3. The middle of the furnace construction process: the firebox is installed, the formation of smoke channels begins.
Row 32. Solid masonry, closing of channel arches, formation of a chimney. Installation of the upper damper.
Rows 33-34. Solid masonry with the formation of a chimney.
Row 35. Construction of the first layer of chimney masonry.
Possible difficulties and problems
Inexperienced craftsmen do not use a frame of wooden beams and a plumb line when constructing stove walls, which leads to deviation of walls from the vertical.
If during the construction process it is discovered skewed walls, the masonry should be dismantled and re-laid.

After finishing the work and allowing it to dry naturally, the mini-oven is heated with small portions of firewood.
At the same time, the stove walls become covered with cracks due to the fact that shrinkage processes are taking place in the heating structure. To eliminate cracks, a solution is diluted and the seams are sealed.
Incorrect fastening of the door fasteners can lead to its displacement. To avoid door skew, it is not left open until the fasteners are completely sealed in the seams. If a shift is detected during construction, the rows are dismantled and the fasteners are sealed again.
Useful video
A video in which a 3D model shows the step-by-step construction of a small stove for a summer house: for clarity, each row is painted in its own color.
Where is it more efficient and safe to place a small-sized stove?
To heating the stove effectively gave off heat, it is placed in the middle one-room dwelling or built-in in interior partitions. Heating and cooking small stoves are placed in the center of the kitchen or against the wall.
The heating facility will be safe, if the ceiling is properly partitioned. A spark arrester is placed on the chimney.
The firebox is a source of increased danger. The furnace is placed so that embers and sparks did not fall on the walls, in doorways, on furniture. If necessary, the walls are protected non-flammable materials (flat slate, ceramic tiles).

Comments