Multifunctional heating device: rules for building an inexpensive stove-fireplace with your own hands
A fireplace stove is a universal device that, when placed in a room, can add coziness to it and also act as a convenient device for heating your home.
If such a stove is placed outside, it becomes a device for cooking.
Content
Types of fireplace stoves with a chimney: drawing and diagram
Common several basic plans fireplace stoves that are located indoors, for example, in a private home.
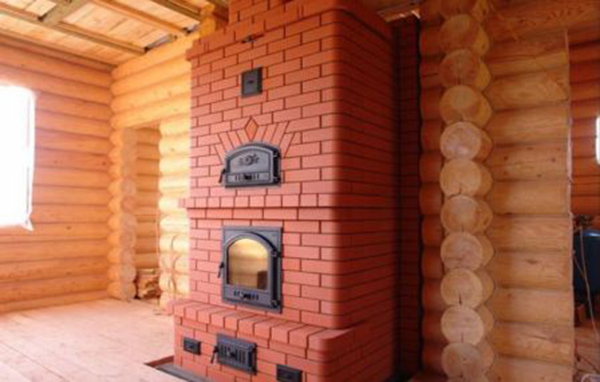
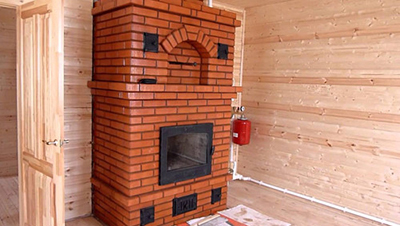
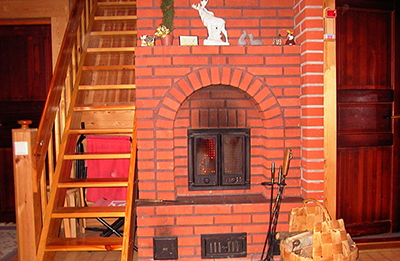
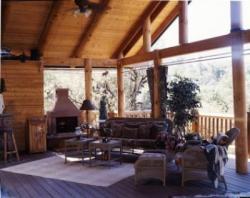
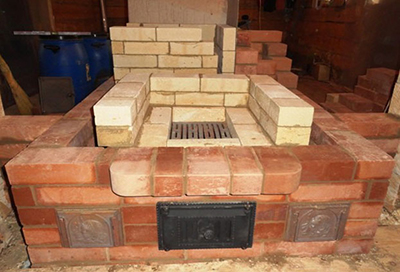
Photo 1. A red brick heating stove-fireplace is installed in a spacious room of a wooden house.
The first option being considered is stove with a large bench, which is a fairly large structure, not suitable for small houses.
However, this design has a number of advantages:
- Can perform the function of heating the roomIf the smoke channel system in such a stove is made taking into account the need to heat several rooms, then the chimney can also heat the rooms that are located along the chimney itself.
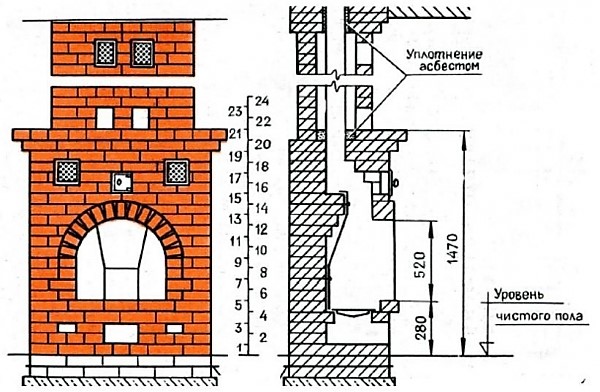
Photo 2. Drawing of a simple heating brick fireplace stove with rows and dimensions in millimetres.
- In case of construction of a structure with cooking chambers, a stove can replace a kitchen stove or, in case of problems with gas supply, act as the main means for preparing various dishes.
- If necessary, the stove bench, built as an extension to the stove, can be used as additional sleeping place with heating.
- Creating two fireboxes This design allows heating only the part that is needed at a particular moment in time, and the use of both fireboxes increases the heat output of the building.
The diagram of such a structure looks like this:
- two blowers with doors, located under the fireboxes - one under the fireplace, the other under the stove;
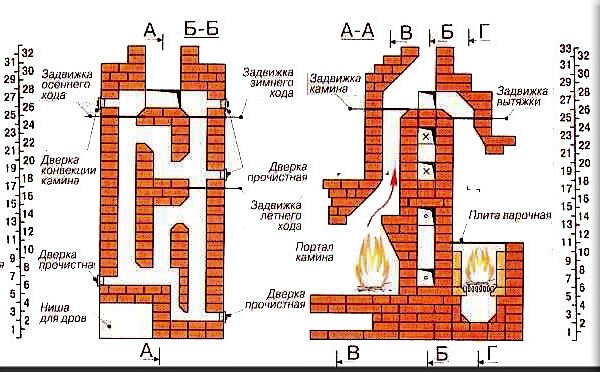
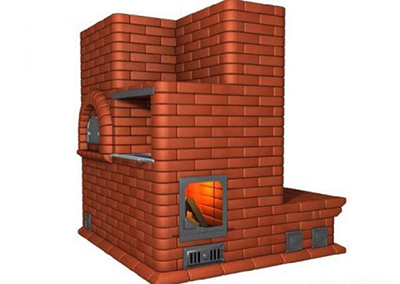
Photo 3. Diagram of a multifunctional brick fireplace stove with a hob and a second firebox. The location of the smoke channels is shown on the left.
- smoke channels for each firebox, which, if desired, can be combined into one chimney;
- the firebox of the stove and the fireplace part itself, which, if necessary, can be brought out to opposite sides of the structure and, thus, will be located in different parts of the house;
- chimney, which can go through several rooms.
Important! The large dimensions of the structure arise from the creation of a full-fledged bed.
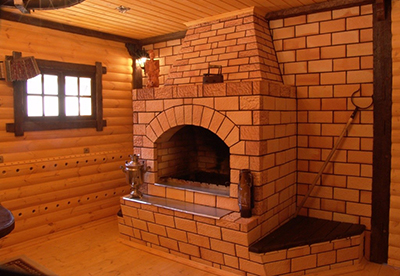
Wall-mounted heating stove made of brick
This version of the stove is a fairly compact design, intended for heating, as well as to create cozinessIt takes up much less space in the room, but it is problematic to use it for cooking.
Key feature This device is both a fireplace and a stove.
They are combined into a structure that can, if necessary, be heated and act as a heating device. for two rooms at once, to the adjacent walls of which it is attached.
The drawing of such a design looks like this:
- ash pit under the furnace firebox with a system of smoke channels to remove excess gaseous combustion products;
- firebox with grate and ash pan;
- fireplace insert with portal and smoke channel system to remove smoke into the flue;
- a smoke duct in the form of a single pipe.
Reference! The hob is absent in such a design, which does not allow cooking on it. The furnace channels from each firebox are better combine into one chimney, which will not worsen the draft in any way, but will allow you to save on material.
A variation of this design can be a fireplace stove, which the base is a squareThe device is used to zone rooms if such a design task is set before it.
What is the difference between a multifunctional heating stove
This type of heating structure is complex design, which meets several tasks at once:
- heating of the room (can be used both as an independent heating device and in combination with existing gas units);
- cooking, provided that the appropriate devices are installed in such a structure;
- decorative task when using a fireplace.
In terms of its dimensions, the design is distinguished by the fact that it can be either very big (for example, in the case when a bed is attached to it), and relatively compact (if a limited number of cooking utensils are used).
Its diagram looks like this:
- blower for stove and fireplace firebox;
- you can place it under the fireplace a niche for drying firewood;
- smoke channel system from each cooking appliance (if they are self-heating);
- smoke exhaust (there may be one for all the heating parts of the stove, sometimes an independent element is designed for each part).
Attention! When placing such a structure in a house, it is best to place it fireplace part in the living room or bedroom, and a firebox and devices for cooking - towards the kitchen.
How to build a fireplace stove with your own hands: step-by-step instructions
This process, regardless of what kind of stove is being built, is standard for any similar brick structure and consists of the following stages:
- Selecting a construction project. At this stage, it is determined which plan will be optimal based on the area of the room, the purpose of use and the final design project.
- Selecting a location. The placement of a fireplace stove will require more space than other similar structures due to the large dimensions of the final structure.
For this reason, after the construction of the structure is completed, there must be sufficient space left for servicing such a device. In addition, it is necessary to comply rules for ensuring fire safety of premises, in which the stove is built.
- Preparation of tools and materials for construction. Particular attention should be paid to these things, as a large amount of not only fireproof materials, but also thermal insulation materials will be needed to reduce the risk of heating up surrounding objects and igniting them.
- Actually construction of a furnace from pouring the foundation to laying chimney and bringing it out onto the roof of the house.
Each stage must be carefully analyzed and executed in strict accordance with the final construction goals.
Selecting a project and size
The plan of the stove that you are going to build with your own hands is selected based on several factors determining factors:
- room dimensions, in which the construction of the structure is carried out;
- purposes of use (only for creating comfort, for heating, for cooking, heating and achieving aesthetic goals);
- amount of material, which can be used;
- ensuring maximum fire safety within a separate house.
When choosing the optimal project, you need to take into account your capabilities.
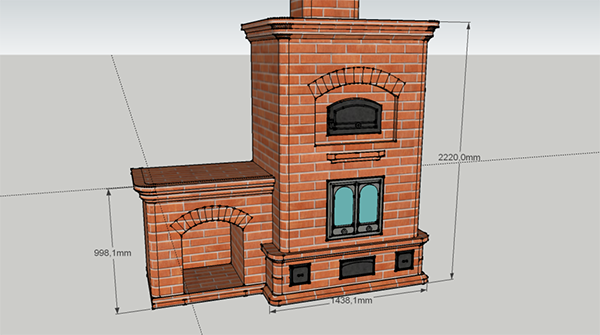
Photo 4. A project for a heating stove-fireplace made of bricks with all dimensions indicated must be made before the start of construction.
Location
It will be necessary to determine the right place in the house for such a complex structure correctly, since it will not be possible to move the constructed structure in the future – the foundation is poured in one place in the form of a massive slab, and all subsequent furnishings are erected around such a structure.
Important! In order for the stove-fireplace to fit successfully in the room, it is necessary that all objects that may be damaged by the heating of the structure or cause a fire, were located at the maximum distance from the device.
To service the building you will need big place around. Cleaning out ashes and coals will have to be done quite often with regular use of the structure, which makes this work very dirty and can spoil the appearance of the surrounding environment.
Chimney cleaning It will also require a fair amount of space around it, as it is not uncommon for additional equipment to be used during this process.
Equipment of materials and tools
To build a brick fireplace stove yourself, you will need the following materials and equipment:
- two types of brick: fireclay and facing;
- fireclay clay for mortar when laying places that have direct contact with fire (can be replaced with fireclay powder sold in hardware stores);
- cement for pouring the foundation and laying the top facing layer of bricks;
- doors for the ash pit and firebox, and also, if necessary, for the fireplace portal;
- grate bars.
The following tools will be needed:
- buckets;
- shovels;
- level and plumb lines;
- drill with brick drill bits;
- hammer.
If you need to cut the brick, you will need a grinder.
How to make a foundation yourself
The most favorable time for pouring the foundation for the stove will be construction of the foundation of the house.
If the entire house is already built and the floors are laid, you will have to cut out some of the boards and dig a pit for the foundation in the finished room.
If you are cutting boards from a finished floor, it is best to make the opening larger than the base of the appliance itself. by 150–200 mm, which will make the construction procedure easier.
- Optimal depth the pit is 50-60 cm, which will help ensure maximum stability of the structure.
- It is placed at the bottom of the pit sand cushionIts height is from 10 to 15 cmIt must be compacted, and approximately the same layer of crushed stone is poured on top, which is also compacted.
- The foundation itself is poured due to its depth in at least two stages, to achieve its maximum density and quality.
- First layer can be poured from a rough solution consisting of sand, cement and crushed stone.
- Subsequent layers are poured using a mixture with a ratio of 1:3 from cement and sand. The solution itself should be as plastic as possible.
- Each layer is poured at least three days after the previous one. The topmost layer is leveled and, if possible, left under some kind of pressure to strengthen the resulting foundation slab. The final hardening takes place within a period of at least three to four weeks.
- On top of the finished and hardened base, you need to fold waterproofing layer made of roofing felt, which is cut exactly along the contour of the foundation (a small overlap can be allowed, which will later be cut off after laying the first layer of brick).
After pouring the foundation and laying roofing felt on it, they carry out dry masonry to determine the actual dimensions of the stove, as well as the amount of material that will be required. After this, the construction of the structure begins.
How to lay masonry: row by row
Particular attention should be paid when starting construction work first row.
They are posting it as smoothly as possible, which will allow us to achieve the ideal position of the order of the entire structure in the future.
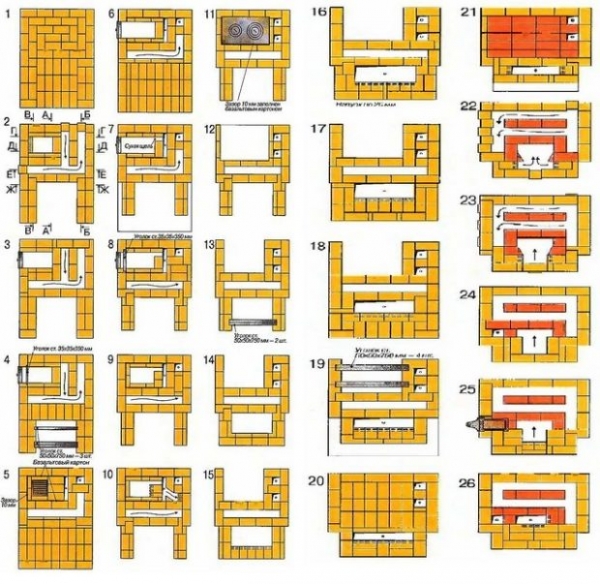
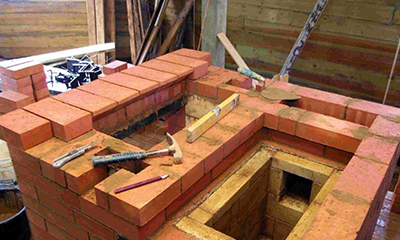
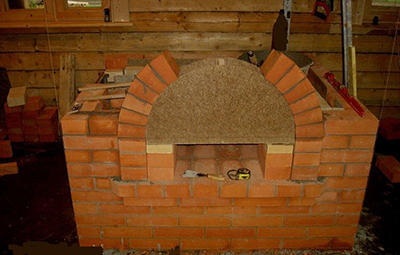
Photo 5. Beginning of the row-by-row construction of a brick stove with a fireplace and a hob. Next comes the formation of the chimney.
- When laying first row It is necessary to draw the location of the entire device on the roofing felt, and, if possible, place drawings of the nodal bricks.
- Second row It is laid out according to the selected drawings and diagram with the first outlines of the smoke channels, as well as the fireplace firebox and ash pit.
- Third row is laid out according to the scheme and fixes the ash pit door. Fixation is carried out using two bricks (they will be removed when laying subsequent rows), as well as using wire, which is embedded in the masonry.
- On the fourth row the firebox begins to form: metal corners or a metal sheet are placed in the place indicated in the diagram, on which the next bricks will later be placed.
- On the fifth row The grate is placed over the ash pan, and the remaining bricks are stacked according to the diagram.
- On the sixth row The stove door is installed in a manner similar to the installation of the ash pit door.
- Rows seven through ten are laid out without creating additional holes.
- Eleventh row It is laid out according to the diagram, and a hob is installed above the firebox.
- Thirteenth row It is also laid out according to the diagram, a metal sheet is placed above the firebox, with the help of which it is planned to form the smoke channel of the fireplace in the future.
- Nineteenth row They cover the chamber above the hob with metal strips, so that on the twentieth row they can cover it with bricks.
- From the twentieth to the twenty-fourth row no metal elements need to be installed.
- On the twenty-fifth row A metal valve is installed, the first one in the row, used to regulate the outflow of smoke and heat.
- From the twenty-sixth to the fifty-third row The installation is carried out in accordance with the diagram, and starting from the fifty-fourth row, the smoke exhaust is laid.
- Sixty-fifth row is formed by installing valves to completely block the smoke exit from the pipe.
- The next step is pipe outlet to the attic through a special hole, around which heat-resistant thermal insulation of the structure is installed to ensure safety from possible fire.
- The pipe structure is laid on the attic and roof according to the pattern of the sixty-fifth row, after which moisture insulation is laid around it.
- The hole in the pipe is eventually installed metal umbrella shaped visor, which will protect the chimney ducts from rain and possible debris. An additional mesh can be installed.
The portal of the device is laid out using circles in the shape chosen by the customers or persons who created the project.
Difficulties in building the device: what can be redone?
When building a brick fireplace stove, the following difficulties may arise:
- Foundation cracking due to incorrect pouring or insufficient drying. Can only be corrected by disassembling the structure.
- Long drying time of the solution. Can be remedied by gradual drying after construction is completed.
- Incorrect functioning of the chimney due to errors in its laying. It can be redesigned by partially disassembling the flue for re-laying, or by creating additional adjustment holes for forced draft.
Useful video
The video provides step-by-step instructions for creating a fireplace stove with high heat output.
In conclusion
A fireplace stove can be built in a short time frame, but this will negatively affect the quality of the structure.
The minimum time in which the structure can be built is at least two months taking into account the drying of the foundation. First heating shall be carried out no earlier than three days after the final completion of all construction work.

Comments