How to add a touch of exoticism to your life with your own hands: a drawing of a Pompeian oven
A Pompeian (also Italian or Roman) oven is a type of cooking device. They allow bake pizza or bread, as well as prepare other dishes from world cuisines.
This type of cooking device appeared on Iberian Peninsula and subsequently became widespread among the peoples of the Mediterranean.
The closest analogues are the Russian oven and tandoor.
Content
Pompeian wood-fired oven: features
Home peculiarity The design of the Pompeian ovens consists of the presence of domes, ensuring uniform heat distribution, minimizing heat loss and optimal draft.
This makes the Pompeian oven indispensable when baking classic Italian pizza at home.
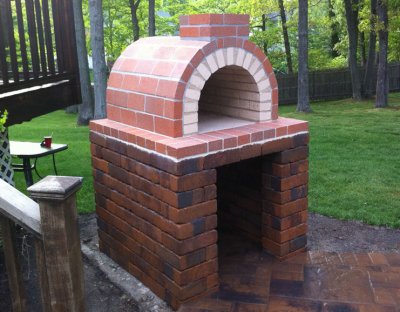
Pompeian ovens are comparatively different compact size. The optimal (and most common) placement option is to install the device outdoors.
Principle and operation
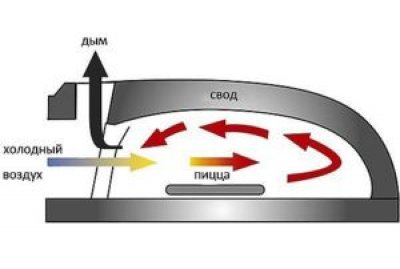
Regardless of the size and design, the general operating principle of Pompeian ovens remains the same: convection thermal energy flow from fuel combustion rises from the hearth (lower horizontal plane of the firebox) and is reflected from the vault of the domeThe entire inner chamber acts as a heating element.
In addition to the uniform distribution of thermal energy, the design of the Pompeian furnaces ensures natural regulation intensity of fuel combustion, thereby eliminating the possibility of deviation from the optimal indicators. This aspect is explained by the fact that the chimney of the Pompeian furnace is located in the front part of the structure, directly above the mouth of the inner chamber.
Design
The diagram of a classic Pompeian oven includes the following elements:
- foundation and pedestal;
- table top;
- dome with an arch;
- pipe chimney.
The large weight of the finished structure requires the presence of a solid foundation and pedestal. The latter is constructed from cinder blocks, and a reinforced concrete slab (optimal thickness 100 mm) is used as a countertop.
Important! Regardless of the shape and size of the structure, height of the stove entrance on average is half the height of the dome, A the width is equal to its height.
Varieties
The most common types of Pompeian ovens are Tuscan and Neapolitan.
Tuscan ovens
They are distinguished by their compact dimensions. The dome is a regular hemisphere, its the height is equal to the radius of the base circle. This option is the most versatile, as in addition to baking pizza, it allows cook and other dishes.
Neapolitan Pizza Ovens
Unlike the Tuscan model, the height of the dome of a Neapolitan oven is 80% of the radius of the base circleThe design of this type of device is intended for making pizza, here it is baked much faster.
Advantages and disadvantages
Among the main advantages of using a Pompeian stove:
- Tall heating speed. You can put food in half an hour after kindling. In an hour the temperature inside the oven reaches the value at 370 °C.
- Tall heat transferThe heat accumulates inside the body and the possibility of cooking is maintained for several hours after the fuel has burned out.
- Compact dimensions and the possibility of construction on any site.
Among the main disadvantages of the Pompeian ovens, the following stand out first and foremost: complexity and high cost structures, as well as the need for arrangement a solid foundation.
Building a Pompeian Oven with Your Own Hands
Despite the differences between existing types of furnaces, their construction schemes have minimal differences and the main criterion for choosing a specific project will be the dimensions (and, as a consequence, the amount of required resources) of the finished structure. In addition, when choosing a project, the location on the site, as well as the climatic and topographic features of the area are taken into account.
Selecting a project
The choice of a project is primarily determined by requirements to the finished unit. If the oven is needed exclusively for baking pizza, then it is advisable to consider the construction of a Neapolitan model, designed specifically for this. If the planned use of the oven is not limited to baking pizza, then a more universal Tuscan version will do.
Schemes and drawings with dimensions
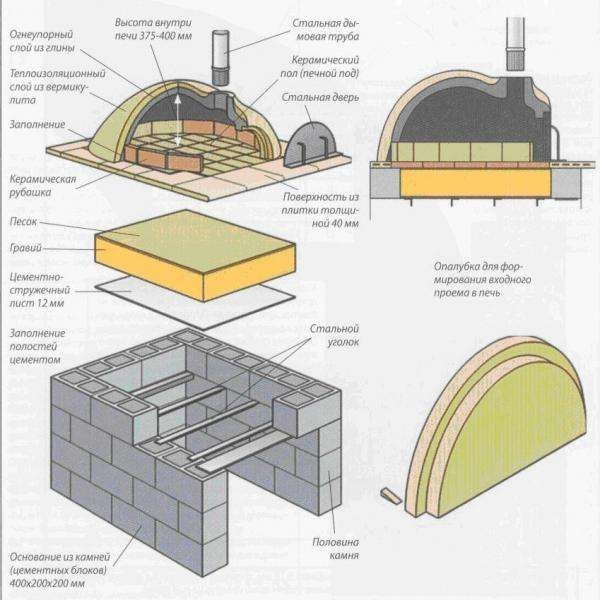
Photo 1. Diagram of the Pompeian furnace. All the main parts of the structure are indicated.
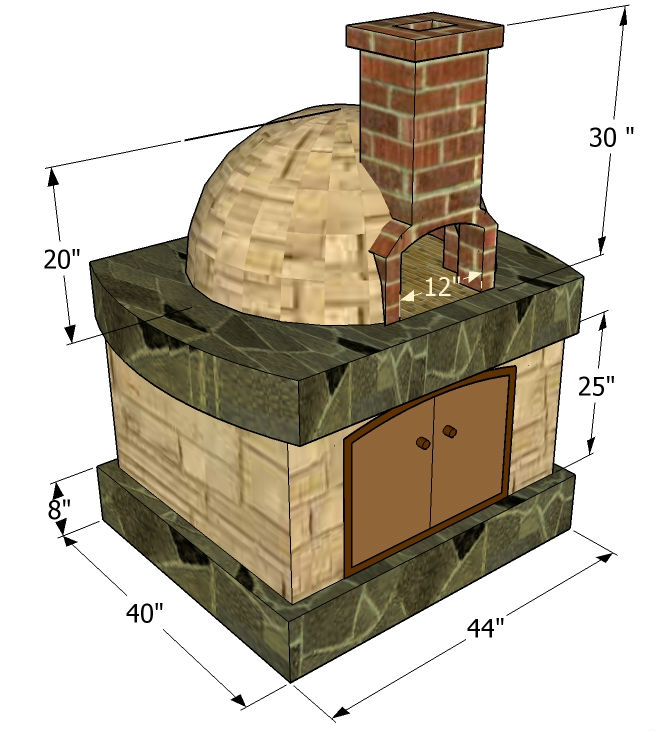
Photo 2. Possible drawing of the stove. All measurements are given in inches (1 inch = 25.4 mm).
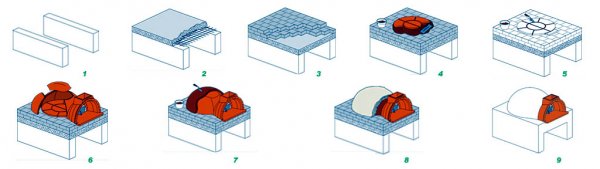
Photo 3. Step-by-step diagram of the construction of a pizza oven.
Materials and tools
To build a Pompeian oven you will need the following materials (the exact quantity depends on the chosen project):
- refractory fireclay bricks - 250-300 pcs.;
- facing brick for the construction of the entrance arch - 20-30 pcs.;
- cinder blocks for the construction of the pedestal - 32 pcs. for the base height 800 mm;
- thermal insulation: mineral wool or calcium silicate boards;
- waterproofing: roofing felt or polyethylene;
- cement, sand, crushed stone;
- mortar (A commercially available ready-made solution of the brand is suitable SHA-28);
- boards for the construction of formwork (width not less than 150 mm);
- reinforcement (diameter 8-10 mm) and metal wire.
When choosing bricks and cinder blocks, you should be guided by their appearance: unacceptable the presence of burrs, geometric deformations or other defects. For fireclay bricks, the presence of small rounded recesses with a smooth inner surface on the edges is acceptable - no more than four defects per brick, no more than one per edge.
Attention! Sand for the solution, should not contain any impurities. A simple way to check is to pour a small amount into a transparent bottle, add water and shake. After 24 hours, the water should be clear (or slightly cloudy). The opposite result indicates low quality of the material.
Tools required:
- level, tape measure, plumb line, protractor;
- trowel, spatula, chisel;
- Bulgarian;
- capacity for solution and water.
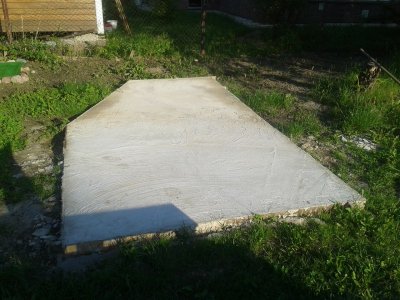
Foundation
The heavy weight of the Pompeian oven requires a strong and reliable foundation. Optimal The season for carrying out work is summer.
Attention! If it is impossible to complete the work before the rains start, it is necessary to ensure reliable waterproofing blanks. In case of shallow groundwater depth under the site, a drainage system should be constructed in advance.
At the planned location of the furnace, work is carried out markup. It is important that the area of the foundation exceeds the area of the pedestal. A pit is dug, depth not less than 350 mm. A wooden structure is constructed along the inner perimeter of the excavation pit. formwork for the foundation.
The finished formwork is covered with a layer of dense polyethylene. Medium-fraction crushed stone is poured onto the bottom, on top of which a layer of sand is poured (100-150 mm). Then another layer of polyethylene is laid out.
On top of the resulting waterproofing cushion The cement mortar is poured in. The mortar is mixed from dry cement and sand (in proportion 1:3 respectively), as well as the required volume of water.
The cement is poured in three stages, with intervals of at least two days for each layer to “set”.
Reinforcement of the foundation is carried out after the solution level has reached the edge of the formwork. In order to finally settle, the finished foundation requires minimum three weeks. Ignoring this limitation is fraught with rapid deformation of the furnace.
Pedestal and table top
The pedestal is made of cinder blocks, the height is selected depending on the user's preferences. Minimum recommended parameter - 800 mm.
Attention! Throughout the entire work it is necessary check the design with a building level and, if necessary, promptly correct any errors.
The finished pedestal has H-shaped or U-shape, optimal side length - 1200 mmThe length of a standard block is 400 mm. Therefore, three blocks are required for the base of each side. The cinder blocks are laid "dry", fastened with metal wire. The workpiece is checked with a building level or other measuring devices, after which the solution is poured into the holes of the cinder blocks. Drying takes up to three days.
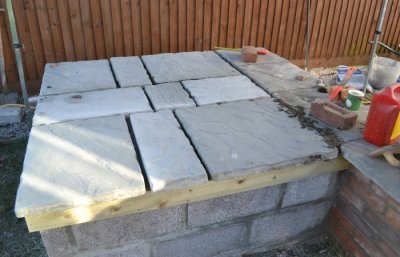
After the pedestal is ready, the tabletop is constructed, the process is similar to creating a foundation:
- In preparation formwork the required size height not less than 150 mm.
- The bottom of the form is lined roofing felt or thick polyethylene.
- A layer of waterproofing is formed on the waterproofing layer. reinforcement mesh with a gap of 50 mmThe places where the edges of the pedestal extend are reinforced with additional reinforcement supports.
- Concrete mortar is poured into the formwork and leveled with a spatula, after which the surface of the future countertop is generously moistened with water and covered with polyethylene.
The recommended period for strength gain is at least three weeksUsing an underdried countertop can result in cracks and subsequent destruction of the structure.
Dome
After the tabletop is placed on the pedestal, the base of the dome is marked on its surface. Diameter circle depends on the selected scheme. According to the markings made in accordance with the order, the foundation is laid out from fireclay bricks.
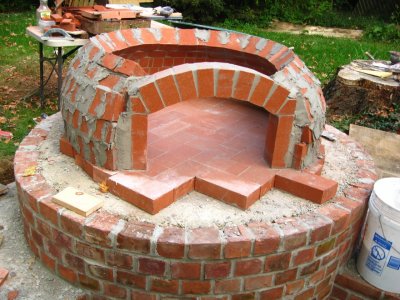
This is how the furnace is formed. It is necessary to use high-quality materials, masonry defects are unacceptable.
Initial installation is carried out without mortar and serves to determine the bricks that need to be cut to comply with the shape of the hearth. Cutting of bricks is carried out with a grinder.
The surface of the table top is laid out in a layer calcium silicate boards, after which the bricks are laid on the mortar in accordance with the diagram. The base of the entrance of the future furnace is laid out so that a rim formed.
After the construction of the hearth the laying of the dome begins. To maintain the required shape and proportions, a cardboard or plywood template is made from intersecting semicircular blanks. First of all, the furnace inlet opening is formed. Bricks are laid on the mortar with minimal gaps.
Further ordering the dome is carried out according to the established template. The masonry starts from the stove entrance and continues to the back of the dome. Laying the next rows requires increasing the distance between the bricks. To maintain the shape of the masonry, wedges must be inserted into the resulting gaps. The masonry is laid according to the scheme until the dome is fully formed. After this, the outer arch is formed. A plywood template should be used for its construction.
Depending on the specific scheme, chimney can be laid out from ordinary bricks or constructed from ready-made metal or ceramic blanks. The height of the chimney also depends on the chosen design option. Upon completion of the chimney installation, all seams are sealed with mortar. After it has gained sufficient strength, the used template structures are dismantled.
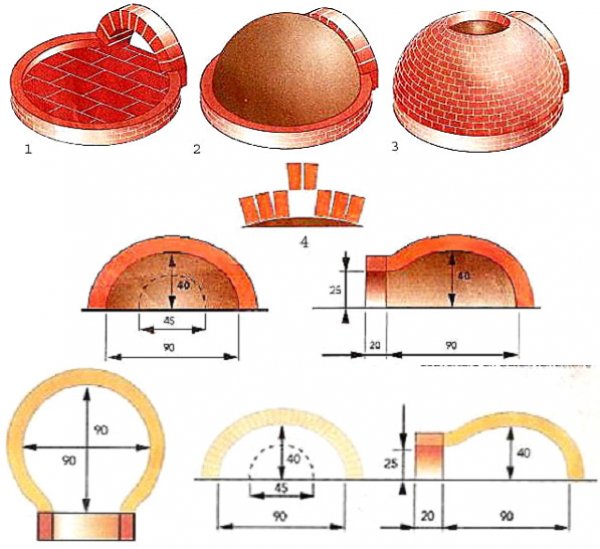
Photo 4. Detailed drawing of the dome from the inside and outside with dimensions indicated.
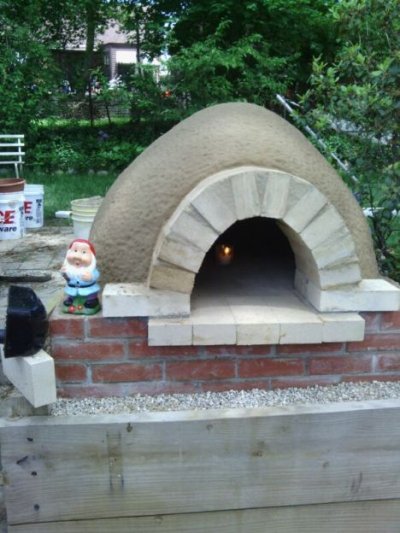
Thermal insulation and cladding made of clay or plaster
The final stages of dome laying are thermal insulation and cladding. Mineral wool or calcium silicate slabs are used as thermal insulation material. The material is laid out on the outer surface of the dome and adjusted to size and shape, after which the insulating layer is fixed with the help of heat resistant glue or special mastics.
The external facing of the stove is made of plaster or clay. If there is no canopy over the structure, it is advisable to make a two-layer facing:
- Interior the layer is being executed heat resistant plaster (maximum layer thickness - 12 mm).
- External the layer is being executed moisture resistant plaster (layer thickness - 4 mm).
The finished Pompeian oven should not be used for at least two weeks from the date of completion of the construction. In case of precipitation, the structure must be covered with a layer of waterproofing material.
Trials
The finished unit is tested after the required drying period has been completed:
- For first kindling the usual is used paper or straw (1.5 kg or 2 kg respectively).
- For second kindling - straw and brushwood (2.5 kg and 0.5 kg).
- For third kindling - 4 kg of wood chips or pellets (use of pellets is only permitted during testing).
- In the course of fourth small kindling is used logs.
- For the next two conventional kindling is used firewood.
Further operation of the furnace is possible only if the tests are successful.
Possible complications
Construction of the Pompeian furnace - complex, expensive and labor-intensive process. The lack of theoretical knowledge and practical skills is fraught with errors that entail both minor defects and complete failure of the finished structure. In addition to physical and financial losses, there is an immediate danger to health and life people.
Achieving optimal efficiency and safety indicators for the finished furnace is possible provided that availability of necessary skills And strict adherence to technology construction.
Using the Pompeian Oven
Despite the high cost and complexity of building a Pompeian oven, the final result the result is worth all the costs. An oven built in accordance with existing technology will allow you to cook classic Italian pizza in compliance with the original recipe. The construction of a Tuscan version will allow you to cook meat, fish, vegetables, various types of pastries, as well as many classic and national dishes in the oven.
Useful video
The video shows in a simple and accessible way how to build a wonderful pizza oven from scratch.


Comments
But it is not clear how to prepare a waterproof solution for the surface layer? With heat-resistant everything is clear - a solution for laying fireclay bricks is used.