Getting to know Eastern cuisine is simple, fast and in any conditions: DIY stove for a cauldron from a pipe
A cauldron is a special type of cookware that is easy to cook in. oriental cuisine.
But this requires special oven, which has its own Pros: quick assembly, high heating rate, relative mobility, possibility of manufacturing from improvised means.
From cons It should be noted: rapid cooling and burning out, the difficulty is in finding a high-quality thick-walled pipe.
Types of stoves for cauldrons
Among metal furnaces, the following stand out: several types of designs:
- simple, on which you can only cook dishes in a cauldron;
- complex or multifunctional — a cauldron or other devices, such as a grill for frying meat or a mobile hot smoking smokehouse, can be used for cooking;
- portable;
- stationary.
The simplest The cauldron is made in the following way: a cylinder is made from a pipe with the upper edge cut in the manner of petals, in which two holes.
At the height 10 centimeters from the top edge under the chimney and approximately 10-15 centimeters from the bottom for the firebox. A grate is installed inside the firebox.
Another option to avoid mixing firewood with already burnt ash is to make mesh bottom a stove on which firewood is placed, and burnt coals and ash fall through holes in the bottom of the firebox onto the ground or a tray installed below.
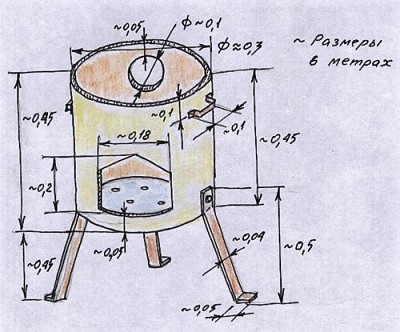
For reference. Optimal size cylindrical part the design is about 800-900 mm, hole diameter for chimney — 100-110 mm, everyone chooses the height of the legs for themselves, so that the cooking process is as convenient and safe as possible.
To avoid spilling of wood and coals, bottom edge it is advisable to place it at a height 100-120 mm from the bottom cylinder, and at a height of 350-400 mm do additional holes to supply the fire with oxygen.
How to make a stove from a pipe
The whole process of building a stove for a cauldron from a pipe consists of three main stages:
- Preparation materials and tools required to create the furnace - selection of a pipe of the optimal diameter, additional elements, electrodes that are suitable for a specific type of metal.
- Creation drawing indicating the specific design features of the stove and the dimensions of additional elements: at what height are the handles, holes, the shape and height of the legs, etc.
- Assembly furnaces in accordance with the created drawing and initial firing to identify possible defects and correct them.
Important! Each stage should be given attention maximum attention, since all of them together work towards the final result.
Selection of materials and tools
To build the stove you will need the following materials:
- Thick wall pipe — the thicker the walls, the better, since such metal will functionally retain heat.
- Pipe for chimney — depending on its diameter, a hole is made for the chimney in the body of the stove.
- Metal corners to create handles for the structure, legs and additional elements of the device.
- Metallic plate for the bottom of the oven.
- Grate — if the project provides for its installation.
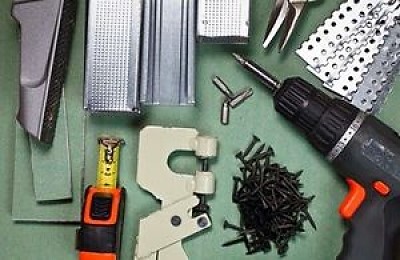
As for the tools used for construction, they include:
- Bulgarian and cutting wheels for it;
- drill and metal drills to create small diameter holes as required by the furnace design;
- welding machine and electrodes suitable for a specific type of metal;
- hammer;
- level;
- protective gloves, glasses and welding mask.
Advice. All materials can also be selected from those available. improvised meansFor example, a thick-walled pipe can be replaced with a gas cylinder, and handles can be made from similar elements of old dishes.

Creating a project
At this stage, it is determined that which scheme is preferable for a specific oven, whether it will be selected for an existing cauldron or whether the cauldron will subsequently be selected for an existing oven, etc.
The design stage meets the tasks of creating a drawing of a specific furnace taking into account all its features. Such a drawing displays not only dimensions, but also location of all major openings, handles and other components.
At the design stage it is displayed information about creating additional elements, for example, a table for food or a firewood rack, are produced calculations of transportation possibilities constructions.
DIY assembly: photo
Assembly is the main stage in the construction of a stove from a pipe. Despite the apparent simplicity, when implementing it, deviation from the drawing is extremely undesirable, as this may lead to violation of design features and subsequent improper functioning of the entire structure.
The furnace assembly consists of certain steps:
- Markup pipes - all openings created in the furnace are made in strict accordance with the drawn up drawing.
- Section pipes and all additional elements according to the applied markings - is carried out with a grinder using circles of different diameters, so it is necessary to remember about safety precautions and protect your eyes and hands when working with this power tool.
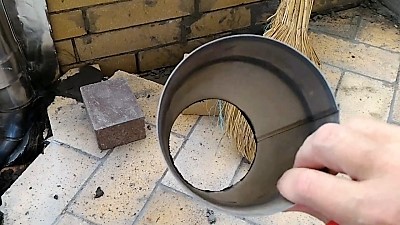
- Initial assembly for testing correspondence of the holes made in the pipe body with the calculations in the drawing.
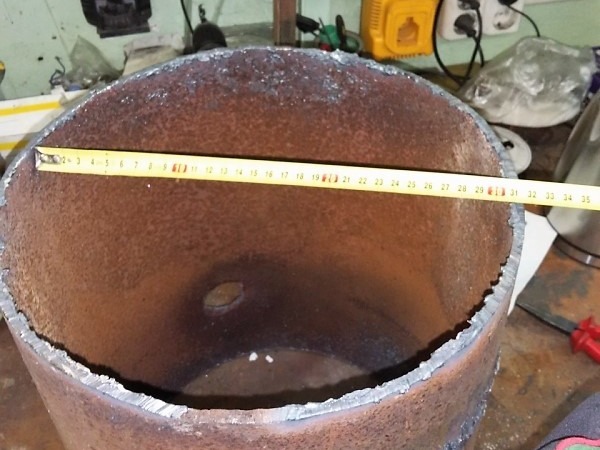
Photo 1. Checking the holes cut in the pipe using a tape measure. The dimensions should match the diagram.
- Assembly constructions using welding for the final finishing of the stove.
Important! When performing any operations with metal, it is necessary to protect yourself from possible injuries with the help of protective glasses or mask, and also gloves. Check the equipment for faults before starting work.
When assembling the stove, the following steps are performed: next steps:
- Top edge pipes and all the "extra" is being cut off using a grinder - all uneven parts that could subsequently cause the structure to become warped are subject to trimming.
- After trimming the result check the cylinder with a level in horizontal and vertical planes.
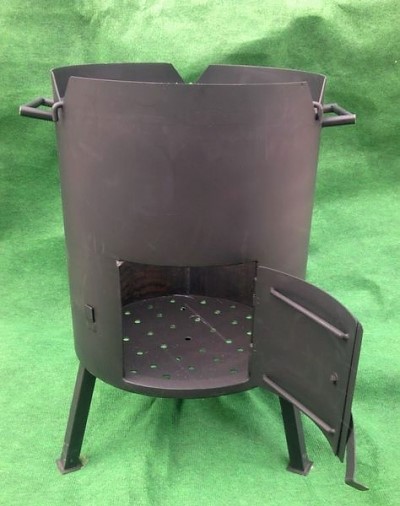
- At a distance 10-15 cm from the bottom is cut out firebox hole. The remaining piece of pipe should not be thrown away, as it can be used to make door to reduce the fire hazard of the stove.
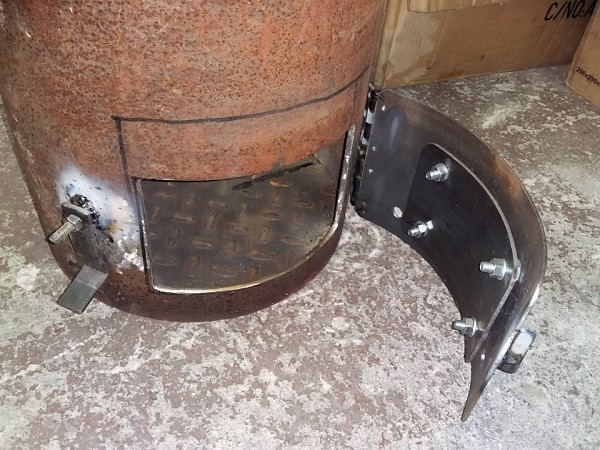
Photo 2. Attaching the door to the stove using bolts on the side of the pre-cut opening for the firebox.
- At a distance of approximately 10 cm from the top edge a hole is cut into the pipe for chimney in accordance with the diameter of the selected pipe.
- On the sides furnaces are made to create an additional flow of oxygen several small holes using a drill or grinder - when creating them, it should be taken into account that too many of them can negatively affect the strength of the structure.
- Using a welding machine the chimney is welded to the main cylinderThe main condition of a chimney is its location. at a right or obtuse angle, which is achieved by connecting the chimney pipe at an angle at 45 degrees.
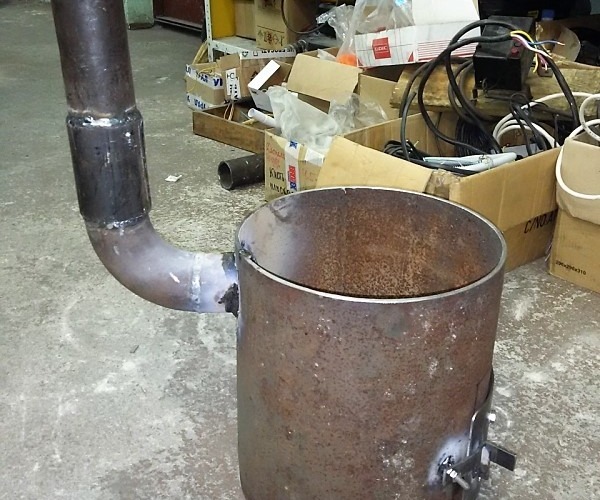
Photo 3. A long chimney pipe welded to an almost finished stove at an obtuse angle.
- Using a welding machine the legs are being mounted structures - each person chooses their number and height, observing the basic rule: maximum stability of the resulting structure.
- It is welded into the base of the cylinder metal plate bottom, and if necessary, use grate — a grate for firewood is installed at the height of the lower edge of the firebox.
- Attached to the top of the device pens.
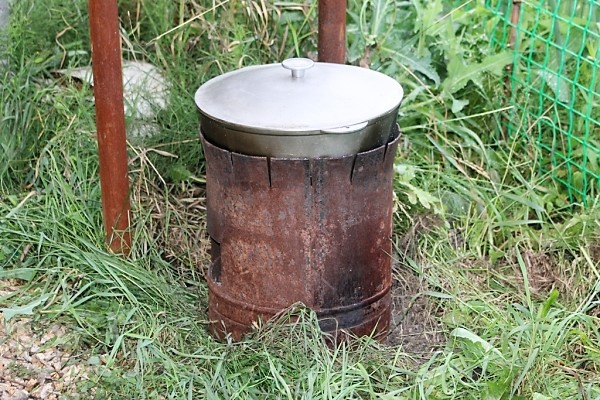
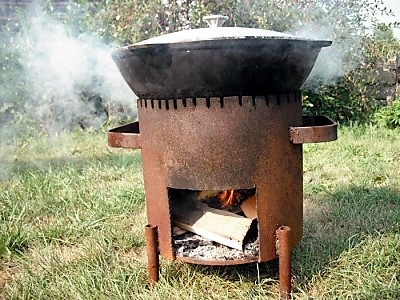
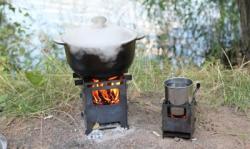
Photo 4. You can place a cauldron on top of the finished stove, light a fire and start cooking.
Once all these steps have been completed, it is advisable to carry out the first heating ovens to diagnose possible deficiencies designs and their corrections. If no defects are found, the device is covered fire-resistant paint or special fireproof varnishes.
Possible complications
When making a stove for a cauldron from a pipe, problems may arise various difficulties:
- Metal, used in the creation of the structure, it doesn't melt, it burns. This can be caused by a small thickness of metal or a high current used in welding. The corrective option is either reduce the current (if this is the reason), or replace metal to a more durable one.

- The metal is not "cooked" due to incorrectly selected electrodes or the metal itself (for example, alloy steel or cast iron). Errors can be eliminated replacement of electrodes or himself metal element.
- Heavy weight structures at the stage of primary assembly. Correct replacement those elements that will reduce the weight of the device or completely exclude.
- After welding, the structure was warped. This problem can be solved in two ways - by careful heating structures or, if heating does not help, disassembly and reassemblyTo prevent this from happening, it is necessary to carefully secure all elements during the construction stage and install them one by one. Securement is possible both with the use of an auxiliary tool and with the help of welding "tacks".
Useful video
A video demonstrating the dimensions and structure of a cauldron oven made from a 420 mm diameter pipe.
A stove for a cauldron made from a pipe is a sure way to touch the oriental cuisine
A stove for a cauldron, which is made from a pipe, is one of the most convenient and common options in Russia. With its help you can touch the preparation of oriental dishes. Any thick-walled pipe will do for the construction of such a stove. Its main feature should be relatively light weight, since during the assembly stage it constantly changes its position in space.
Or you can buy a low-quality stove that will burn out in six months, while a high-quality one is very expensive.