Meals cooked outdoors will taste even better! Building an outdoor brick oven
Cooking with outdoor ovens allows you to get delicious meat and vegetables. Such designs safe, are equipped with a smokehouse, the fuel in them is ignited in any weather.
Buying or building a barbecue is the opportunity to relax in the fresh air most of the yearAt the same time, a brick oven will not only not take up much space on the site, but will also advantageously decorate the area around the house.
Content
Types of brick ovens
Differences in furnace device schemes are evident in the features of masonry, shapes and sizes.
Simple BBQ
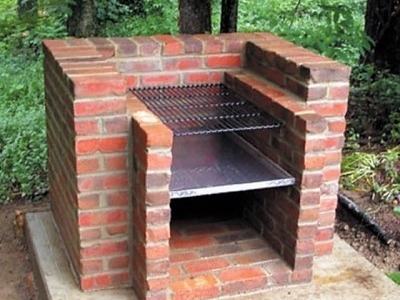
A popular outdoor structure is a barbecue stove. It is built using simple brickwork, which resembles the letter "P".
The internal walls have several projections, to attach the meat grates to them and metal sheet for coals. Design small in weight, so there is no need to build a massive foundation.
For the base choose the trimmings concrete pillars. Raise the device to a height that is convenient for comfortable cooking.
Outdoor stove with smokehouse
The design of such a furnace above the hob in the smoke collector is equipped smokehouse. It can be created from more accessible materials than a barbecue. The special feature of the stove with a smokehouse is lack of fireproof masonry.
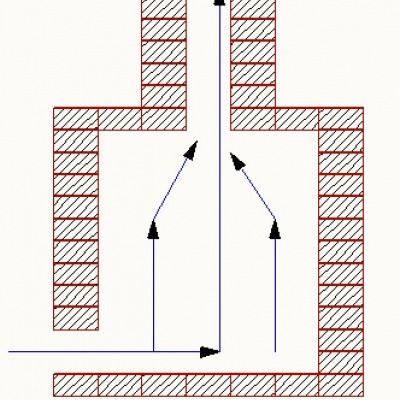
Scheme of a straight-through chimney for a stove
This device is to be erected more difficult, than the previous ones, but the increased ease of use and attractive appearance outweigh all the shortcomings.
Similar products in appearance look like a fireplace. However, this is not entirely true. Using an open fire in a stove of this type is dangerous. This is explained pipe device - it is performed in a straight-through manner.
They cook on these ovens using coalsFirewood is used only at a great distance from residential and utility buildings.
How to build a brick oven outside with your own hands
When building a stove, it is important to strictly follow all the steps, described below.
Selection of materials
The following materials are used to construct the furnace:
- Fireclay brick. Often used aerated concreteSuch materials cope well with high temperatures.
- Ready metal structuresIn this case, the cost of installing the stove will be quite high.
Aerated concrete blocks cost much less than quality bricks. But the appearance of the structure will not be very advantageous. Such stoves must be faced.
Attention! A common variant is - purchase of a ready-made stoveThis is explained by the ease of installation according to the instructions provided.
With purchase combustion chamber things are more complicated. For this reason, it is built independently.
Tools
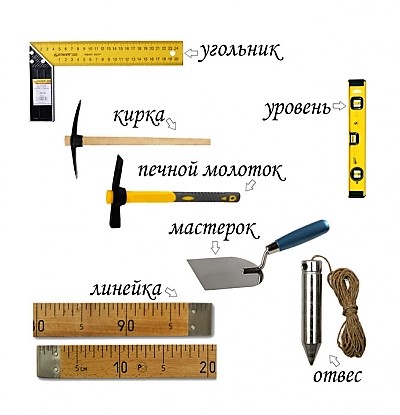
To build a brick oven, prepare the following materials and tools:
- fireclay brick;
- shovel;
- nylon rope;
- clay required fat content;
- sand;
- cement powder;
- doors for the blower and firebox;
- trowel;
- Bulgarian;
- building level.
Choose the order according to your taste preferences.
Preparing a place in the yard
The outdoor stove is placed in a place convenient for both relaxing and cooking. In this case, the design is included in the site plan at the stage of building the house. In the case of an existing building, a place for an outdoor brick oven should be chosen according to several conditions:
- Conduct light to the location of the furnace.
- Select sizes depends on the personal tastes of the owners of the site and the functions of the future structure.
- Between the building and the gazebo pave the way.
- Installing a stove from the leeward sideThis will prevent smoke from entering the residential building.
- It is not allowed to build outdoor stove near bushes and trees - Plants do not like excessive heat.
- Do not post next to the structure flammable items.
Foundation drawing
From the installation site remove all the rubbish, level out. Do the work. in this order:
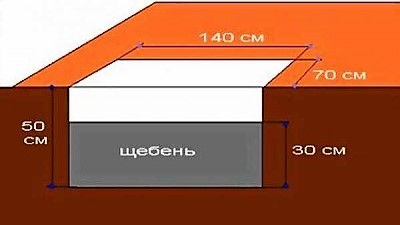
- Use a nylon rope to mark out the area. The foundation should exceed the dimensions of the oven by 10 cm on each side.
- Dig it out half-meter pit.
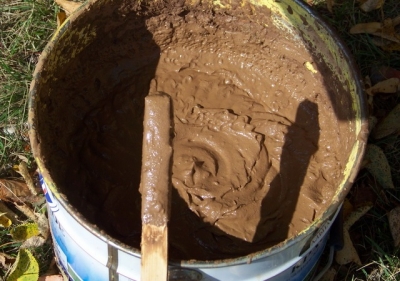
- Knead solution. Mix sand with "three hundredth" cement in ratio 3:1. Then stir the resulting solution and add water. Make the mixture liquid.
- Fill the bottom of the hole with crushed stone, and then compact the resulting "pillow". Now pour in the liquid solution.
For reference. The foundation hardens around two weeks.
Getting Started with Construction
Create work plan. Prepare a diagram of the furnace. Decide on the placement of the structure, its purpose and appearanceOnce you have made a plan, it is easy to calculate the amount of building materials.
Attention! Choose materials only high quality. For good brick, it is permissible to use a minimum amount of mortar. When choosing used brick, clean the surfaces of each element.
Requirements to the construction of a brick oven:
- Do it solution for masonry plastic. Do not allow it to liquefy. This will prevent drips and ensure that the seams are filled.
- Sift mix through sieve with small cells (up to 1.5 mm).
- When using oily mix the clays her with sand until the desired consistency is achieved.
- Knead solution thoroughly. Check the entire mixture with your hands before starting work. Do not leave lumps. Homogeneity solution is the main purpose of mixing it.
- Before mixing the solution check the fat content clay. To do this, take one liter of clay of different compositions and roll them 0.5 cm balls. After drying drop it each of them onto a flat surface from a height of one meter. Ball, maximum retaining its shape, is suitable for creating a solution.
- In two days before starting work soak the clay in water. It will acquire the required level of plasticity.
After preparation, proceed to building the stove.
Laying procedure. Row by row
Once the base has set, cover it. roofing felt. Grease the joints with mastic. This layer will become waterproof. Next comes the laying process:
- At the beginning of work use only a whole brick, then - ¾ and ½ of the product. Due to this, the row will be firmly connected. After finishing each row check its horizontality level.
- After completion first row install door blowing. Wrap it around the contour with asbestos cord for compaction.
- Secure the door by laying it in order wire 3 mm thick.
Attention! Not recommended install metal plates first, A then attach doors to themThey can only be fixed by an experienced welder (which is explained by the difficulty of welding cast iron to steel).
- Use a grinder to make a hole in the brick furrow, in which the wire will be laid.
- The gap formed between the door and the brick, reduce up to 1 cm thickness.
- After closing the blower, conduct installation of grate bars. To do this, make cuts in the brick. This way, the grate will be located strictly along the gap.
- Continue building the stove until it is time to install it. the second door. Cut the brick with a grinder. Keep a distance between the masonry and the metal parts. 1 cm gap.
- Close the top part stove - metal or stone.
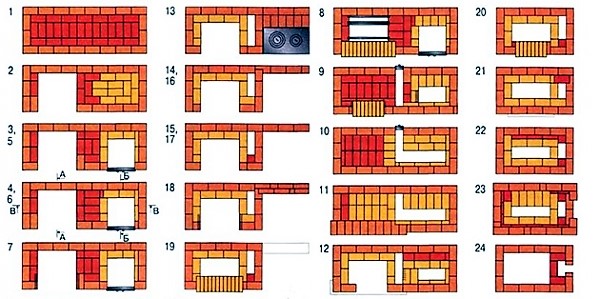
Photo 1. An example of the layout of an outdoor stove with a barbecue and a hob, contains 24 rows without taking into account the chimney.
Chimney
Build on an outdoor stove modular chimney. It will last quite a long time. Another advantage of choosing such a design is easy to install. Use to insulate joints. heat resistant sealant.
Build the chimney in accordance with certain rules:
- If you are going to be looking at the fire during your vacation, buy one door with glass insert.
- Joints between modules make it dense.
- Brackets install every 2 meters.
- In walls or ceilings leave no gaps.
Photos of street stoves
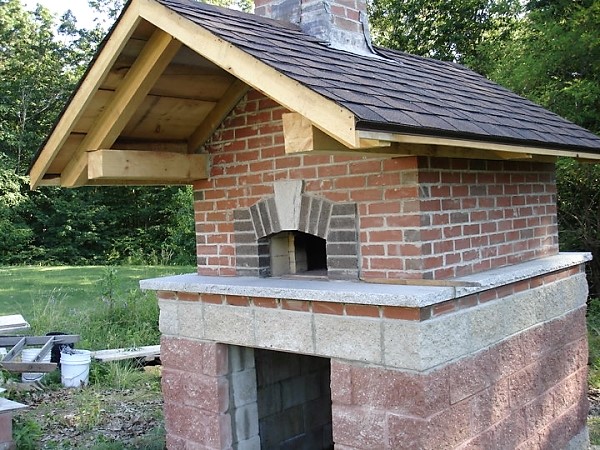
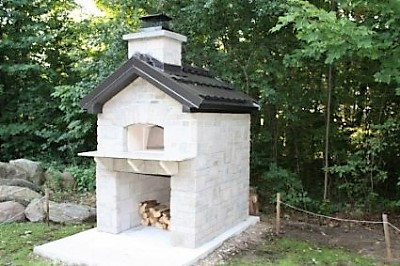
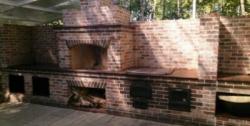
Photo 2. An example of a simple outdoor brick oven, with a roof, but without any additional devices.

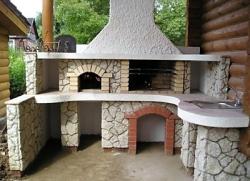
Photo 3. Brick oven with a barbecue and two countertops for cooking outside.
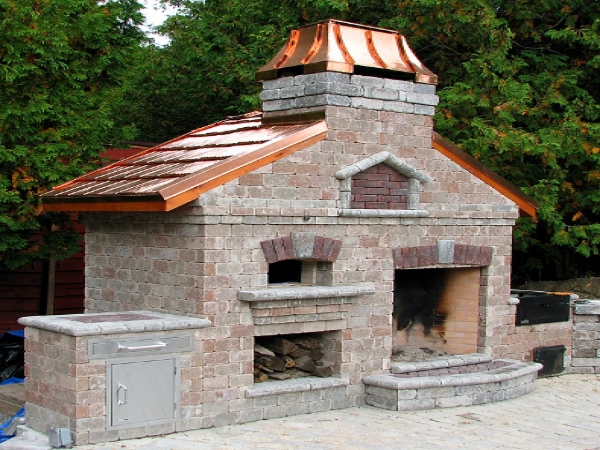
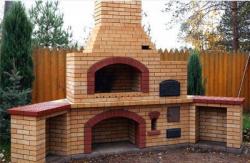
Photo 4. A whole outdoor complex made of brick with a stove, fireplace and barbecue for a full-fledged rest.
Possible difficulties
For laying outdoor stoves, select a solution that is capable of maintain strength under the influence of precipitation. If you add some cement to the clay-sand mixture, you will get quite strong seams. Use ready-made fireproof compositions that are not washed away by water with caution - the masonry will become strong and will crack under high heat.
When choosing the dimensions of an outdoor stove, consider increased chimney cross-section and lower height compared to home designs. Select section 350 sq. cm.
Basic mistakes when laying the stove:
- The brick is being laid without dressing the suture.
- Lining does not take into account expansion coefficients bricks. Masonry bricks and fireclay bricks have different properties. Lay them with a certain gap. If these elements are installed tightly, the masonry will quickly collapse.
- Metallic elements are installed in such a way that they are located in interaction with fire. Before installing the firebox door, wrap it with asbestos cord so that it does not destroy the masonry when heated. Fix the metal plate so that it is not clamped by bricks, but lies freely.
- Bake not fully installed on the foundationThis leads to displacement or collapse of the structure.
Useful video
A video that talks about some of the intricacies of building outdoor brick barbecue ovens.
It is important to choose a location for the structure
Build an outdoor brick oven simple instructions everyone can do it. Choose a place for it. near the gazebo or other recreational area. Do not place the device near a house or garden plants. Erect the structure so that it is located from the leeward side to the house.

Comments