It will even fit in your pocket! How to make a wood-burning stove with your own hands
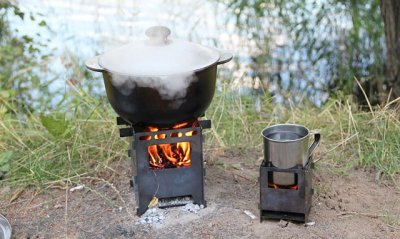
A wood-burning stove is a small device that can be used boil water or cook food.
It is used for hiking, fishing, and at the dacha.
Depending on the size, it is suitable for one or several people. Such a stove consumes fuel economically.
Content
Woodchip stove diagrams, drawings
Due to its compact size, the stove does not take up much space and weighs little. This is what makes it stand out from a gas burner, which requires gas cylinders. The total weight of the burner with cylinders reaches several kilograms. And the wood chipper weighs depending on its design. about a kilogram.
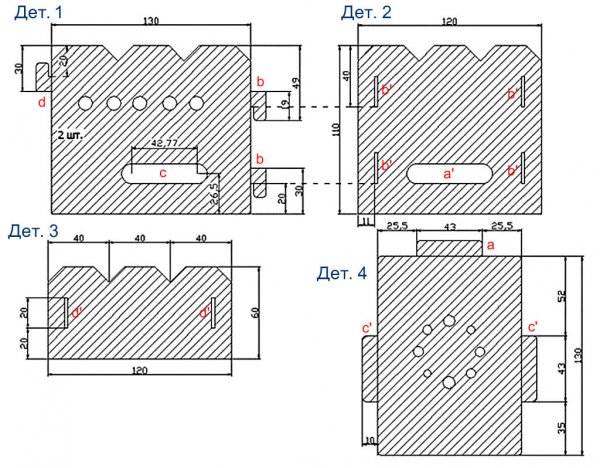
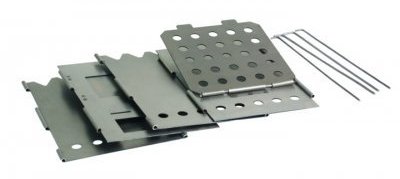
Photo 1. Drawing of a square woodchip stove. Contains four parts, the dimensions of each element are indicated.
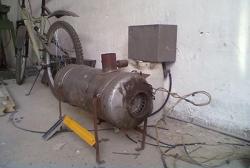
Construction It's easy to make it yourself from scrap materials. For one person, it is made from a large tin can. A larger version is assembled from the drum of an old washing machine.
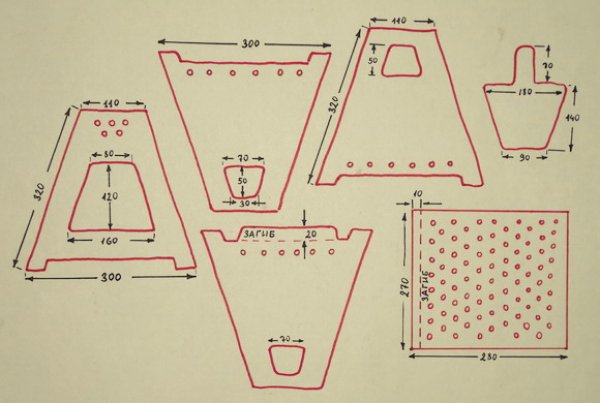
Photo 2. Drawing of a cone-shaped woodchip stove. Such a device can be folded like an accordion.
If you need a size larger than the can, and you don’t have an unnecessary machine, you can use sheet metal. There are several types of structures. They differ in shape and scope of application.
Important! All devices assume air intake holes at the bottom. This ensures good traction and fuel combustion.
First: a stove for a cauldron
This option is intended for use in hiking, mostly in singles. Most tourists have a standard-sized army pot. The stove is made for it. The shape of the wood chip stove similar to a cooking containerThis design option is the lightest.
Reference. The dimensions of the stove are selected so that the pot fits without a gap. Then it heats up faster, since the heat does not escape through the cracks. For adjustment, a drawing of the bottom is made, edging the lid of the pot with a flange.
The second one is square in shape.
Most cooking utensils are round, so the previous option is not suitable for them. It will come in handy both on a hike and at the dacha a wood chipper with a square cross-section.
If it is made collapsible, the device will be easier to transport and store. The dimensions can be increased proportionally if necessary.
The shape of the holes in the side walls can be any.
Third trapezoid
This wood-burning stove is also collapsible, but it is assembled like an accordion, rather than divided into separate parts. It differs from the previous one. trapezoidal shape.
This type of stove is more stable; the heat in the device is concentrated in the central plane.
If the top of the structure is made too narrow, some of the heat will be lost through the holes in the upper side of the walls. The device weighs approximately about a kilogram.
Making a stove with your own hands
One of the advantages of a wood-burning stove is that it is easy to make yourself. First, choose a suitable project. Prepare materials and tools. Then build the stove.
The choice of scheme depends on several parameters:
- depending on the place of use - on a hike or at the dacha;
- from the number of people you need to cook for;
- depending on what materials are available.
Selection of materials and preparation of tools
For scheme 1 galvanized or is used "canned" tin. For option 2 better to take steel 1-2 mm thick. The oven will be heavier (about a kilogram), but stronger. Thicker metal is not needed, since the dimensions of the device are insignificant.
You will need steel wire 3-4 mm thick. It can be replaced with knitting needles. In general, used materials (but of good quality) are often used for such projects.
For fastenings, prepare bolts, nuts and engraving washers. To create a furnace The third diagram requires piano hinges.
The following tools will be required:
- Bulgarian;
- drill;
- file;
- pliers;
- hammer;
- center punch.
Construction of a furnace according to scheme 1
The construction stages are as follows:
- Mark the template on paper or cardboard. You can print out the diagram.
- The bottom is cut out according to the size of the pot lid.
- Mark the sheet metal according to this template and cut it out.
- Make holes in the side walls and bottom. The holes in the walls serve both for draft and for attaching the wire on which the pot will be placed.
- Bend the sheet, which will serve as walls, into the desired shape.
- Bend the "petals" in two places, indicated on the diagram.
- Place the bottom on them.
- Bend the "petals" again.
- Tightly fasten the structure.
- The remaining "petals" will serve as legs.
- Insert the pieces of wire or cut knitting needles into the corresponding holes.
Attention! Holes on the bottom should be smallso that pieces of coal don't fall out.
How to make a wood chipper according to scheme 2
Cut out the walls according to the template. Their dimensions depend on the dimensions of the cookware that is planned to be used with the stove.
In such a design, nothing needs to be bent. But for stability make cuts, into which the walls will be inserted. Then no additional fastening will be required.
Drill holes in the walls and insert support spokes. Check how the oven is assembled.
Assembly of a wood-burning stove according to diagram 3
To create a pyramid oven, follow these steps:
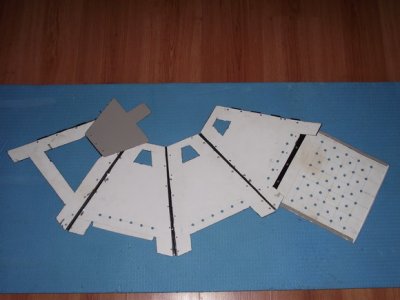
- Cut out template blanks.
- Drill holes.
- Do it larger hole for the door and a smaller one for the chimneys.
- Bend the edge of one of the walls, so that the grate holds.
- Cut the piano hinges to the size of the walls, fasten the walls with them.
- Attach a door to them And ears of cornto (also through loops).
- From a loop attached to the outer wall, pull out the knitting needle and bend its tipThis spoke will hold the device together.
Possible complications
The design of the wood chipper is elementary and does not require any special knowledge or tools for its manufacture. The main difficulty during construction is the following: It is necessary to bend the sheet so that the walls tightly embrace the bottom. Pipes of the appropriate diameter will help with this issue.
Useful video
Watch a video review of a homemade stainless steel wood-burning stove.
What fuel is suitable for the device?
This type of oven extremely undemanding to fuel. Branches, chips, tree bark, pine cones, brushwood, fuel briquettes, alcohol, dry fuel are used. The last two options are used as a last resort. The best material is wood fuel.

Comments
If everything is done correctly, the stove will last a long time.
Actually, at first I made it as a simple burner, but a lot of energy was wasted, then I covered it with tin from a tin can, and now coffee in the tent brews faster.