There is no limit to perfection: how to improve a gazebo by building a brick stove for it with your own hands

The gazebo is a great place not only for hanging out with friends, but also for cooking.
It is very convenient to have a stove here: the device will allow you to fry kebabs And will extend the outdoor holiday season.
Instead of portable equipment like a barbecue, it is better to build DIY brick stove.
Selection of material
There are several types of bricks suitable for building a stove:
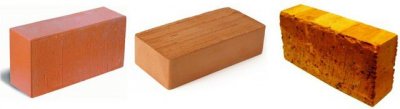
- Heat resistantThis is a brick of traditional red shades that does not contain holes.
- Ceramic clay plastic molding brick. Withstands high temperatures and accumulates heat well. It is necessary to distinguish this type from other clay bricks, which are not suitable for building stoves.
- Fireclay refractory brick. It can withstand high temperatures, but is more suitable for stove cladding or decorative inserts.
Builders combine several types of bricks or take a homogeneous material, it all depends on their preferences.
To build a stove you will need:
- ready-made hood and chimney or sheet metal for their creation;
- mortars for brickwork;
- table top;
- durable tiles or porcelain stoneware for heat-resistant covering of surfaces near the stove;
- sealants.
Preparing the foundation
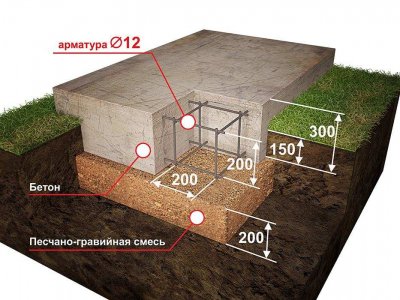
It is better to think through a project of a gazebo with a built-in stove, since a wooden structure may not be able to withstand a bulky structure.
If you plan to install the device in an already built gazebo, you will have to dismantle part of the foundation.
The wooden floor needs to be removed and filled with concrete. On such a platform it is permissible to carry out further work:
- Dig out 30 cm a pit, the bottom of which is compacted with sand and gravel.
- Secure the sand and gravel mixture with a thin layer of concrete mortar.
- Build formwork for the foundation. Chipboard or regular strong boards are suitable for this.
- Inside the formwork, make a frame from reinforcement connected with wire.
- Fill everything with concrete. You need to make sure that the reinforcement is under the solution.
- The foundation must harden within three weeks. At high temperatures and in dry weather it is necessary to moisten it with water.
Attention! The foundation must extend beyond the base of the stove by 15 centimeters.
Brick oven diagram for a gazebo
It is best to build not just a brick oven for the gazebo, but a whole complex, including a countertop, roasting pan and oven.
The comfortable height of the stove without a chimney is 2.18 meters. The bottom rows of bricks should be laid out, leaving space for the coal pit (90 cm in height). It is usually located under the brazier, the height of which is 60 cm, width - 78-100 cm, depth - 15-20 centimeters. A fireproof material must be placed on the bottom of the firebox; it can be made from a metal sheet. The row following the brazier should be widened by half a brick and from there start building the chimney, gradually narrowing it upwards.
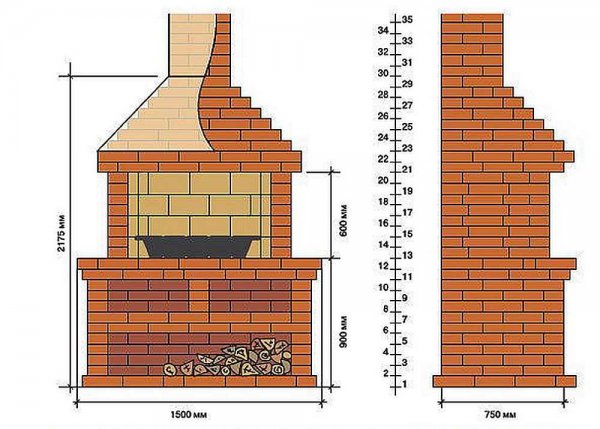
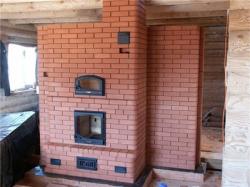
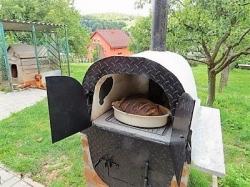
Photo 1. Brick oven with barbecue, front and side view. This device is perfect for gazebos, as you can cook on coals in it.
To strengthen the foundation first row They often lay it out, completely covering the foundation with bricks, and only then move on to the rows with niches.
Reference. To heat the room, the firebox is installed low, approximately at knee level. But for ease of use, it is better not to place the brazier lower in the gazebo stove 90 cm from the floor.
Thickness The oven is equal to half a brick.
How to make a brick stove with your own hands? Order of the device
The following solution is suitable for laying: cement, sand and red clay in proportions 1:3:2.
- In a project that includes a countertop, the bottom rows should be laid out in the shape of the letter "Ш". The stove itself is supposed to be on the left, and the tabletop or table for cutting meat is on the right. First, lay five rows. Be sure to check them with a level. For strong vertical fixation, the solution must be applied to the walls of each brick.
- Every second row should start with half a brick. The thickness of the back wall is 3 bricks, side walls - 2.
- 6, 9 and 14 rows make protruding. The bottom one is for a removable tray, the middle one is for barbecue grates or grate bars, and the top one is for a smokehouse. The final one Row 15 will fit right under the work surface of the table.
- The gap between the brick and the countertop should be covered with sealing gel, so that if desired, a sink and water supply can be built into the workspace.
- The front part of the stove can be rounded into an arch. To do this, you need to install a wooden frame, on top of which you lay and pour bricks. The laying should be finished with a central brick, securing the entire arch with it. After the solution hardens, the wooden stand can be removed.
- The table top is ordered in advance or made independently made of plywood and porcelain stoneware.
- The chimney and hood can be purchased ready-made or made by yourself. To do this, you will need to weld the sheet metal together to get the desired shape. The joints need to be treated with a sealant so that smoke does not escape through them. The length of the pipe should be not less than 60 cm, diameter - 12 cm.
- If the gazebo has a roof, the chimney should be insulated by wrapping it asbestos cardboard or non-combustible mineral woolThe top of the pipe is protected by a cone of sheet metal: this will prevent rain and snow from getting in.
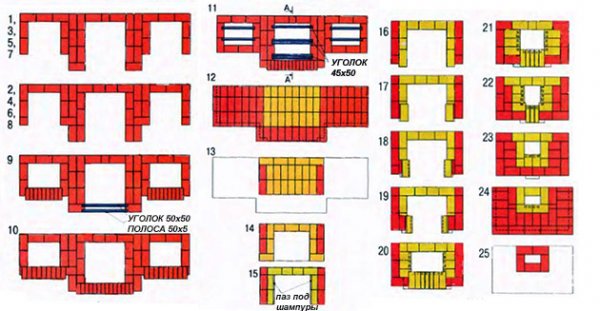
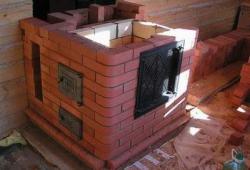
Photo 2. Row-by-row construction of a brick oven for a gazebo. Consists of 26 stages, two types of brick are used in production.
The lower part of the resulting structure can be used as a woodshed. Bottom of the brazier it's more practical to do steel.
Difficulties in construction
Many people have difficulties with building a stove even at the design stage. If you lack experience, it is better to find ready-made schemes of brick stoves on the Internet: they are suitable for any gazebo. It will remain correct pour the foundation and calculate the space.
If the bricks are laid incorrectly, unevenness and protrusions may appear. At first, the flaws may not be noticed, but they will definitely show themselves as the next rows are erected. To avoid this, you can use a horizontal thread stretched along the level as a guide. It will help you see any unevenness right away.
If a bump does appear, remove the top rows of bricks.
It is necessary to ensure that there are no niches left in the masonry so that the solution is distributed evenly. There are only 2-3 hours, until the solution has set.
When building an arch, you need to trim the side bricks with a grinderIf it is not there, the building material can be carefully split with precise blows.
If precipitation gets in through the joint between the chimney pipe and the roof, it is possible to fix it without dismantling the masonry. Walk along the joint bitumen-based roofing tape. It is necessary to wrap the pipe with it, completely covering the cracks and problem areas. When heated, the tape sticks together. After such manipulations, no bad weather is scary.
Photos of finished devices
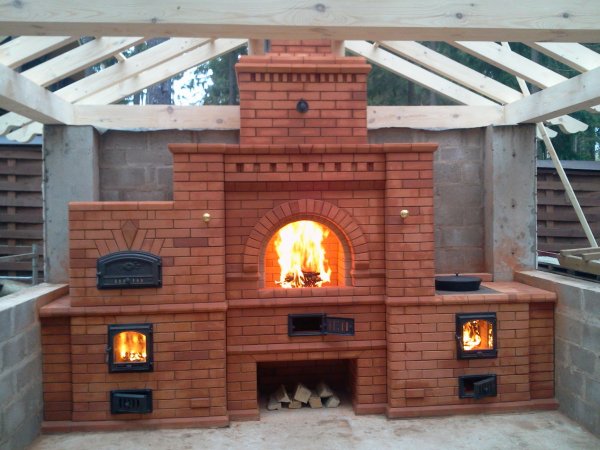
Photo 3. Brick oven for a gazebo. Supplemented with a hob and oven.
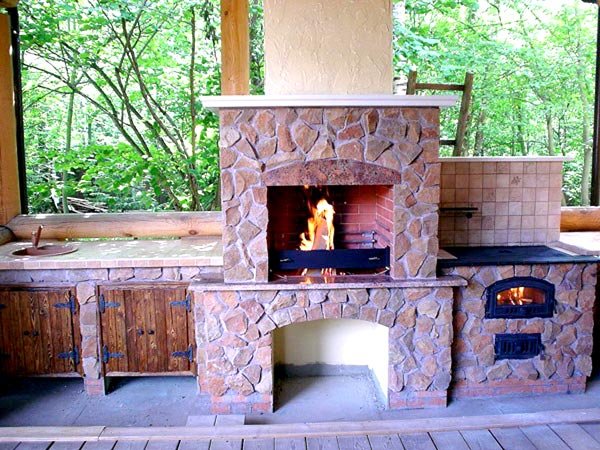
Photo 4. A gazebo stove made of brick. The surface of the device is finished with stone.

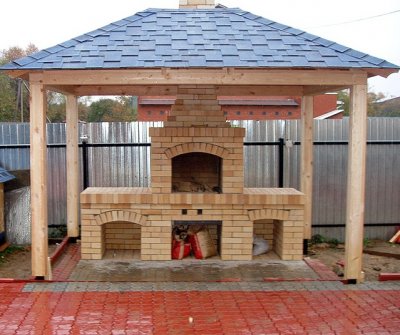
Photo 5. Brick oven built inside the gazebo. The device is additionally equipped with a barbecue.
Useful video
Watch an interesting video that talks about the features of building a brick barbecue oven for a gazebo.
Using a stove in a gazebo
After the construction of the furnace is completed, it is necessary to wait for some time., before lighting a fire in it:
- Required three weeks foundation hardening.
- Need to 28 days for complete drying of the mortar when laying rows.
- After the arch is created, work continues no earlier than in 20 hours — wait until the mortar sets. The oven itself can only be used after all rows of bricks have completely dried.
After the required period of time has passed, you can invite friends and enjoy the kebabs cooked in the new oven.
This design creates in the gazebo cosiness and serves as a great place for culinary experiments.

And the foundation depth of 50 cm together with the cushion is too small for our harsh winters, such a foundation should be built to the depth of soil freezing (1.5 m), or to the depth of solid soil, and this is crushed stone, stone, clay. Sand is not a solid soil, otherwise the building will begin to sag and tilt, which I experienced myself when I built a garage by digging only 50 cm and pouring the foundation in the same way. As a result, after 2 years I had to strengthen the garage with a powerful screed on top to prevent further expansion of the crack in the wall. Of course, the screed holds the wall, the crack stopped growing. After I faced the wall, the screed was no longer visible, but the tilt, if you look closely, is slightly noticeable. So when building such a gazebo, you need to take the foundation seriously.