In the best traditions! How to build a Russian stove with your own hands?
You are viewing the section Russian stove, located in the large section Types of furnaces.
Even those who have never been to a village know what a real Russian stove is, because it plays an important role in many of our favorite childhood fairy tales.
The Russian brick stove is famous a variety of useful functions; it was used to heat homes and cook food, to dry and prepare berries, herbs and mushrooms for the winter.
The disadvantages of such a device can be considered the need for constant fuel supply And cleaning the ash remaining after it burns out, and also quite complex installation. It is better to entrust the work of laying a brick oven to a professional; in case of independent work, careful adherence to recommendations will be required.
Content
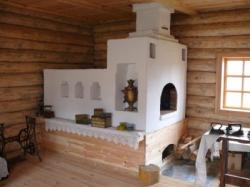
Scheme of a classic Russian stove, its dimensions
The structure and design of a classic furnace subject to a strict scheme.
- Dimensions. Length is three arshins (not less than two meters), the width was equal to two arshins (about one and a half meters), the height of the hearth was about half a meter, and the height of the stove itself was about three arshins. The stove bench was usually arranged at the height of a person's growth. Such dimensions are optimal, providing uniform heating of the house with an area from 30 sq.m.
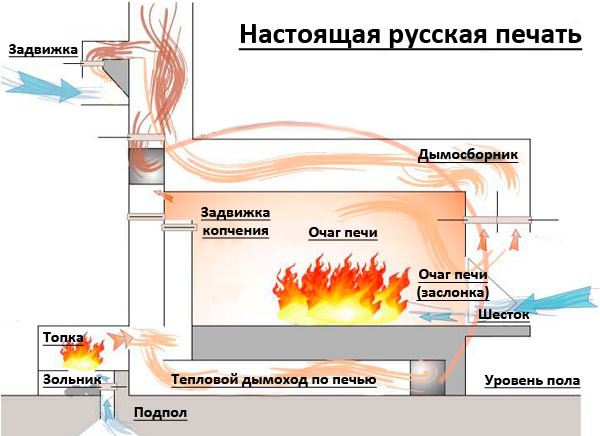
Photo 1. Diagram of the structure of a classic Russian stove made of brick, with parts of the structure indicated.
- Foundation. It was necessarily separate from the main foundation of the house, although they were often built at the same time. The material was usually broken brick or stone, less often wooden blocks. Now most often used reinforced foundation or foundation made of reinforced concrete blocks.
- Design. The firebox (furnace), the underside is the bottom of the firebox, the hearth is the place in front of the firebox where it was convenient to put heavy dishes before placing them deep into the stove. The mouth separates the firebox from the hearth, through which firewood is loaded, and also the combustion products exit into the chimney. The damper closes the chimney opening if necessary, the mouth is closed by a damper. The underside of the stove is used to store firewood.
- Material. The stove is made of firebricks (fireclay) And cement according to certain rules, providing better heating and heat transfer. In the classic version, bricks are laid in strictly horizontal rows, masonry of one or two bricks wide is possible.
The design of the classic Russian stove has been refined over the years, allowing for the minimization of shortcomings and the achievement of the most high efficiency in operation, so the choice of this particular model for construction will definitely justify itself.
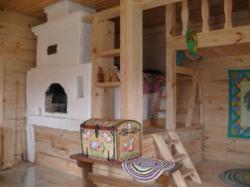
Construction of a Dutch-style oven
The main difference between this version and the classic one is its pronounced compactness, and therefore the convenience of installation and operation in a small living space. Dutch oven does not have a bed And becomes vertical and high.
The second important difference is chimney duct system, allowing the heated gas to circulate up and down, cooling and heating up, significantly increasing the heating efficiency from one fuel load. Such a furnace also significantly warms up faster (about half an hour compared to the classic version).
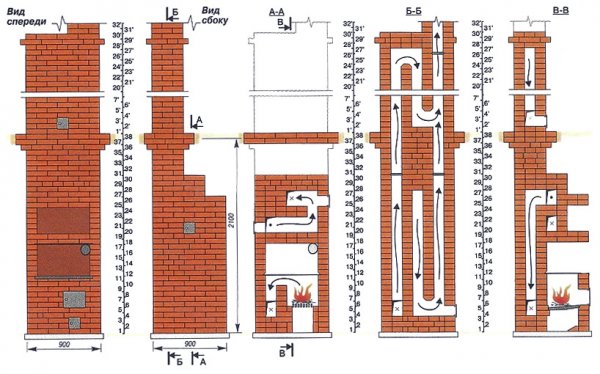
Photo 2. Diagram of the device of a two-storey Russian stove with Dutch rows. Front and side views.
Scheme: a large rectangular structure is installed on the foundation combustion chamber; sometimes it is possible to divide it into two parts: the combustion process takes place in one, and oxygen comes from the second (blowing chamber). Thanks to this device, the fuel in the Dutch stove often does not burn, but smolders, providing a longer heating period.
A firebox is being built above the combustion chamber channel chimney, occupying the entire remaining space of the furnace (usually built six channels). At the exit from the last channel, a pipe is installed damper. A niche is usually arranged immediately above the firebox, where the hob - this provides the possibility of cooking.
The Dutch masonry layout has a more complex scheme due to the multi-channel chimney, so it is recommended to first lay the oven out dry without mortar, in order to avoid mistakes in the future and more accurately calculate the amount of material required.
Important! The disadvantages of such a furnace will be a lower area coverage (about 10-15 sq.m) and fewer functions.
For small homes, a Dutch oven would be an ideal option, especially due to its compact size. can be installed not only on the first floor of the houseAt one time, Dutch stoves were the main source of heating for multi-apartment apartment buildings.
With a zigzag

To increase heating efficiency In a Russian stove, the chimney is not laid out straight, but with a zigzag.
As hot gas passes through it, the time it spends in the furnace increases, as does the time it takes for its walls to heat up.
In the Dutch oven this principle is brought to perfection, since the gas has time to cool down and is heated again.
But due to the design of the classic Russian stove, the zigzag is most often made horizontal and is provided only with one or two bends.
Attention! When laying out the zigzag, it is necessary to take into account that it will need to be regularly cleaned of ash, therefore, in its lower part, an opening with a door-damper must be equipped.
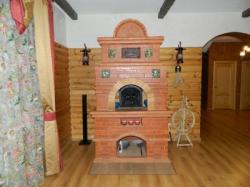
With heating shield
A higher degree of heating of the room and fuel economy will be provided by a device with a heating shield. Such a stove is an improved type of a Dutch stove and is designed for heating a large area.
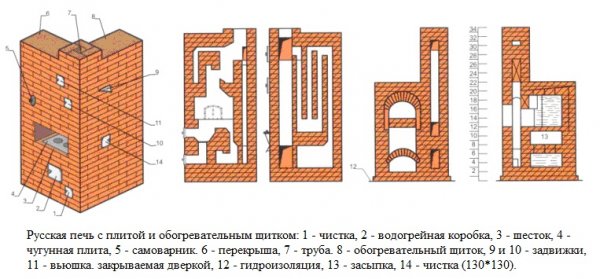
Photo 3. Scheme of a brick Russian stove, with a heating shield. The numbers indicate the parts of the structure.
A chimney is laid inside it. with multiple channels, but it is possible to pass smoke directly into the chimney - this is very convenient in the summer, when heating the room is not required. Such stoves, due to their size, can be equipped with a stove bench and most often have a hob.
How to make a Russian stove with your own hands
It is better to entrust the construction of the stove to a professional. Detailed sequential diagrams and manuals can help you carry out the work yourself, but it is still better to seek advice from an experienced stove-maker - this is will help to avoid gross errors.
Selecting a project, drawings
The construction of the furnace is a labor-intensive and complex work that requires a responsible approach and careful preliminary consideration of all conditions. All elements must be installed step by step, and the order of actions must be followed correctly. The choice of a project depends on several criteria:
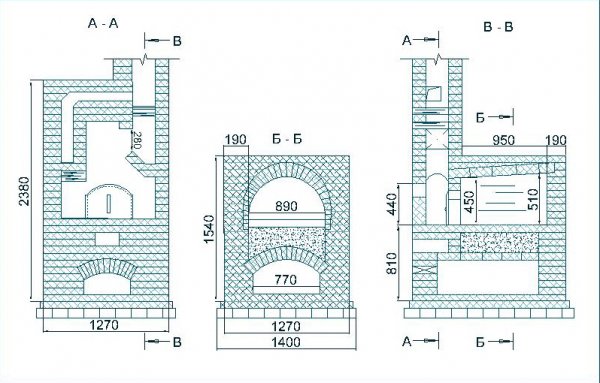
Photo 4. Drawing of a Russian stove with Dutch ordering. Dimensions of the device are given in millimeters.
- Area of the heated room. A classic Russian stove can heat a fairly large house with several rooms, while a compact Dutch stove will suit a small room. The version with a heating shield is also well suited for medium and large country houses.
- Necessary functions. The classic version provides the widest range of tasks to be performed, more compact versions lack some of them, but compensate for this with other advantages. If the goal is primarily heating, a stove with a shield, additionally equipped with a hob, is best suited.
- Economy and efficiency. According to these criteria, the most profitable stoves will be those with a shield and Dutch stoves, which have a long operating time on one load of firewood.
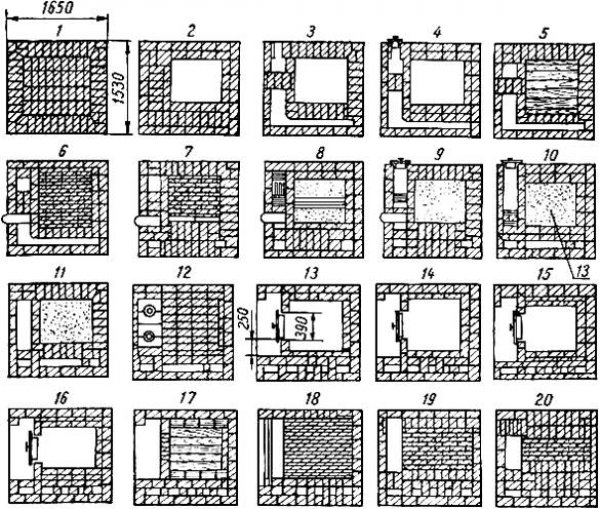
Photo 5. Drawing of the row layout of a Russian brick stove with dimensions of 1650x1530 mm.
An insignificant criterion is the type of fuel - in most cases, all types of Russian stoves work on solid fuel, but for some of its types (for example, coal) there may be slight differences in the structure of the combustion chamber.
Selection of material
The choice of materials for construction largely depends on their ability to withstand heat. Used only refractory brick grades, not expanding or cracking under the influence of high temperature. The same requirements apply to the bonding mixtures. The strength of the material is also of great importance - the Russian stove is very massive and heavy, over time the fragile brick will crumble and crack.
Reference. The firebox, where the temperature reaches its highest values, is lined with bricks made of fireclay clay; for the construction of other parts, less expensive ceramic bricks can be used.
The mortar must seal the seams well, be elastic, and not crack under the influence of temperature. Various fireproof mortar mixtures can be purchased in stores. You can make the mortar yourself from mixtures of fatty clay and sand (usually in a ratio of 1 to 2)To lay out the firebox, fireclay powder is added to the solution.
In addition to masonry materials, it is necessary to purchase metal parts for the future stove: dampers, doors, grilles. They are usually made of cast iron or steel and can be found in specialized hardware stores.
Preparing the tools
For correct execution of masonry you will need a number of tools:

- Shovel. It is used for mixing the mortar and laying it on masonry sections.
- Construction level. Necessary for leveling rows of masonry.
- Cord. It is stretched as a guide for aligning rows of bricks.
- Trowel. Used for scooping and applying mortar to bricks, smoothing it out and removing excess.
- Hammer. Format tool "pick" is needed to break off parts of the brick, giving it the shape needed for laying the element. You can also additionally use a heavier hammer for hewing the brick.
- Bulgarian. It is used to cut bricks into pieces of the required size.
- Square. Consists of two metal plates and is used to align corners.
- Expansion. A tool for adding decorativeness to a masonry joint. It is used when no further finishing of the surface is planned.
- Rule. It is necessary to check the evenness of the masonry, in particular the foundation.
- Plumb line. Helps to assess the quality of vertical masonry.
In addition to the tools, you will need enough large capacity For mixing mortar, a galvanized bucket with low walls is best suited.
Preparing the site
When choosing a location for installing a stove, you need to carefully study the conditions.
- Foundation. In any case, it is recommended to install a separate one. If the stove weighs more than 750 kg, then its installation is mandatory. A separate foundation is needed in order not to damage the main one.
- Walls. If the walls are wooden, you need to install the stove at some distance from them. The walls themselves around the stove need to be cover with fire-resistant material.
- Heating efficiencyThe most common option is to install a Russian stove in the middle of the house or a large room. In this case, the heat will not be absorbed by the walls, and the entire living space will be heated evenly and quickly.
- Chimney device. It is necessary to choose the most convenient place where the beams and rafters will not interfere with the installation of the chimney outside. The chimney should pass near the ridge of the roof.
When combining heating and cooking functions, the location for the stove is chosen in the area of the future kitchen, but for proper heat transfer it is recommended to arrange it closer to the center of the house.
How to build a foundation
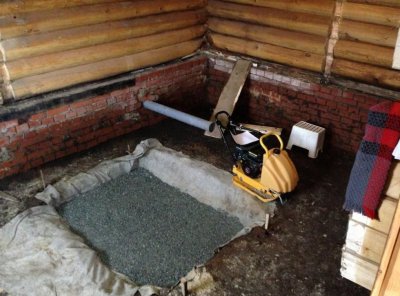
For the best results, a stove is installed when building a house. separate foundation. The depth of the pit depends on the properties of the soil and the height of the groundwater. The size should be by 20 cm larger than the base of the stove.
Manufacturing technology is as follows: drainage from broken stone or brick is poured into the bottom of the pit, and a layer of wet sand is placed on top and tightly compacted.
Next in order comes a layer of crushed stone, another layer of sand and a final layer of crushed stone. about 10 cm wide. Waterproofing is laid on it, formwork made of damp boards or logs is installed. Reinforcement is installed inside the box and filled with cement. The foundation is also covered with waterproofing from above.
How to build a stove: step-by-step laying, photo
Step by step instructions laying of furnace elements:
- Under-oven. The wood drying compartment is not laid out in all types of furnaces. You can use overheated brick for it. An arch is installed above the under-furnace using a special arc-shaped formwork (which is best made collapsible).
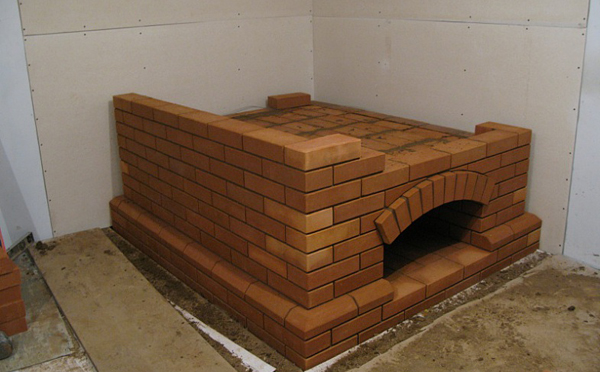
Photo 6. Finished brick oven. Used for storing firewood and other materials.
- Fuel tank. It is installed on the ceiling (arch), and fireclay bricks are used for its laying.
- Under. The bottom of the firebox is often made inclined towards the hearth. For this purpose, a clay-sand backfill is used.
- The Crucible. This element is the most difficult when laying the furnace. Its walls should be as even as possible. They are erected at a slight slope from hewn fireclay bricks. The furnace ends with an arch - a mouth, where the damper is later installed.
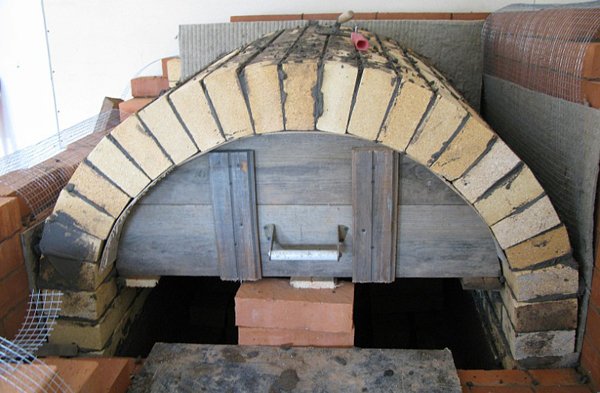
Photo 7. The process of building a furnace, it is the most difficult to build. It is used directly for making fire.
- Firebox vault. Like the vault of the under-furnace, it is made using special formwork. The width is half a brick. The surface of the vault of the firebox should be as even as possible. For the strength of the vault, each middle brick of the row is hewn into a wedge shape.
- Shestok. The section in front of the cooking chamber consists of a base, a wall with an arch and side walls, as well as a vault with a chimney opening. It is laid out of ceramic bricks at the same time as the hearth.
- Re-roofing. The upper part of the stove. The masonry is made of bricks in 3 rowsTo comply with fire safety regulations, the distance from the ceiling to the ceiling of the room must be no less than 35 cm.
- Chimney. It is laid out especially carefully, its internal walls should not have protrusions to avoid the danger of soot accumulation. The seams should be tight and without cracks.
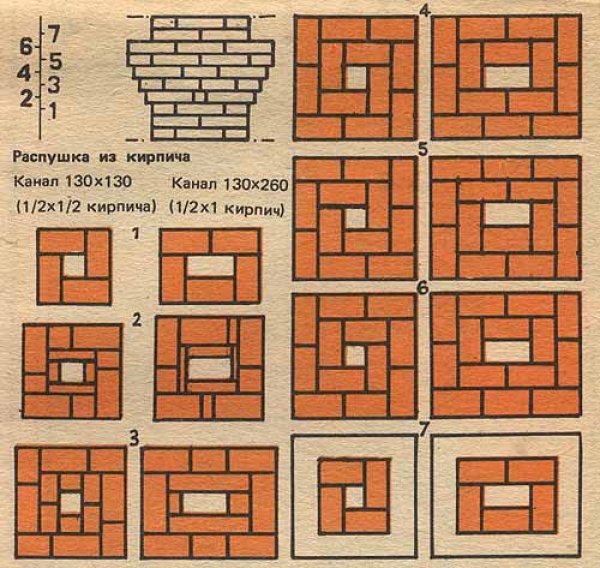
Photo 8. Sequential diagram of the order of the chimney for the stove. Contains seven stages.
As the stove is being built, the dampers and doors, which are purchased in advance, are installed. After the laying is completed, the stove is usually treated with a special heat-resistant putty or plaster for better sealing of seams.
Possible problems
There are several mistakes that can be made during construction.
Connection of foundations — due to different loads, there may be a difference in subsidence, which will cause the furnace to deteriorate in the future may become skewed.
If you take river sand instead of quarry sand, you will get masonry mortar not strong enough due to the smoothness of the sand grains and their poor adhesion.
Hewn and cut bricks deteriorate faster, so when laying them, you need to try to install them with the cut side facing inside the seam.

When laying a chimney, it is necessary to use a special plug so that the mortar does not remain on the internal walls, while the surface of the masonry is cleaned of mortar through every 4-5 rows.
If you do not arrange a cleaning hole in those places where the chimney changes direction, it will soot will accumulateWhen installing dampers and doors, one must not forget about the property of metal to expand - the masonry cannot be carried out without a small gap.
These and other mistakes can be avoided if, before starting work, consult with an experienced craftsman.
Advantages of choosing a Russian stove
Despite the complexity of construction work, the characteristics of the Russian stove make it a profitable choice for a country house. Undoubted advantages:
- high efficiency — if all the rules of placement are observed, the stove heats the entire house;
- high-quality and uniform heat transfer;
- multifunctionality;
- therapeutic effect exposure to heat;
- simple and convenient operation, safety use;
- reliability, long service life;
- availability and low cost of fuel.
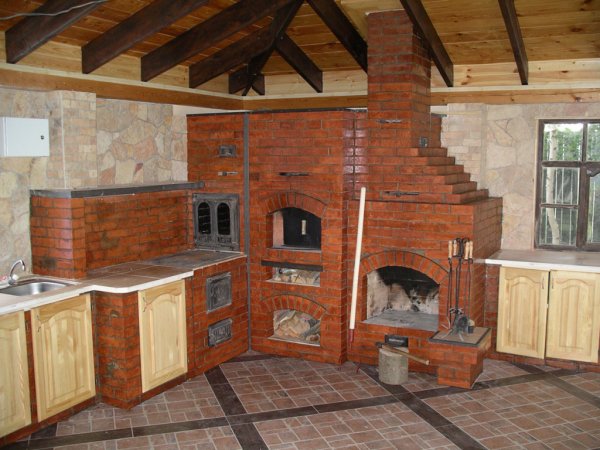
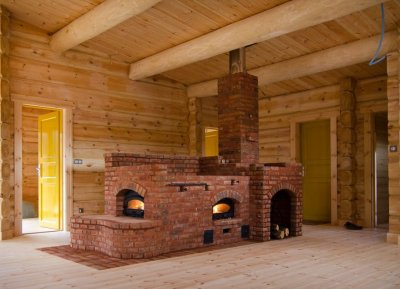
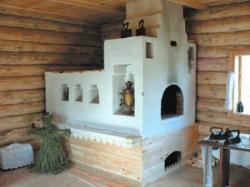
Photo 9. The finished brick oven. In addition to the hearth, there is space for cooking, drying and storing firewood.
The ancient methods are especially unusual treatment of respiratory organs using a stove: the sick person was put to sleep in the cooling firebox, due to which his body and lungs were warmed up. The firebox was also used as a room for washing - the cooling stove created the effect of a steam room, so there was no need to heat the bathhouse every time.
Minor flaws (bulkiness or the need for regular ash cleaning) cannot be covered numerous advantagesThe Russian stove has not only not been consigned to oblivion, but is becoming increasingly popular among modern lovers of life outside the city.
Useful video
Watch an interesting video that tells about the features of building a classic Russian stove, its laying using old bricks.
Comments